Watch it draw itself · tap to replay
How to Draw a Toll Booth
Draw a toll booth in 13 easy steps, about 10 minutes. Free, with a printable worksheet.
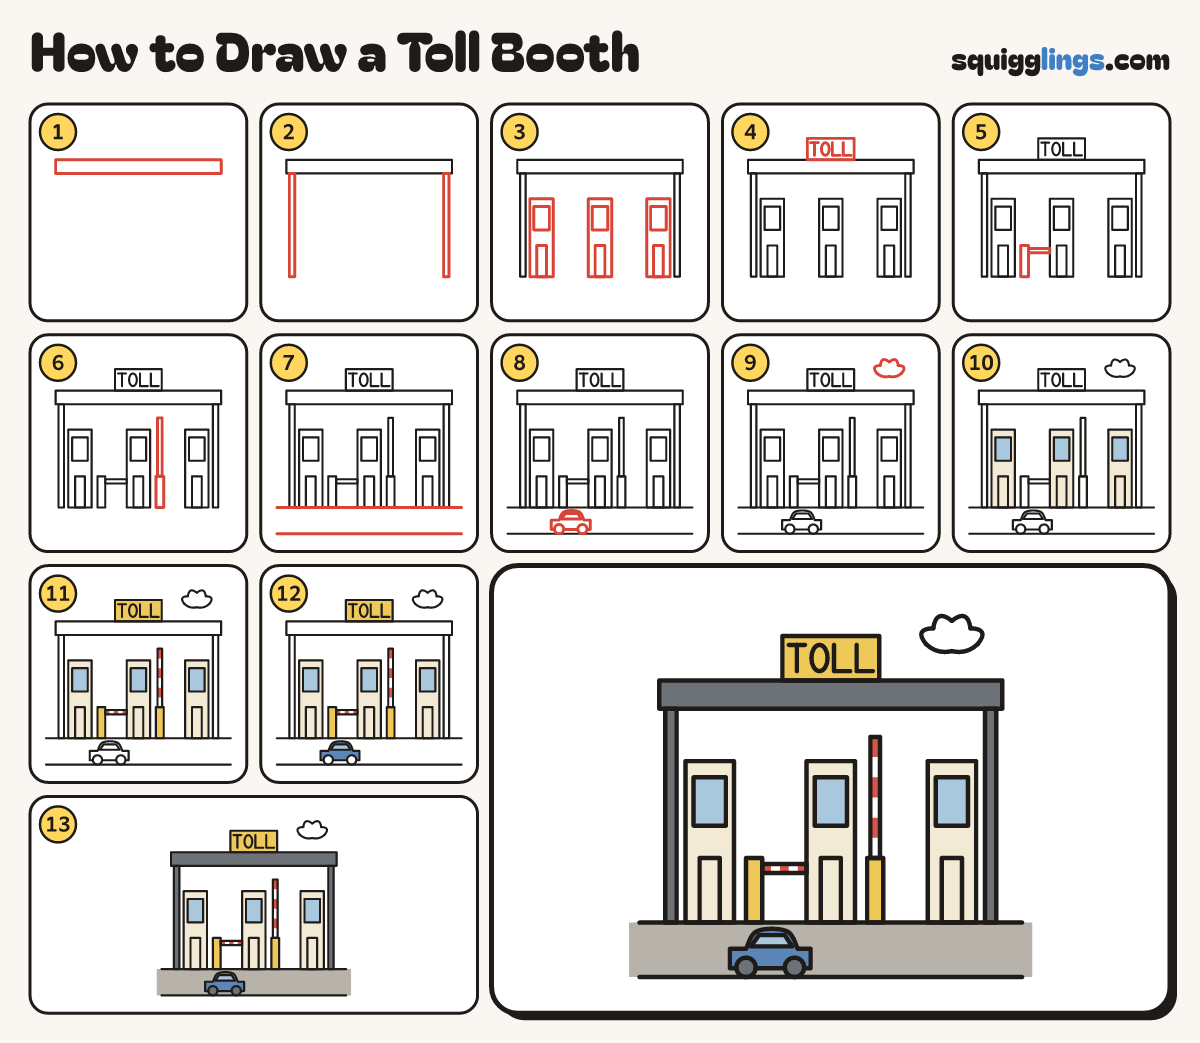
Each picture adds one red line. Draw that line, then scroll to the next picture. Rub out any dashed helper lines at the end. First up: the canopy.
Step 1: The canopy
Across the upper part of your paper draw a long flat box for the canopy, nearly edge to edge.
Step 2: Two posts
From near each end of the canopy draw a tall post straight down, most of the way to the bottom.
Step 3: Three booths
Under the canopy draw 3 narrow boxes standing on the ground, each with a square window and a narrow door.
Tip Cars stop at a booth to pay, then the barrier arm lifts.
Step 4: The sign
On top of the canopy in the middle draw a box and write TOLL inside it in block capitals.
Step 5: A lowered barrier
Beside the left booth draw a short box on the ground, with a flat arm to the middle booth.
Step 6: A raised barrier
Beside the middle booth draw another short box on the ground, with its arm standing straight up towards the canopy.
Step 7: Ground and road
Under the booths draw a straight ground line from edge to edge, and a second, lower one for the road.
Step 8: A car
On the road, bottom left, draw a little car: a long body, a roof bump, a window and 2 wheels.
Step 9: A cloud
Draw a small puffy cloud in the sky to the right of the sign.
Step 10: Cream booths, sky windows
Colour the three booths cream around their windows, then colour the windows sky blue.
Step 11: Yellow sign, striped arms
Colour the sign and the little boxes yellow, then give each barrier arm red and white stripes.
Step 12: White cloud, blue car
Colour the cloud white and the car window sky blue, then the car blue around the window.
Step 13: Grey road, slate canopy
Colour the road grey around the car, and the canopy, posts and wheels slate grey. Your toll booth is done!
Your finished drawing
Follow the steps above and this is where you end up: a toll booth, drawn by you.
Every step in one picture