Watch it draw itself · tap to replay
How to Draw a Tape Recorder
Draw a tape recorder in 14 easy steps, about 11 minutes. Free, with a printable worksheet.
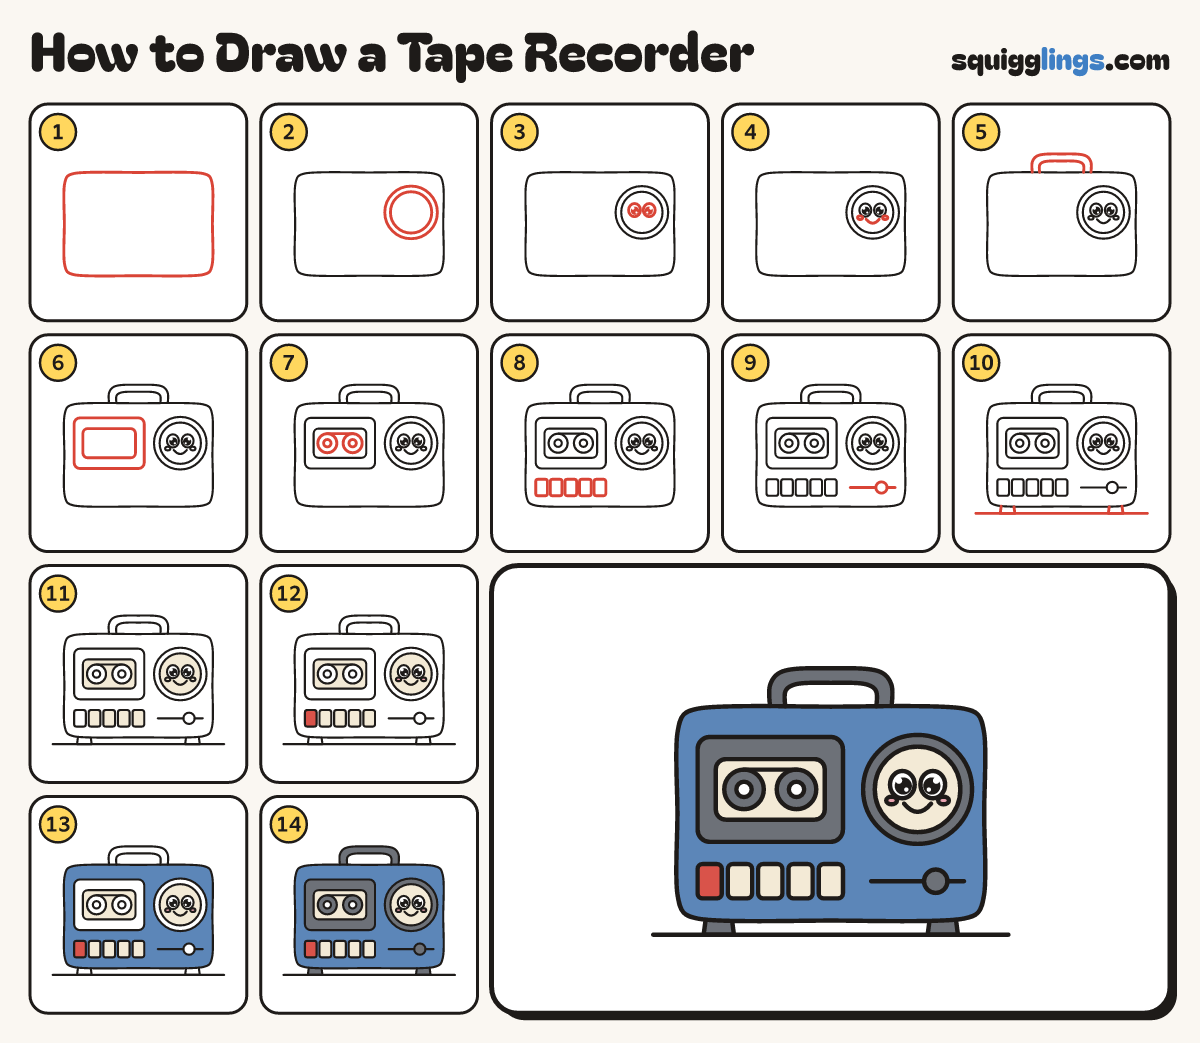
Each picture adds one red line. Draw that line, then scroll to the next picture. Rub out any dashed helper lines at the end. First up: the recorder box.
Step 1: The recorder box
In the middle of your paper draw a big soft box with round corners, wider than tall.
Step 2: The speaker
In the right half draw one big speaker circle, half as tall as the box. Draw a smaller circle inside.
Step 3: 2 big eyes
Inside the inner circle draw 2 big egg eyes, half an eye apart. Colour a big black dot in each.
Tip Leave a tiny white shine in each black dot.
Step 4: Smile and cheeks
Under the eyes draw a wide U smile from eye to eye. Draw a small oval cheek beside each end.
Step 5: A handle
On top of the box draw a wide flat rainbow handle, with both ends standing on the box.
Step 6: The tape door
In the left half draw a soft rectangle as tall as the speaker: the tape door. Draw a window inside.
Step 7: 2 tape reels
In the window draw 2 round reels with a small circle in each. Join their tops with a line.
Tip The reels are the wheels that wind the tape.
Step 8: 5 buttons
Under the tape door draw 5 small square buttons in a row, with a little gap between them.
Tip Keep them all the same size, like piano keys.
Step 9: Volume slider
Under the speaker draw a line straight across. Draw a small round knob sitting on it.
Step 10: Feet and ground
Under the box draw 2 short feet near the corners, and a ground line under them from left to right.
Step 11: Cream parts
Go over your lines. Colour the window, the inner speaker circle and the last 4 buttons cream.
Tip Leave the eyes and the reels white.
Step 12: Pink and red
Colour the cheeks pink. Colour the first button red: it is the record button.
Step 13: Blue box
Colour the box blue, around the tape door, the speaker, the buttons and the knob.
Step 14: Grey parts
Colour the door frame, reels, speaker ring, knob, handle and feet grey. Your tape recorder is ready!
Your finished drawing
Follow the steps above and this is where you end up: a tape recorder, drawn by you.
Every step in one picture