Watch it draw itself · tap to replay
How to Draw a Ski Lodge
Draw a ski lodge in 13 easy steps, about 10 minutes. Free, with a printable worksheet.
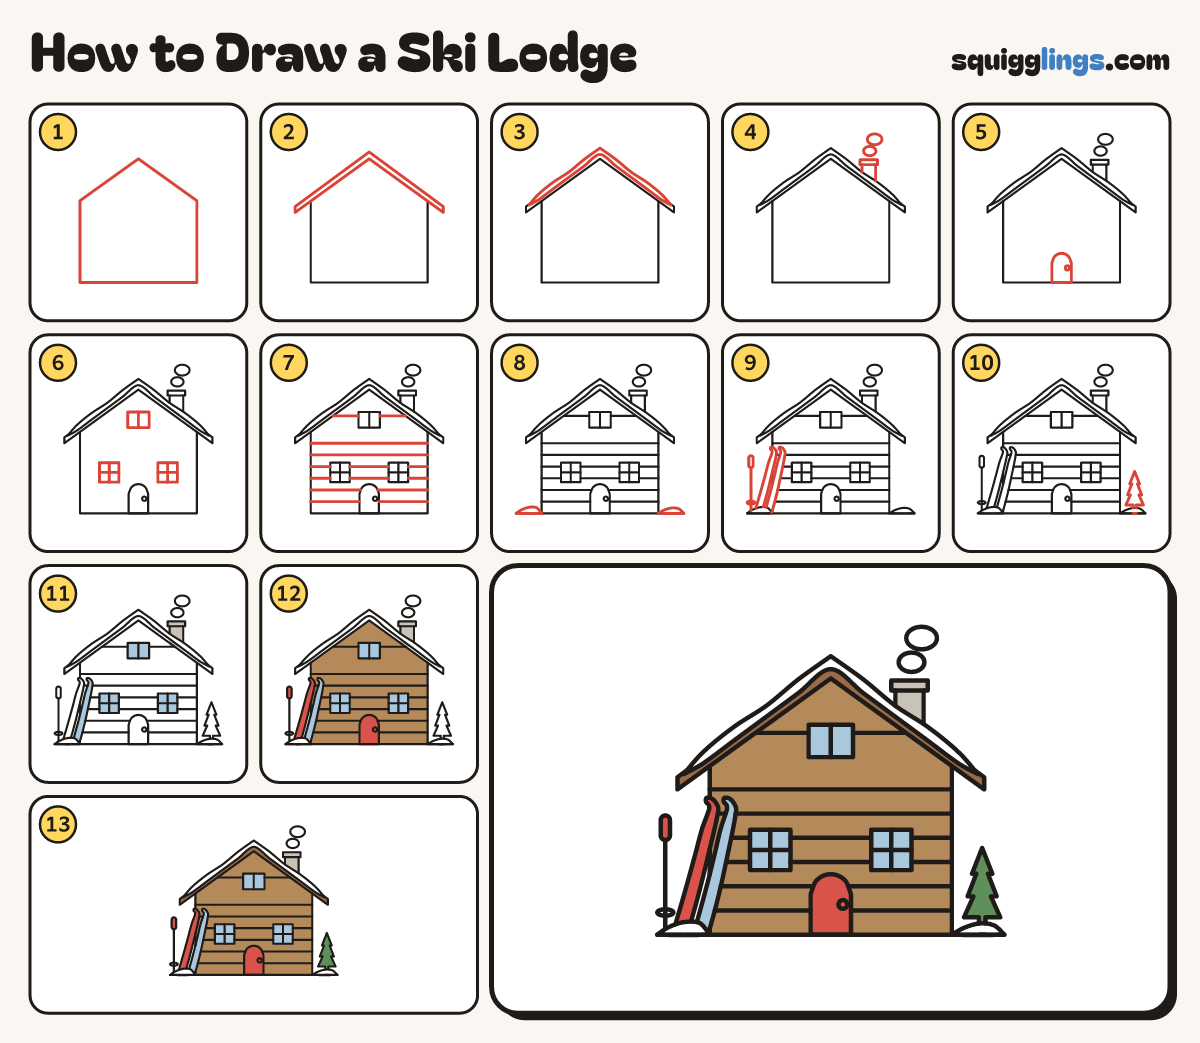
Each picture adds one red line. Draw that line, then scroll to the next picture. Rub out any dashed helper lines at the end. First up: the walls.
Step 1: The walls
A little below the middle draw a house shape: 2 walls with a pointed top, closed along the bottom.
Step 2: The big roof
On top draw a big pointed roof that sticks out well past both walls. Draw a thick edge under it.
Tip A huge steep roof so the snow slides off.
Step 3: Snow on the roof
Start above the left roof corner. Draw a bumpy snow band over the point, down to the right corner.
Step 4: The chimney
On the right slope draw a stout chimney with a wider cap on top. Add 2 puffs of smoke.
Step 5: The door
In the middle of the wall draw a tall arched door on the ground, with a knob on the right.
Step 6: 3 windows
Draw a square window with a cross on each side of the door. Add a small window under the peak.
Step 7: The logs
Draw straight log lines from wall to wall. Stop at each window or the door and start again past it.
Step 8: Ground and snow drifts
From the bottom of each wall draw a short ground line out, with a soft snow drift on top.
Step 9: Skis and a pole
Draw 2 skis from the snow up to the left wall, with curly tips. Add a pole in the snow.
Step 10: A pine tree
On the right draw a pine tree: a stack of pointed triangles on a short trunk in the snow.
Step 11: Sky blue and stone
Colour the windows and the right ski sky blue, and the chimney stone grey. Leave the snow white.
Step 12: Walls and red door
Colour the walls wood brown around the windows, door and skis, then the door, left ski and grip red.
Step 13: Green pine, brown roof
Colour the pine tree green and the roof edge under the snow brown. Your ski lodge is done!
Your finished drawing
Follow the steps above and this is where you end up: a ski lodge, drawn by you.
Every step in one picture