Watch it draw itself · tap to replay
How to Draw Ramen
Draw ramen in 14 easy steps, about 11 minutes. Free, with a printable worksheet.
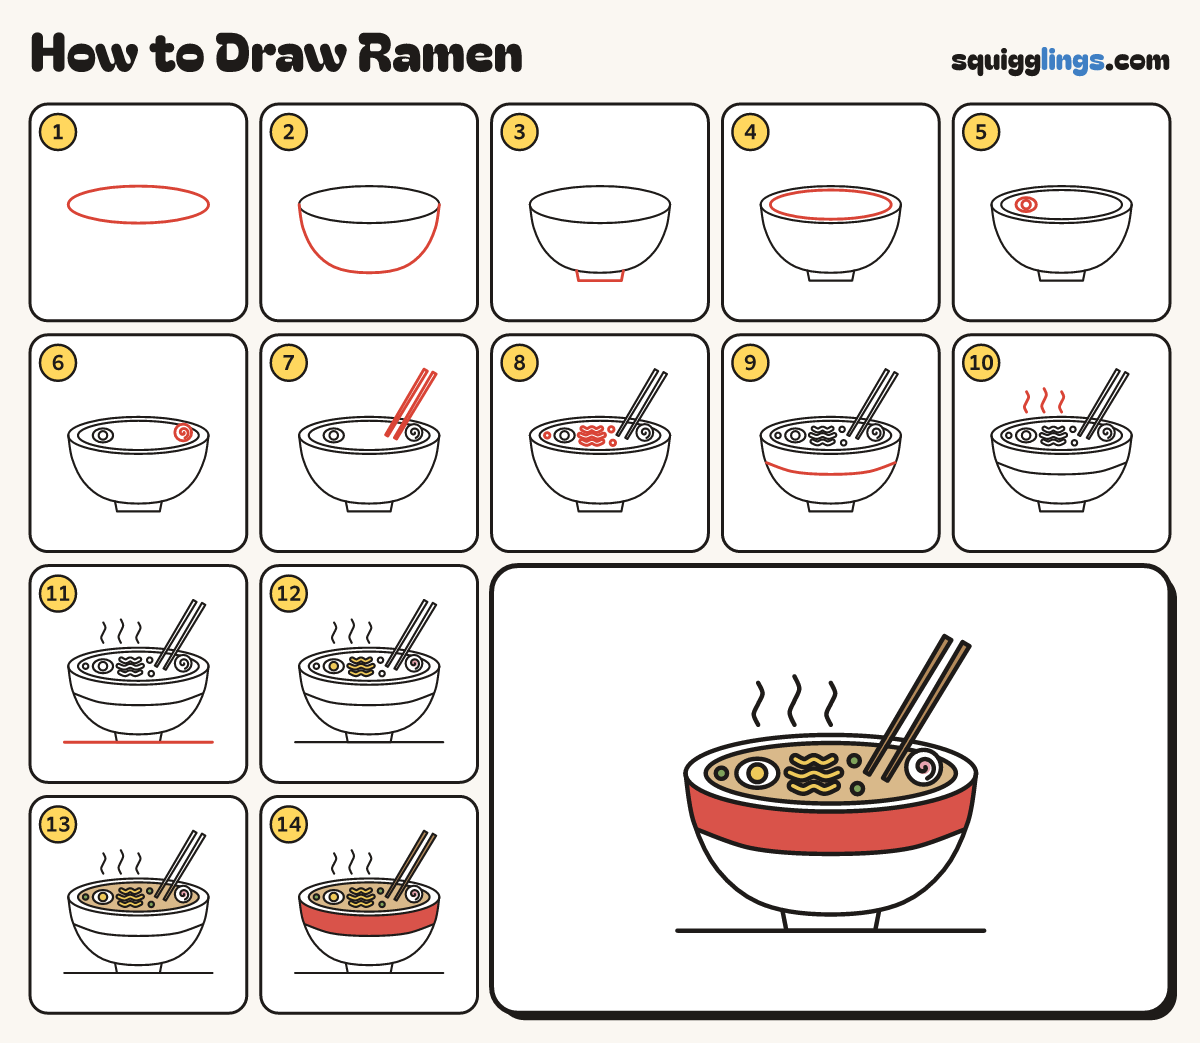
Each picture adds one red line. Draw that line, then scroll to the next picture. Rub out any dashed helper lines at the end. First up: the rim.
Step 1: The rim
Above the middle of your paper draw a wide flat oval as wide as your hand.
Step 2: The bowl
Start at the left end of the oval. Draw a big deep U down, up to the right end.
Step 3: The foot
Under the bowl draw a short little stand: start on the bottom, go down, across, and up to the bottom.
Step 4: The broth
Inside the rim draw a second flat oval a finger inside it for the soup.
Step 5: Half an egg
On the left of the soup draw an egg oval with a round yolk in the middle.
Step 6: Fish cake
On the right of the soup draw a round fish cake peeking over the soup, with a swirl inside.
Step 7: Chopsticks
From the soup draw 2 long thin chopsticks side by side, leaning up and out to the right.
Step 8: Noodles and onions
Between the egg and the chopsticks draw 3 fat wavy noodles. Add 3 little onion rings on the soup.
Step 9: The stripe
Start on the left side under the rim, draw a smile line round the bowl, stop on the right side.
Step 10: Steam
Start just above the rim and draw 3 wiggly steam lines going up, the middle one tallest.
Step 11: Table line
Draw a table line from left to right, just touching the bottom of the foot.
Step 12: Yellow noodles, pink swirl
Go over your lines, then colour the noodles and the yolk yellow, and the fish cake swirl pink.
Step 13: Tan soup, green onions
Colour the soup tan around the egg, noodles and fish cake. Colour the onion rings green.
Step 14: Red band, wood chopsticks
Colour the band under the rim red and the chopsticks wood brown. Leave the bowl white. Your ramen is ready!
Your finished drawing
Follow the steps above and this is where you end up: ramen, drawn by you.
Every step in one picture