Watch it draw itself · tap to replay
How to Draw a Rain Poncho
Draw a rain poncho in 14 easy steps, about 11 minutes. Free, with a printable worksheet.
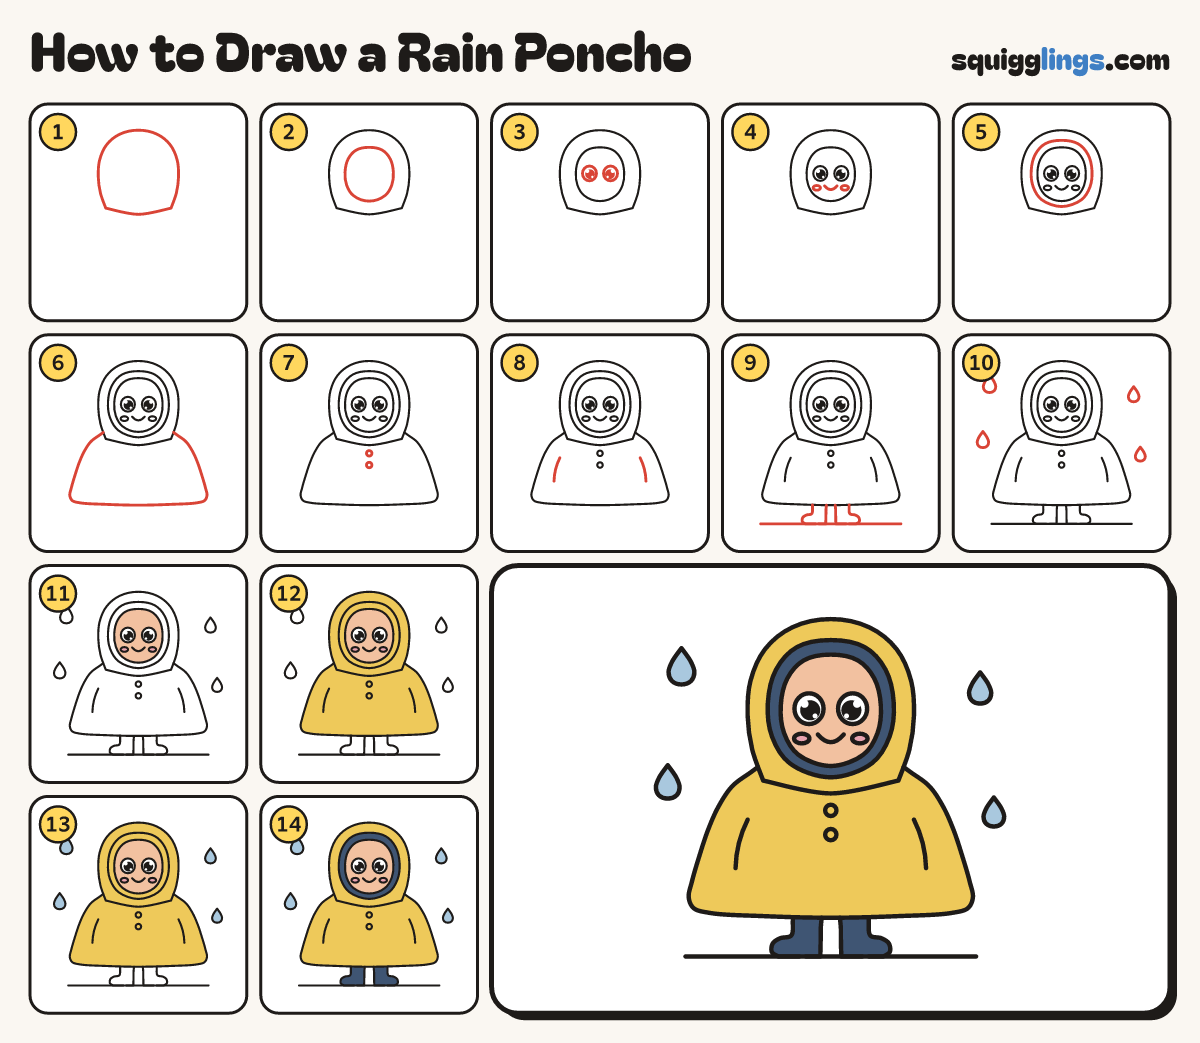
Each picture adds one red line. Draw that line, then scroll to the next picture. Rub out any dashed helper lines at the end. First up: the hood.
Step 1: The hood
Near the top, draw a big round hood like an upside-down egg, with a gently sagging bottom line.
Tip Make it big: the face goes inside it.
Step 2: The face
Inside the hood, draw a smaller egg for the face, with a wide gap all round.
Step 3: 2 big eyes
In the middle of the face, draw 2 big round eyes, each with a black dot and a shine.
Step 4: Smile and cheeks
Under the eyes, draw a little U smile and a small flat oval cheek just outside each end.
Step 5: Hood edge
Around the face, draw a second egg a little way out, for the edge of the hood.
Step 6: The poncho
From each hood side, draw a round shoulder, then a long side sloping out. Join them with a curved hem.
Tip A poncho has no sleeves: it is one wide cape.
Step 7: Snaps
Under the chin, draw 2 small circles for the snaps, one under the other.
Step 8: Arm slits
On each side, draw a short curved arm slit, starting halfway down and stopping well above the hem.
Step 9: Boots and ground
Under the hem, draw 2 short boots, toes out. Add a ground line under them, as wide as the poncho.
Step 10: Raindrops
Draw 4 big raindrops in the air around the poncho: 2 on each side, not touching it.
Step 11: Peach face, pink cheeks
Colour the face peach and the cheeks pink. Leave the eyes white.
Step 12: Yellow poncho
Colour the hood and the poncho yellow, going around the hood edge and the face.
Step 13: Sky raindrops
Colour the 4 raindrops sky blue.
Step 14: Navy edge and boots
Colour the hood edge around the face and the 2 boots navy. Your rain poncho is ready!
Your finished drawing
Follow the steps above and this is where you end up: a rain poncho, drawn by you.
Every step in one picture