Watch it draw itself · tap to replay
How to Draw a Pumpkin Stack
Draw a pumpkin stack in 13 easy steps, about 10 minutes. Free, with a printable worksheet.
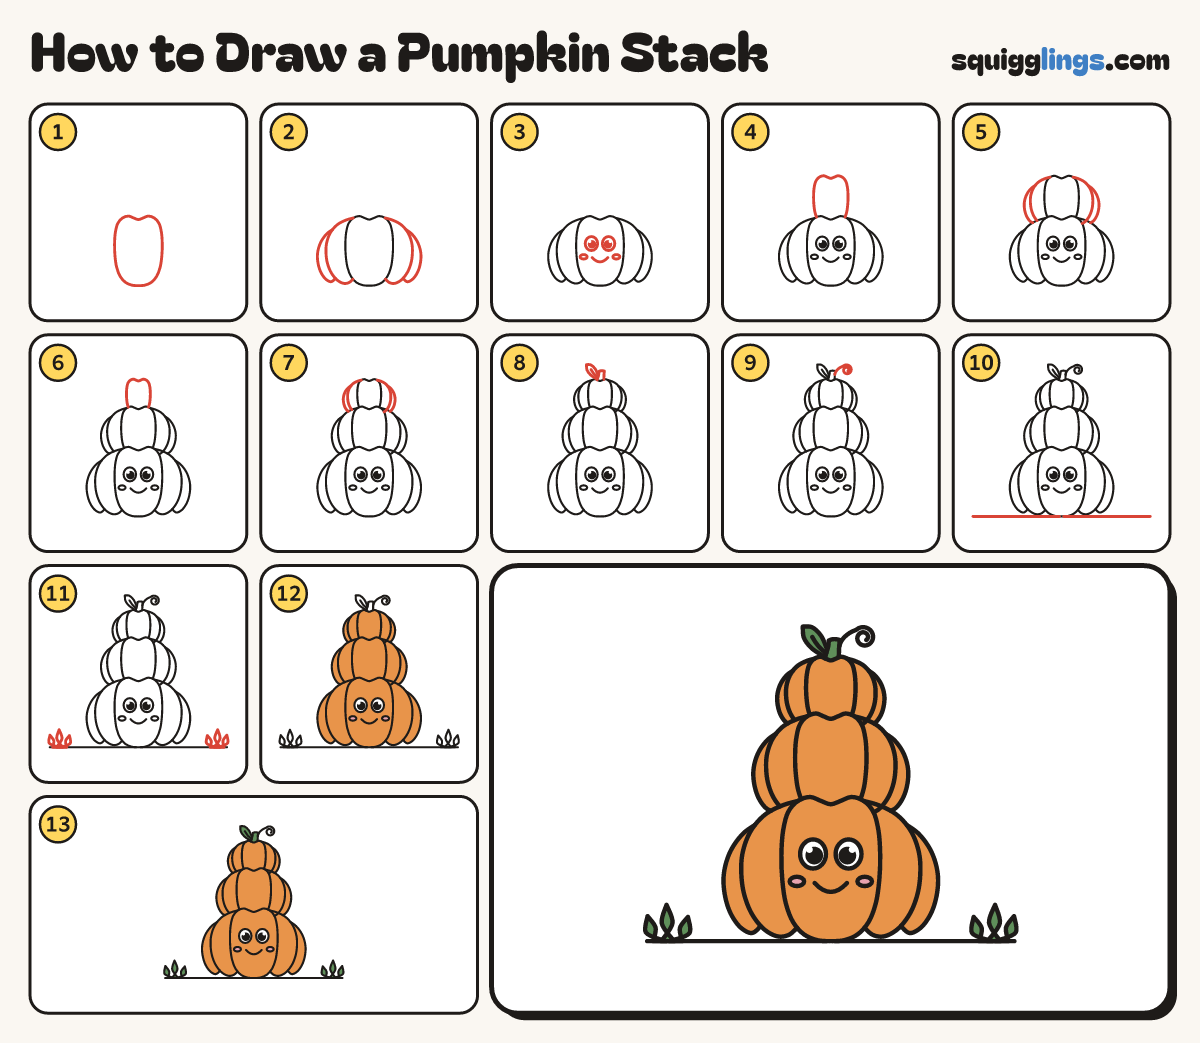
Each picture adds one red line. Draw that line, then scroll to the next picture. Rub out any dashed helper lines at the end. First up: the big middle bump.
Step 1: The big middle bump
Low on your paper draw a tall bump: 2 shoulders with a dip between, round sides, and a sagging bottom.
Tip Leave room above it for 2 more pumpkins.
Step 2: Big side bumps
Start under each shoulder. Draw a fat C out and round, back to the middle bump. Add a slimmer C.
Tip The slim C starts and stops on the fat bump outside it.
Step 3: A happy face
On the middle bump draw 2 big egg eyes with black dots. Add a U smile and 2 cheeks.
Step 4: The middle pumpkin
In the dip of the big pumpkin draw a smaller middle bump the same way: shoulders, a dip, round sides.
Tip About two thirds the size of the big one.
Step 5: Middle pumpkin bumps
Give the middle pumpkin fat and slim Cs, each starting on the bump inside it, stopping on the big pumpkin.
Step 6: The little pumpkin
In the dip of the middle pumpkin draw a little middle bump the same way, bottom hidden in the dip.
Tip About half the size of the middle one.
Step 7: Little pumpkin bumps
Give the little pumpkin fat and slim Cs, each starting on the bump inside it, stopping on the middle pumpkin.
Step 8: Stem and leaf
On the top dip draw a short stem: up, flat top, back down to the dip. Add a leaf.
Tip The leaf grows up and left to a soft point, with a middle line.
Step 9: Curly vine
Start on the right of the stem. Swing a vine out right, curling into a swirl. Stop in the middle.
Step 10: Ground line
Start at the left edge. Draw a ground line under the pumpkins, across to the right edge.
Tip Lift your pencil where it would go through the pumpkin.
Step 11: Grass tufts
At each end of the ground line draw 3 pointy grass blades standing on the line.
Step 12: Pink cheeks, orange pumpkins
Colour the cheeks pink, then colour all 3 pumpkins orange, around the eyes and cheeks. Leave the eyes white.
Step 13: Green stem and grass
Colour the stem, the leaf and the grass green.
Your finished drawing
Follow the steps above and this is where you end up: a pumpkin stack, drawn by you.
Every step in one picture