Watch it draw itself · tap to replay
How to Draw a Log Flume
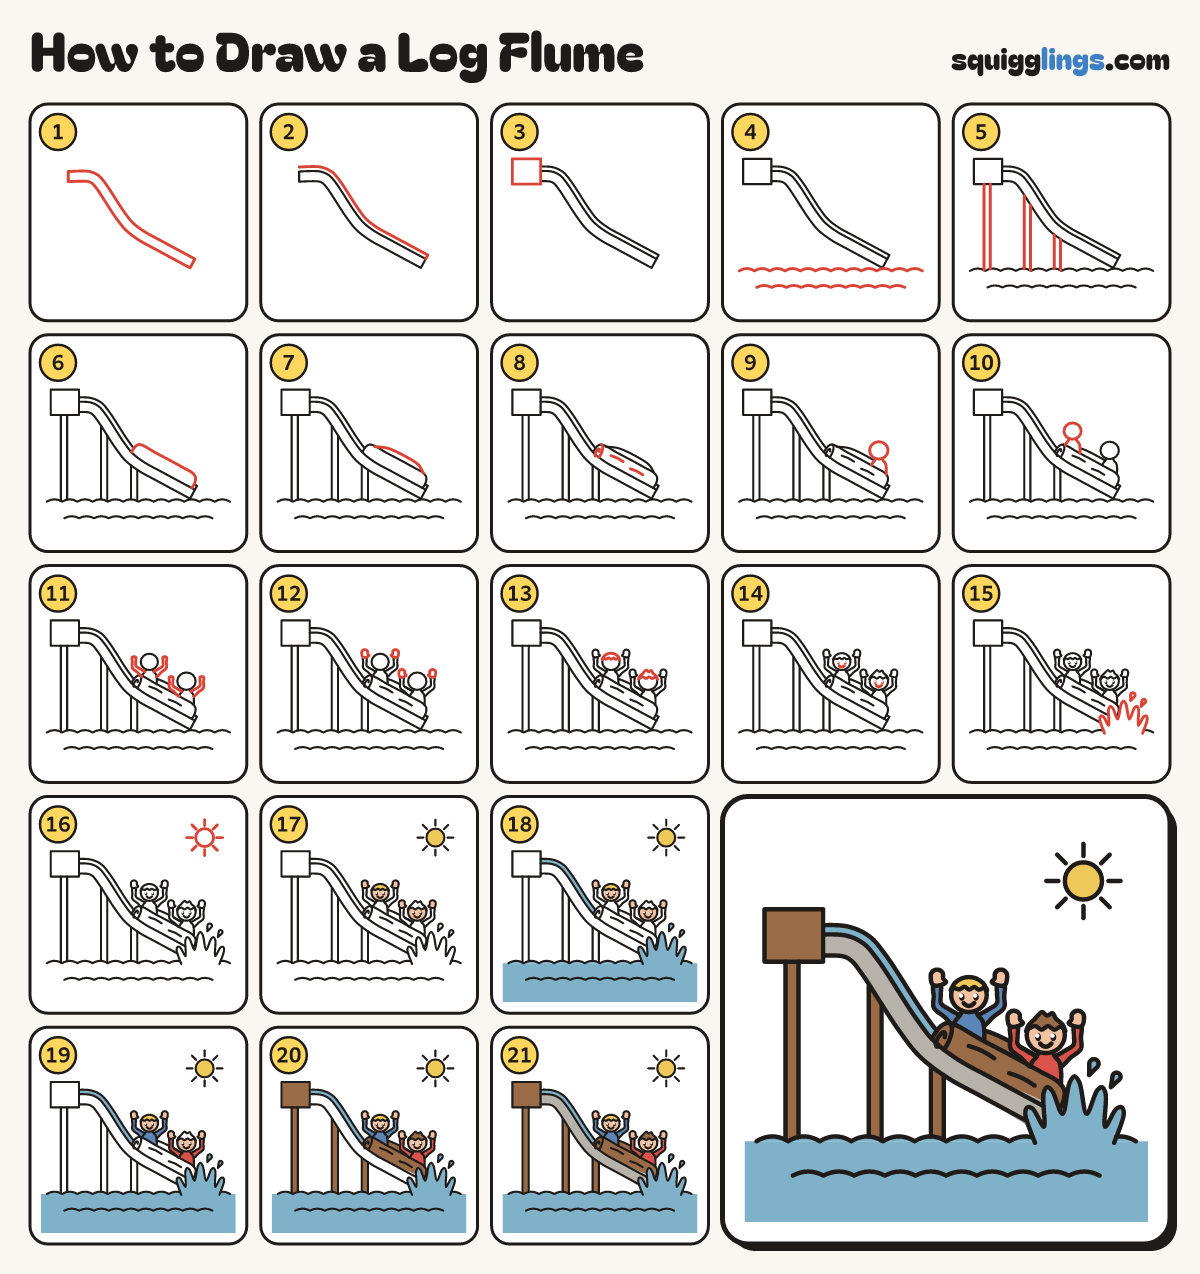
Draw a log flume in 21 steps, about 16 minutes. Free, with a printable worksheet.
Each picture adds one red line. Draw that line, then scroll to the next picture. Rub out any dashed helper lines at the end. First up: the flume.
Step 1: The flume
Start at the top left. Draw a long band that runs flat, bends, then slides steeply down to the right.
Step 2: Water channel
Just above the band, draw a line from the top left down to the band's end. The water runs between.
Step 3: Platform
Over the top left end of the flume, draw a small box for the platform where riders get on.
Step 4: Pool waves
Across the bottom, draw a row of gentle wave bumps from side to side. Add a shorter wavy line below.
Step 5: Tall posts
Under the platform and the slope, draw 3 tall posts. Start each inside the flume and stop on the waves.
Step 6: Log boat
Near the bottom of the slope, draw a long log tipping downhill. Hide its bottom inside the flume.
Tip A hollow log floats along the water channel and plunges into a splash.
Step 7: Carved top
Along the top of the log, draw a long flat hump from end to end for the open, carved top.
Step 8: Cut end and bark
Start at the log's back top and curve down to its bottom. Add a small ring and 2 bark lines.
Step 9: Front rider
In the lower half of the log, draw a round head. Draw round shoulders under it, stopping at the log.
Step 10: Back rider
Higher up the log, draw a second head and shoulders the same way, leaving a gap between the riders.
Step 11: Arms up
From each rider's shoulders, draw 2 arms reaching up past the head, bending a little at the elbow.
Step 12: Hands
At the top of each arm, draw a round mitten hand with a little thumb bump.
Step 13: Hair on top
Draw hair on top of each head only: tufty for the front rider, a bumpy fringe for the back rider.
Step 14: Happy faces
Give each rider 2 big black oval eyes with a white shine, and a wide smile.
Step 15: Splash
Start on the waves by the log's nose. Draw 5 round splash tongues, stop on the waves. Add 2 drops.
Step 16: The sun
In the top right corner, draw a small sun with 8 short rays.
Step 17: Peach and yellow
Colour the faces and hands peach, then the sun and the back rider's hair yellow.
Step 18: Blue water
Colour the pool, the water channel, the splash and the drops blue.
Step 19: Red and blue shirts
Colour the front rider's shirt and arms red, and the back rider's shirt and arms blue.
Step 20: Brown log and posts
Colour the log, its carved top, the posts, the platform and the front rider's hair brown.
Step 21: Grey flume
Colour the side of the flume grey. Go over your lines and your log flume is done!
Your finished drawing
Follow the steps above and this is where you end up: a log flume, drawn by you.
Every step in one picture