Watch it draw itself · tap to replay
How to Draw a Jack in the Pulpit
Draw a jack in the pulpit in 13 easy steps, about 10 minutes. Free, with a printable worksheet.
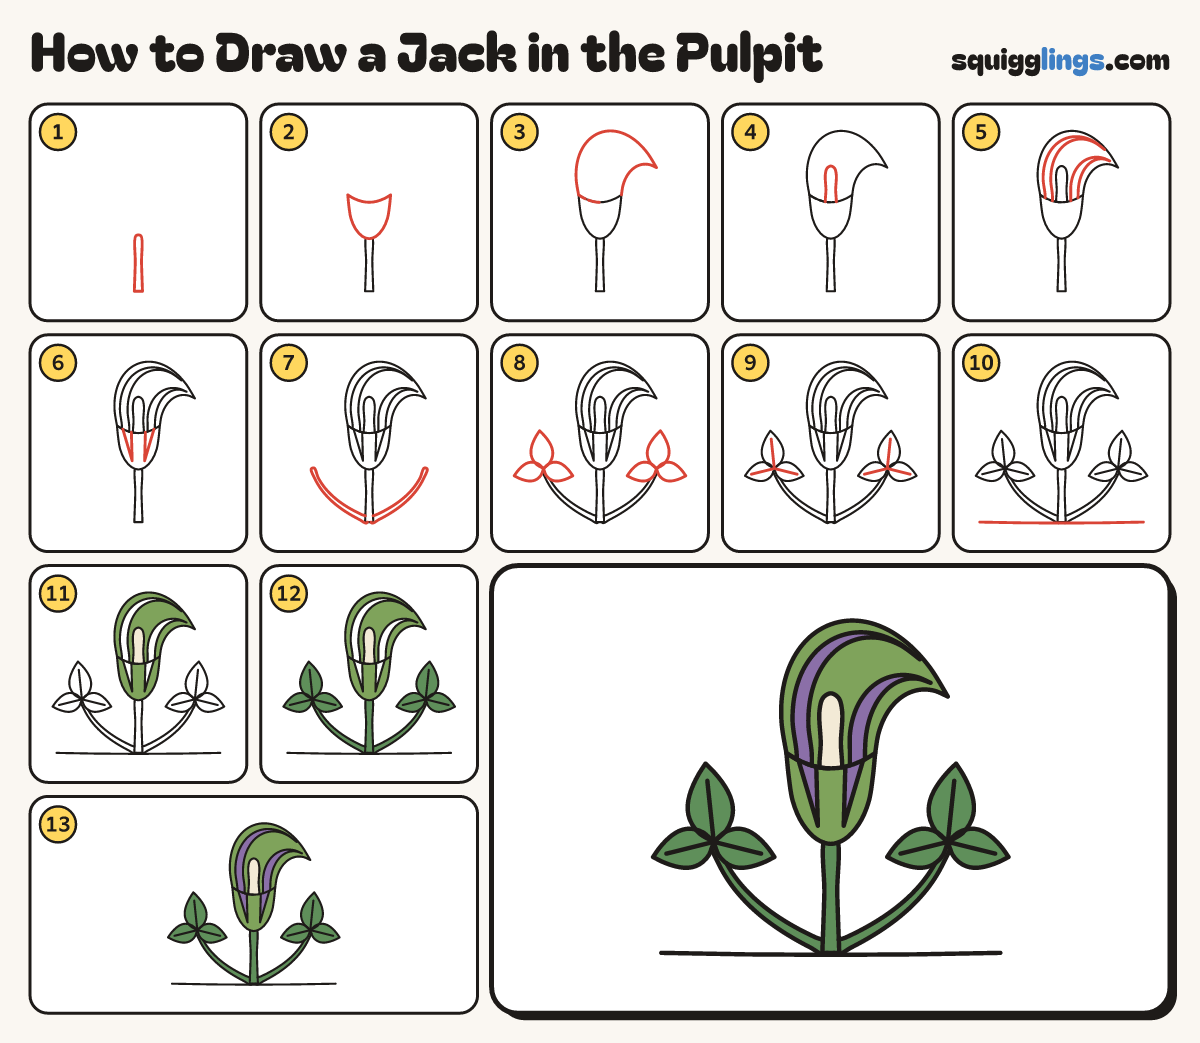
Each picture adds one red line. Draw that line, then scroll to the next picture. Rub out any dashed helper lines at the end. First up: the stem.
Step 1: The stem
Start near the bottom in the middle. Draw a thin stem straight up, stopping below the middle.
Step 2: The cup
On top of the stem draw a tall cup, wider at the top. Join the lips with a smile curve.
Tip This cup is the pulpit that Jack stands in.
Step 3: The hood
From the left lip swing up and over to a point on the right. Curve back to the right lip.
Tip The point droops over like the tip of an elf hat.
Step 4: Jack
Standing in the cup draw Jack: a thin club with a round top, poking up above the rim.
Step 5: Hood stripes
On the hood draw 2 long pointed stripes from the rim, one each side of Jack, bending towards the tip.
Step 6: Cup stripes
On the cup draw 2 long thin V stripes hanging down from the rim, one on each side.
Step 7: Leaf stalks
From the bottom of the stem draw a thin stalk on each side, curving out and then up.
Step 8: Three-part leaves
On top of each stalk draw 3 pointed leaves: a tall one going up and one out to each side.
Tip Every jack-in-the-pulpit leaf comes in 3 parts.
Step 9: Leaf lines
Draw 1 line along the middle of each leaf, from near the stalk towards the tip.
Step 10: Ground line
From left to right draw a soft ground line under the plant.
Step 11: Cream Jack, green flower
Go over your lines. Colour Jack cream. Colour the cup and hood light green, around the stripes.
Step 12: Green leaves
Colour the stem, both stalks and all 6 leaves green.
Step 13: Purple stripes
Colour the 4 stripes purple. Your jack-in-the-pulpit is done!
Your finished drawing
Follow the steps above and this is where you end up: a jack in the pulpit, drawn by you.
Every step in one picture