Watch it draw itself · tap to replay
How to Draw a Hamsa
Draw a hamsa in 13 easy steps, about 10 minutes. Free, with a printable worksheet.
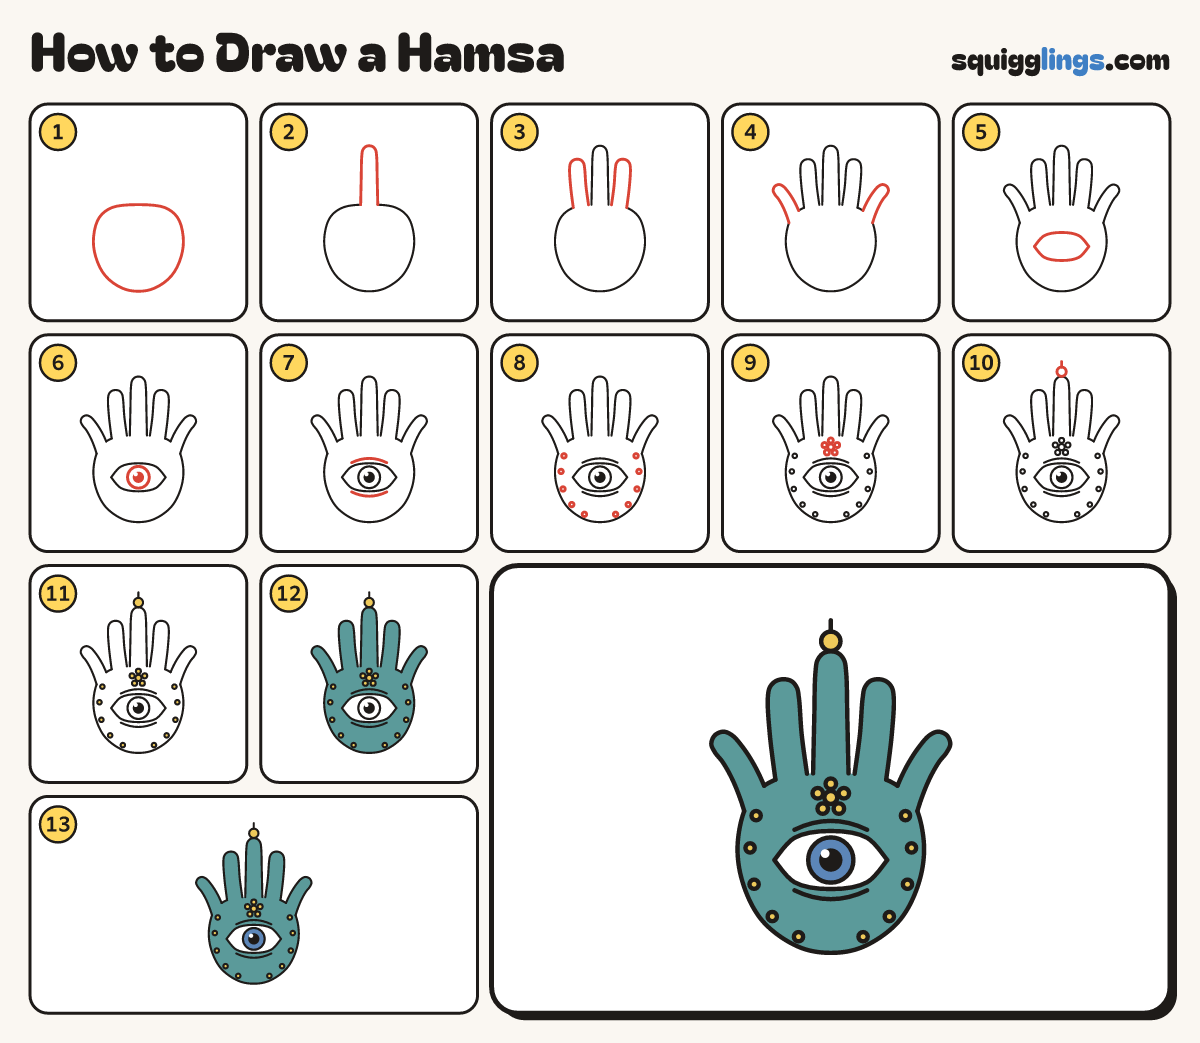
Each picture adds one red line. Draw that line, then scroll to the next picture. Rub out any dashed helper lines at the end. First up: the palm.
Step 1: The palm
In the middle draw a big rounded palm like a fat egg, flatter on top and round at the bottom.
Tip A hamsa has no wrist, so close the palm all the way round.
Step 2: The middle finger
On top of the palm draw a tall middle finger, starting on the palm line and stopping back on it.
Tip A little narrower going up, with a round tip like an upside-down U.
Step 3: Two more fingers
Draw a shorter finger each side of the middle one, starting and stopping on the palm, leaving a V gap.
Step 4: Two thumbs
Draw a short thumb on each side, up and out with a round tip, starting and stopping on the palm.
Tip Keep the thumbs shorter than the fingers. A hamsa has 2, so it looks the same both ways.
Step 5: The eye
In the middle of the palm draw a big almond eye lying on its side, pointy at both ends.
Step 6: Iris and pupil
In the almond draw a big circle and a small one inside. Colour the small one black with a shine.
Step 7: Lid arcs
Draw a rainbow arc just above the eye and an upside-down one just below, both shorter than the eye.
Step 8: A border of dots
Just inside the edge of the palm draw a row of 5 little dots down each side.
Step 9: A little flower
Above the eye, under the middle finger, draw a tiny flower: a small circle with 5 round petals around it.
Step 10: Ring and chain
On the tip of the middle finger draw a small ring, with a short chain line going straight up.
Step 11: Yellow dots and ring
Colour the dots, the flower and the ring yellow.
Step 12: Teal hand
Colour the palm, fingers and thumbs teal, around the yellow dots and flower. Leave the eye white.
Step 13: Blue eye
Colour the big eye circle blue, leaving the shine white. Go over your lines and your hamsa is done!
Your finished drawing
Follow the steps above and this is where you end up: a hamsa, drawn by you.
Every step in one picture