Watch it draw itself · tap to replay
How to Draw a Flamingo Float
Draw a flamingo float in 13 easy steps, about 10 minutes. Free, with a printable worksheet.
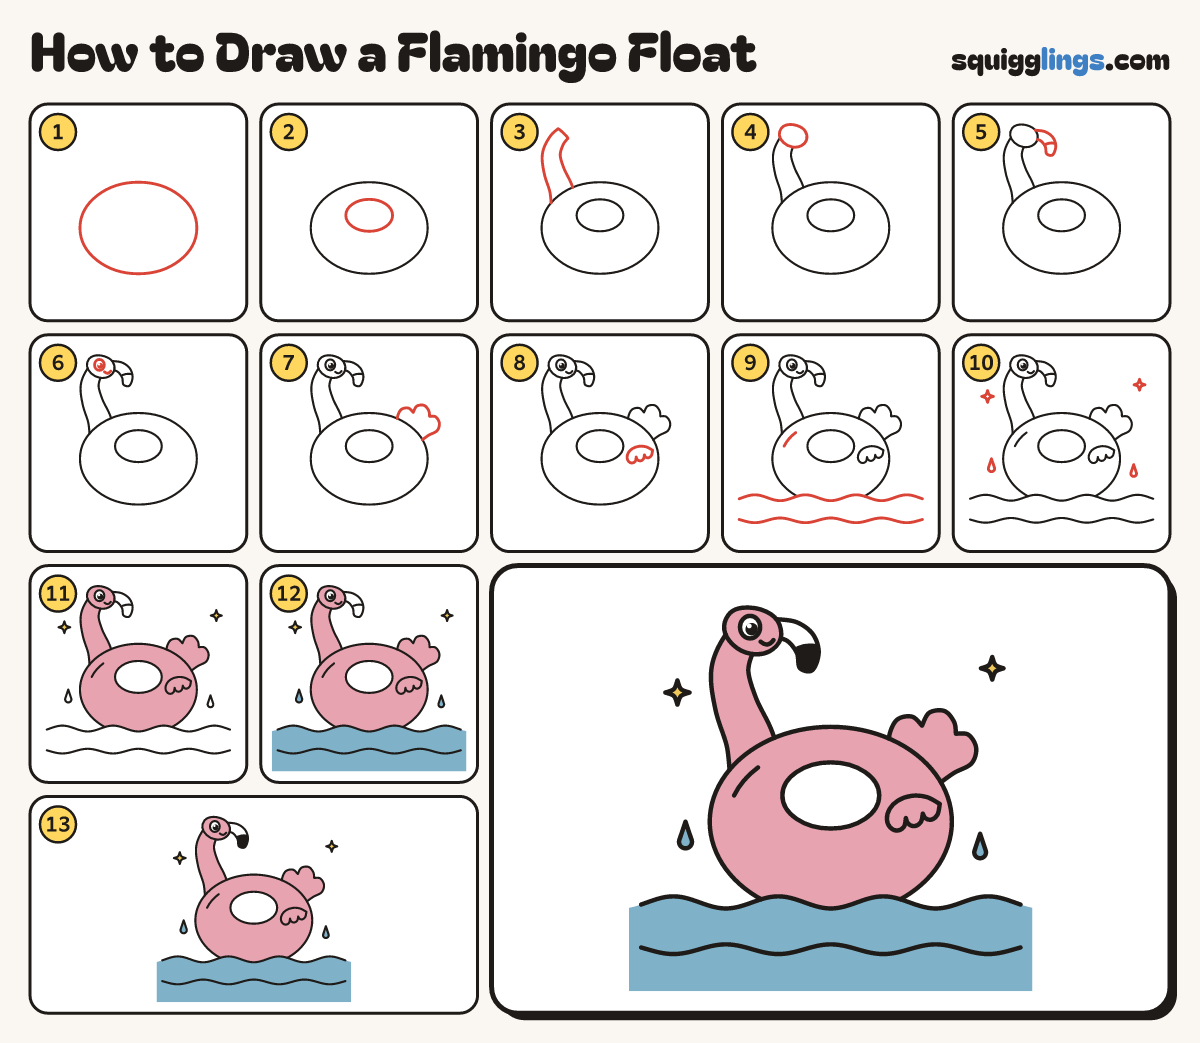
Each picture adds one red line. Draw that line, then scroll to the next picture. Rub out any dashed helper lines at the end. First up: the ring.
Step 1: The ring
A little below the middle of your paper, draw a big wide oval for the float ring.
Step 2: The hole
Inside the ring, in its upper half, draw a smaller squashed oval for the hole you sit in.
Tip The hole sits high, so the front of the ring is fat.
Step 3: Long neck
Start at the top left of the ring. Draw a tall S neck up and back down to the ring.
Tip Fat at the ring, slim under the head, like a question mark.
Step 4: The head
On top of the neck, draw an egg head lying down, a little wider than the neck.
Step 5: Bent beak
On the right of the head, draw a fat banana beak bending down. Add a short line near its tip.
Tip The beak bends down: that is the flamingo's signature.
Step 6: Eye and smile
In the head, draw a big eye with a dot and a shine, and a small smile by the beak.
Step 7: Soft tail
Start on the ring's top right. Draw 3 round tail bumps in a low fan, back to the ring.
Step 8: Little wing
On the right side of the ring, draw a small wing: a round top and 3 soft bumps underneath.
Step 9: Shine and water
Draw a short curved shine on the ring's upper left. Draw 2 wavy water lines from side to side.
Tip Rub out the bottom of the ring under the top water line, so the float sits in the water.
Step 10: Sparkles and drops
Add a 4-point sparkle high on each side, and a little drop each side.
Step 11: Yellow and pink
Colour the sparkles yellow. Colour the ring, neck, head, tail and wing pink. Leave the eye and beak white.
Step 12: Blue water
Colour the water blue right down to the bottom and edges of your paper. Colour the drops blue.
Step 13: Black beak tip
Colour the tip of the beak black, past the short line. Your flamingo float is done!
Your finished drawing
Follow the steps above and this is where you end up: a flamingo float, drawn by you.
Every step in one picture