Watch it draw itself · tap to replay
How to Draw a Dane
Draw a Dane in 13 easy steps, about 10 minutes. Free, with a printable worksheet.
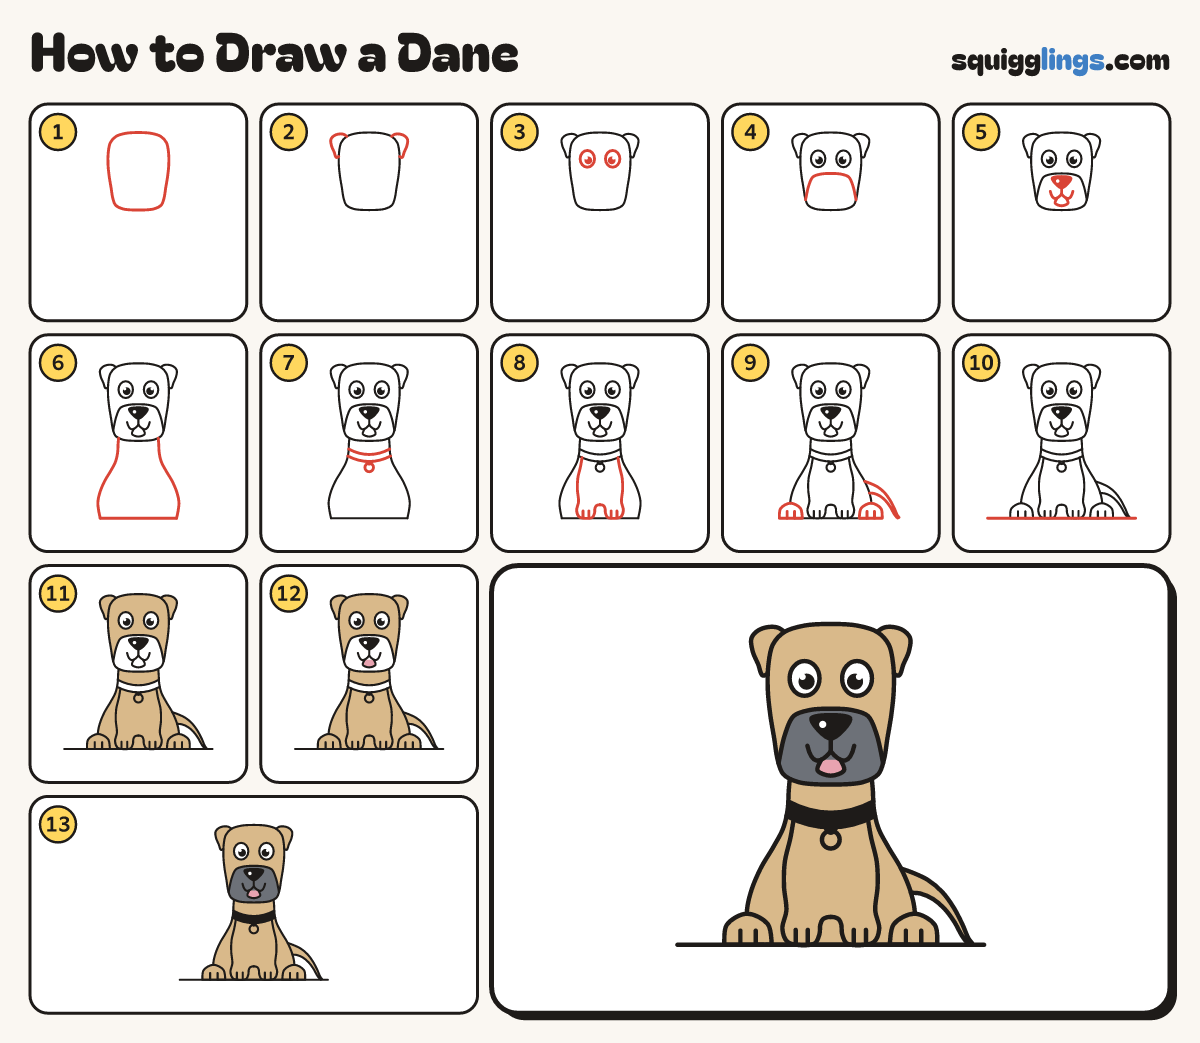
Each picture adds one red line. Draw that line, then scroll to the next picture. Rub out any dashed helper lines at the end. First up: tall head.
Step 1: Tall head
Near the top of your paper, draw a tall soft rectangle head, a little narrower at the chin.
Tip A Great Dane's head is long: taller than it is wide.
Step 2: Small folded ears
At each top corner of the head, draw a small ear flap folding over and down to a soft point.
Step 3: Two big eyes
In the top half of the head, draw 2 egg eyes. Colour a big black dot in each.
Step 4: Long square muzzle
Start low on one side of the head. Draw an upside-down U under the eyes, over to the other side.
Step 5: Nose and smile
Add a black nose on the muzzle. From it draw a line down to a w smile and a tongue.
Step 6: Long neck and body
From each corner of the chin, draw a line down the neck, round the hip. Join them at the bottom.
Step 7: Collar and tag
Across the neck, draw 2 sagging curves from one side over to the other. Hang a round tag below.
Step 8: Long front legs
From under the collar, draw 2 long legs down to round paws with 2 toe lines and an arch between.
Step 9: Back paws and tail
Add hill paws with 2 toe lines. From the right hip, draw a whip tail down to the paw bottoms.
Step 10: The ground
Draw a long ground line across under all 4 paws.
Step 11: Fawn fur
Colour the head above the muzzle, the ears, body, legs, paws and tail tan. Leave the eyes and collar white.
Step 12: Pink tongue
Colour the tongue pink.
Step 13: Grey mask, black collar
Colour the muzzle dark grey around the nose and tongue. Colour the collar black.
Your finished drawing
Follow the steps above and this is where you end up: a Dane, drawn by you.
Every step in one picture