Watch it draw itself · tap to replay
How to Draw a Construction Worker
Draw a construction worker in 13 easy steps, about 10 minutes. Free, with a printable worksheet.
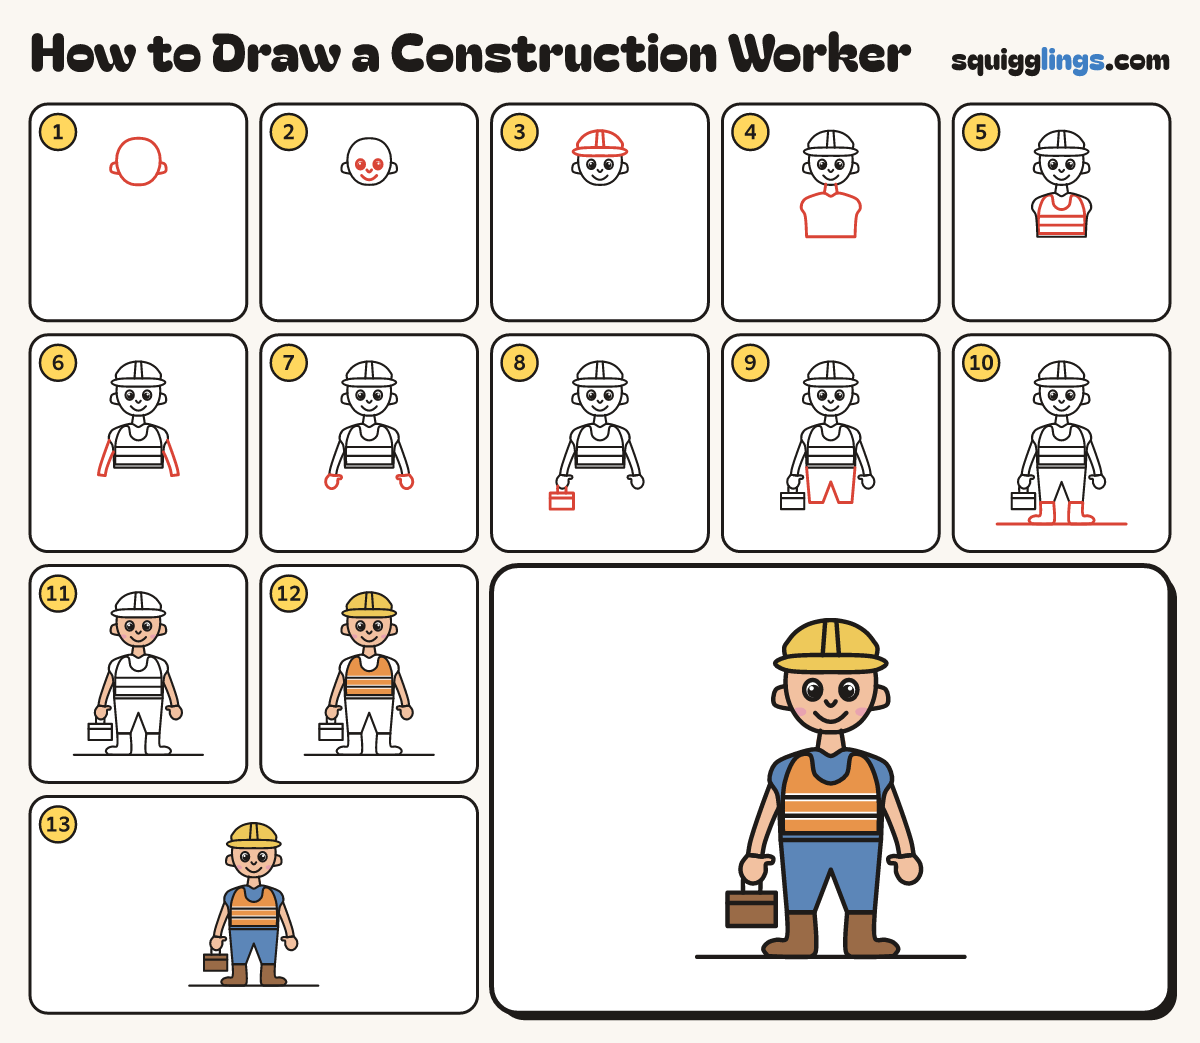
Each picture adds one red line. Draw that line, then scroll to the next picture. Rub out any dashed helper lines at the end. First up: head and ears.
Step 1: Head and ears
Near the top draw an egg head. Add a C ear on each side, starting and ending on the head.
Tip Leave most of the page below for the body and legs.
Step 2: The face
In the middle of the head draw 2 eyes with shines. Add a small nose and a smile under them.
Step 3: Hard hat
From the head's left side, draw a dome to the right. Add a brim and a ridge up the front.
Step 4: Neck and T-shirt
Start under the chin with 2 neck lines. Draw a boxy T-shirt with short sleeves, back to the neck.
Step 5: Safety vest
On the shirt draw a vest: over each shoulder, down the sides and across the bottom. Add 2 stripes.
Step 6: Arms
From under each sleeve draw a bare arm hanging down, narrower toward the wrist.
Step 7: Mitten hands
Under each wrist draw a round mitten fist with a little thumb bump pointing in.
Step 8: Toolbox
Under the left fist draw a box with a lid line. From its top draw a handle into the fist.
Step 9: Trousers
Start at the bottom left of the shirt. Draw 2 long trouser legs down, back to the right corner.
Step 10: Boots and ground
Under each leg draw a tall boot with the toe pointing out and a heel block. Add a ground line.
Step 11: Peach skin, pink cheeks
Colour the cheeks pink. Colour the face, ears, neck, arms and hands peach around them. Leave the eyes white.
Step 12: Yellow hat, orange vest
Colour the hard hat yellow and the vest orange, leaving the stripes white.
Step 13: Blue jeans, brown boots
Colour the shirt and trousers blue, and the boots and toolbox brown.
Your finished drawing
Follow the steps above and this is where you end up: a construction worker, drawn by you.
Every step in one picture