Watch it draw itself · tap to replay
How to Draw a Cherry Picker
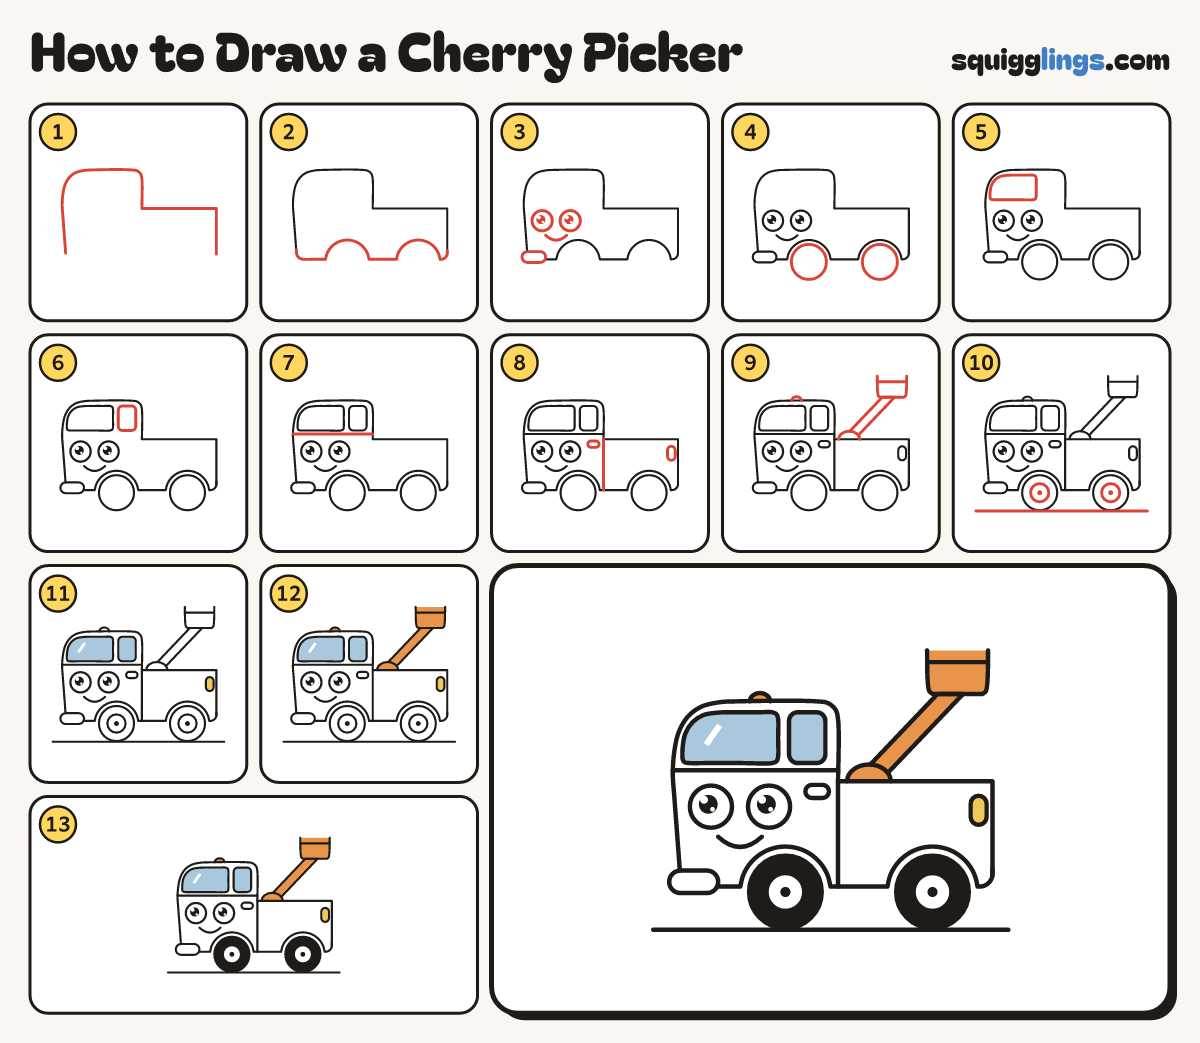
Draw a cherry picker in 13 easy steps, about 10 minutes. Free, with a printable worksheet.
Each picture adds one red line. Draw that line, then scroll to the next picture. Rub out any dashed helper lines at the end. First up: nose, cab and bed.
Step 1: Nose, cab and bed
Start low on the left. Go up over a tall round cab, level along a low bed, stop low right.
Tip The cab is a tall loaf in front; the bed is half as tall.
Step 2: Floor with wheel bumps
Start at the bottom front. Draw the floor with 2 big rainbow bumps, and stop at the bottom back.
Step 3: Eyes, smile, bumper
On the front wall, draw 2 big round eyes side by side, a smile under them and a pill bumper.
Step 4: Two fat tyres
Under each bump, draw a big round tyre, a little smaller than the bump, with air showing round its top.
Tip The tyres are fat, almost half as tall as the van.
Step 5: The big windscreen
A finger inside the front corner, draw a big window that follows the curve, flat under the roof.
Tip The windscreen is wider than tall; keep it a finger inside the body line.
Step 6: The door window
A finger behind the windscreen, draw a chunky rounded rectangle, as tall as the windscreen, for the door window.
Step 7: Level stripe
Start at the cab's back, just under the door window. Draw a straight stripe forward, stop at the front.
Step 8: Cab seam, tail light
From the cab's back wall, draw a seam down to the floor. Add a pill handle and a tail light.
Step 9: Boom, bucket, beacon
Draw a dome on the bed, a slanted boom from it up to an open bucket. Add a roof beacon.
Tip The boom leans like a ladder; the bucket stays open on top.
Step 10: Hubcaps and road
In each tyre, draw a hubcap circle with a middle dot. Draw a long straight road under the tyres.
Step 11: Sky windows, yellow light
Go over your lines. Colour the windows sky blue and the tail light yellow. Leave the eyes white.
Tip Leave a little slanted shine white on the windscreen.
Step 12: Orange boom and bucket
Colour the dome, boom, bucket and beacon orange. The truck and bumper stay white.
Step 13: Black tyres
Colour the tyres black, stopping at the hubcaps so they stay white.
Your finished drawing
Follow the steps above and this is where you end up: a cherry picker, drawn by you.
Every step in one picture