Watch it draw itself · tap to replay
How to Draw a Bunk Bed
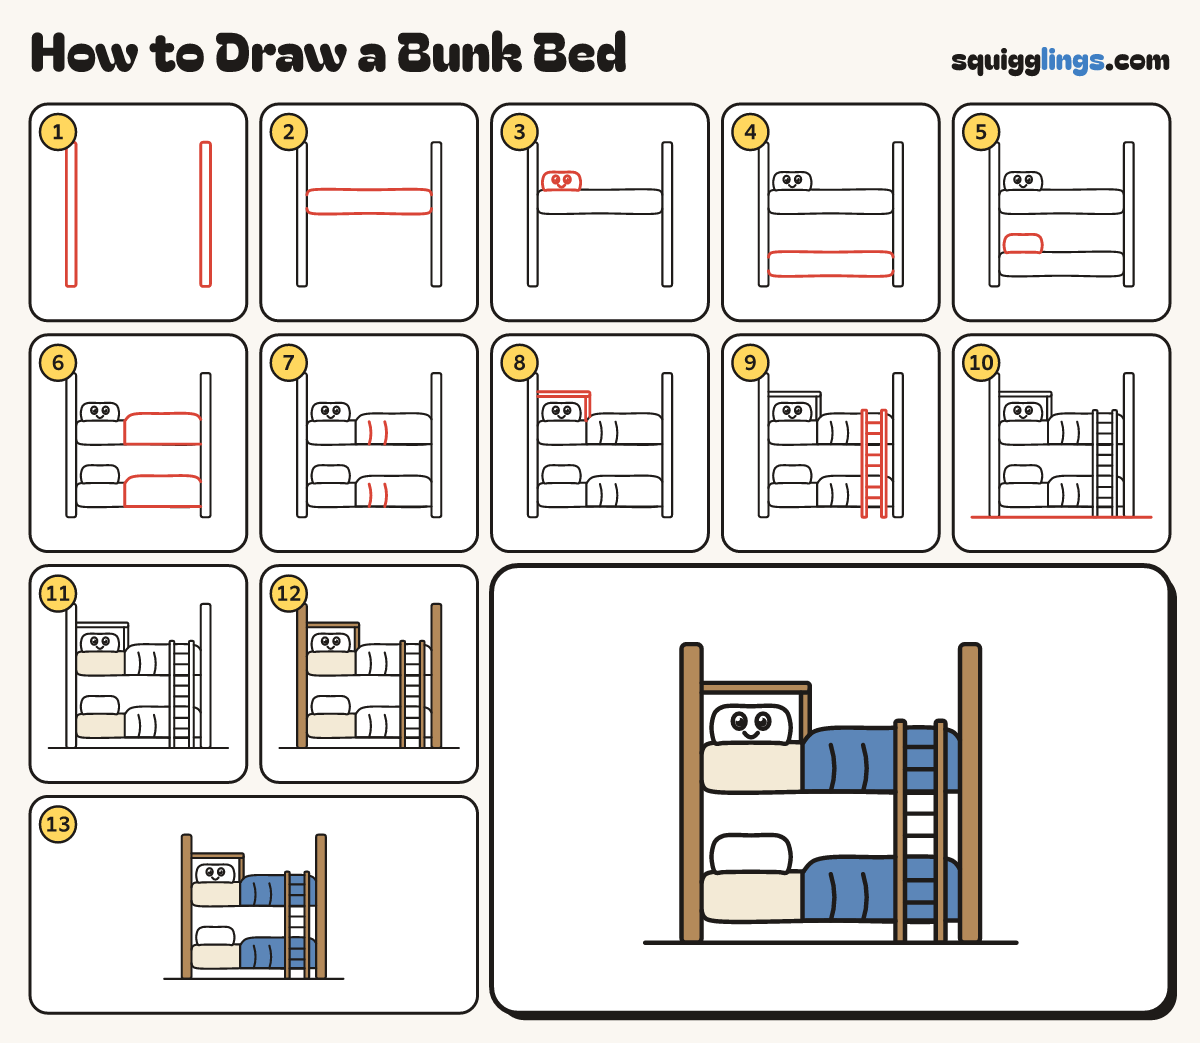
Draw a bunk bed in 13 easy steps, about 10 minutes. Free, with a printable worksheet.
Each picture adds one red line. Draw that line, then scroll to the next picture. Rub out any dashed helper lines at the end. First up: two tall posts.
Step 1: Two tall posts
Draw 2 tall thin posts, one near each edge, from near the top down to near the bottom.
Tip The beds will hang between them.
Step 2: The top bunk
A little above the middle, between the posts, draw a long flat box for the top mattress, post to post.
Step 3: Top pillow and face
On the left of the top mattress draw a puffy pillow with 2 round eyes, black dots and a smile.
Step 4: The bottom bunk
Lower down, a hand below the top bunk, draw a second mattress just the same between the posts.
Step 5: Bottom pillow
Draw a plain puffy pillow on the left of the bottom mattress, with no face.
Step 6: Two blankets
On each mattress draw a blanket from the middle: a wavy top across to the right post, down, and back.
Step 7: Blanket folds
Draw 2 soft curved lines down each blanket from top to bottom, for the folds.
Step 8: Guard rail
From the left post draw a long bar over the pillow, ending in a short post down to the mattress.
Step 9: The ladder
Draw a ladder on the right, from the floor up to just above the top blanket, with 6 rungs.
Step 10: The floor
Draw the floor line from edge to edge, touching the bottoms of the posts and the ladder.
Step 11: Cream mattresses
Go over your lines, then colour both mattresses cream. Leave the pillows and eyes white.
Step 12: Wood posts and ladder
Colour the posts, the rail and the ladder wood brown.
Step 13: Blue blankets
Colour both blankets blue, around the ladder, and your bunk bed is ready for bedtime!
Your finished drawing
Follow the steps above and this is where you end up: a bunk bed, drawn by you.
Every step in one picture