Watch it draw itself · tap to replay
How to Draw a Bluegill
Draw a bluegill in 13 easy steps, about 10 minutes. Free, with a printable worksheet.
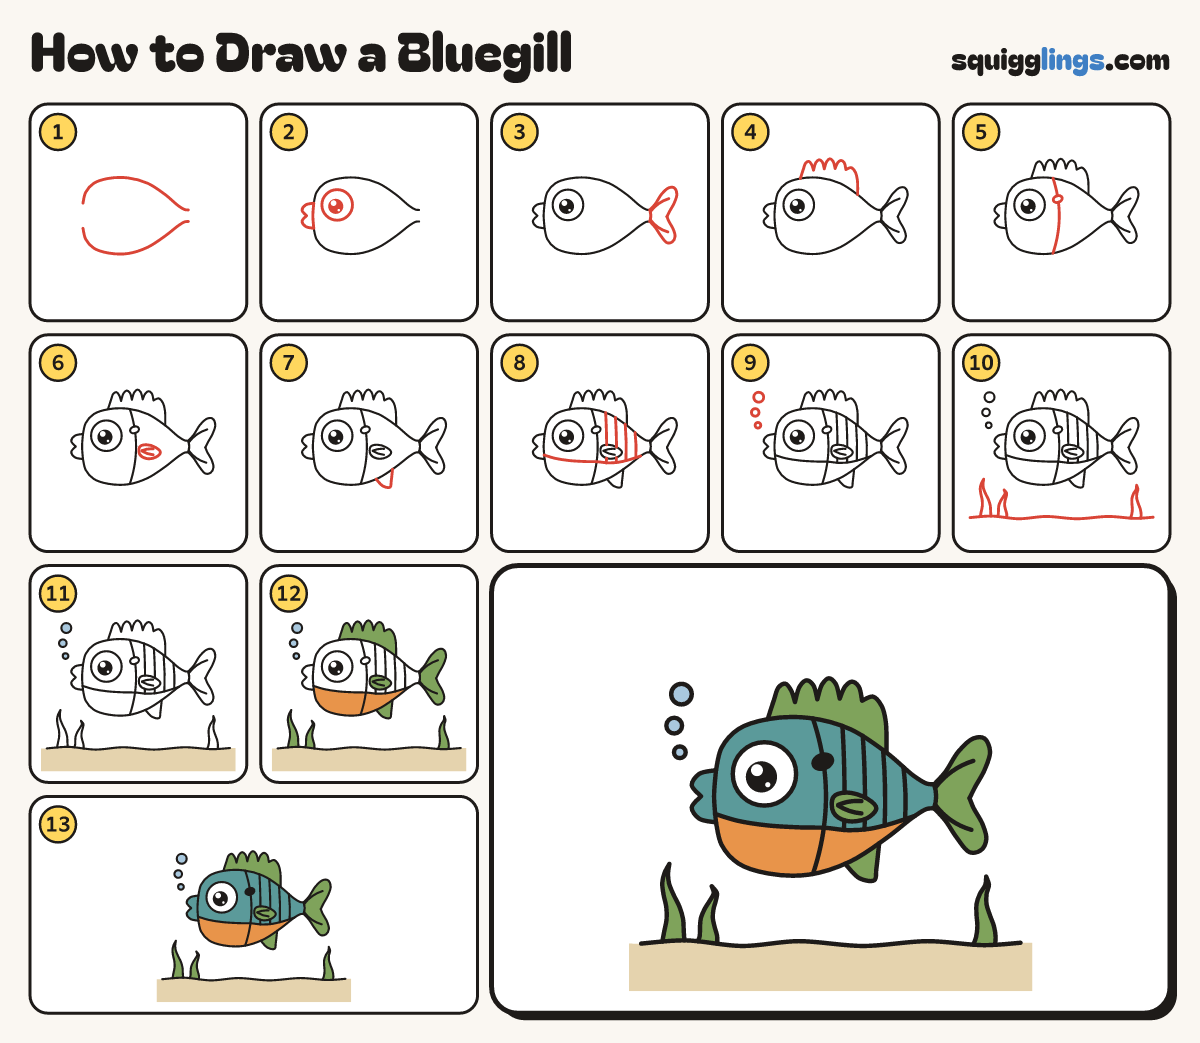
Each picture adds one red line. Draw that line, then scroll to the next picture. Rub out any dashed helper lines at the end. First up: fat egg body.
Step 1: Fat egg body
From left to right draw a big rainbow for the back and a smile for the belly, both ends open.
Step 2: Eye and kissy lips
At the front draw a huge round eye with a dot. Close the front with kissy lips like a 3.
Step 3: Bow-tie tail
From the back's end draw 2 fat lobes to the belly. Add a line where it joins, and 2 rays.
Step 4: Spiny top fin
From the back, before the middle, draw 4 rounded spines, then a round lobe down to the back.
Step 5: Gill and ear flap
A finger behind the eye, draw a C from the back down to the belly. Add an oval ear flap.
Step 6: Side fin
Behind the gill, a little below the middle, draw a leaf fin lying on its side. Add 2 short rays.
Step 7: Belly fin
From the belly behind the side fin, draw a small sail leaning back, up to the belly nearer the tail.
Step 8: Belly line and stripes
From the lips draw a line under the eye and fin to the belly. Add 4 stripes down to it.
Step 9: Bubbles
In front of the lips draw 3 bubbles floating up: small, bigger, biggest.
Step 10: Sand and seaweed
Draw a wavy sand line from edge to edge. Grow 3 wavy seaweed blades from it: 2 left, 1 right.
Step 11: Blue bubbles, sandy floor
Colour the bubbles light blue. Colour the floor under the sand line sandy, out to the edges.
Step 12: Orange belly, green fins
Colour the belly under the belly line orange. Colour the tail, all 3 fins and the seaweed leaf green.
Step 13: Teal body, black flap
Colour the body and lips teal around the side fin and belly. Leave the eye white. Colour the flap black.
Your finished drawing
Follow the steps above and this is where you end up: a bluegill, drawn by you.
Every step in one picture