Watch it draw itself · tap to replay
How to Draw a Tree Frog
Draw a tree frog in 13 easy steps, about 10 minutes. Free, with a printable worksheet.
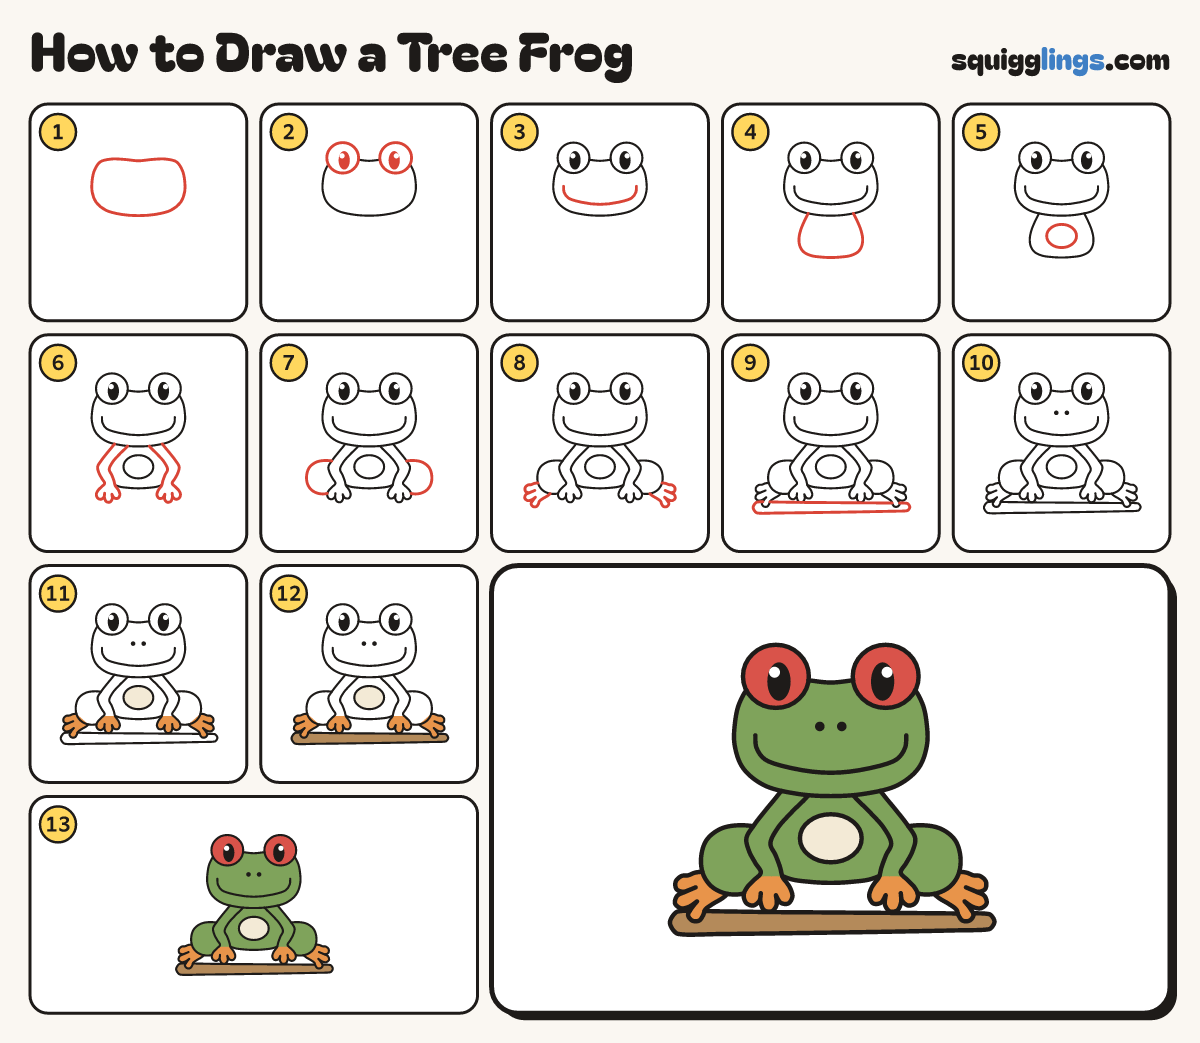
Each picture adds one red line. Draw that line, then scroll to the next picture. Rub out any dashed helper lines at the end. First up: the head.
Step 1: The head
Near the top of your paper draw a wide head with a flat top and a soft round chin.
Tip The cheeks are the widest part. Leave room above for the eyes.
Step 2: Big eyes on top
Draw 2 big circles on the top corners of the head, half off. Add a tall black pupil in each.
Tip Tree frog eyes are huge, and the pupils are tall slots, like a cat's.
Step 3: Big wide smile
Start under the left eye. Draw one big smile swooping across the face. Stop under the right eye.
Tip A frog's mouth goes nearly cheek to cheek. Turn the ends up.
Step 4: Squat tummy
Start under the left cheek. Draw a fat tummy down and round a flattish bottom. Stop under the right cheek.
Tip Frogs are squat: the tummy is wider than tall, and narrower than the head.
Step 5: Belly patch
Inside the tummy draw one big oval belly patch, a finger in from the tummy line all round.
Step 6: Arms and sticky hands
Start under each cheek. Draw an arm bending out at the elbow, down to 3 fingers with round pads.
Tip Round sticky pads, like little lollipops, grip the branch.
Step 7: Folded back legs
Halfway down each arm draw a fat bean out to the side for a folded leg, stopping on the hand.
Tip All you see of the back leg is the big bent knee.
Step 8: Feet with sticky pads
From the bottom of each knee draw a flat foot pointing out, with 3 long toes ending in round pads.
Step 9: The branch
Under the frog draw a long branch, round at both ends and getting thinner towards the right.
Tip Lift your pencil where the branch passes behind the hands and feet.
Step 10: Nostrils
Draw 2 little nostril dots above the middle of the smile.
Step 11: Orange toes, cream tummy
Colour the hands and feet bright orange, and the belly patch cream.
Step 12: Wood branch
Colour the branch wood brown, around the hands and feet.
Step 13: Green frog, red eyes
Colour the frog light green around the belly, hands and feet, and the eyes red. Your tree frog is done!
Tip Bright red eyes are what make it a tree frog.
Your finished drawing
Follow the steps above and this is where you end up: a tree frog, drawn by you.
Every step in one picture