Watch it draw itself · tap to replay
How to Draw a Tiger with a Hat
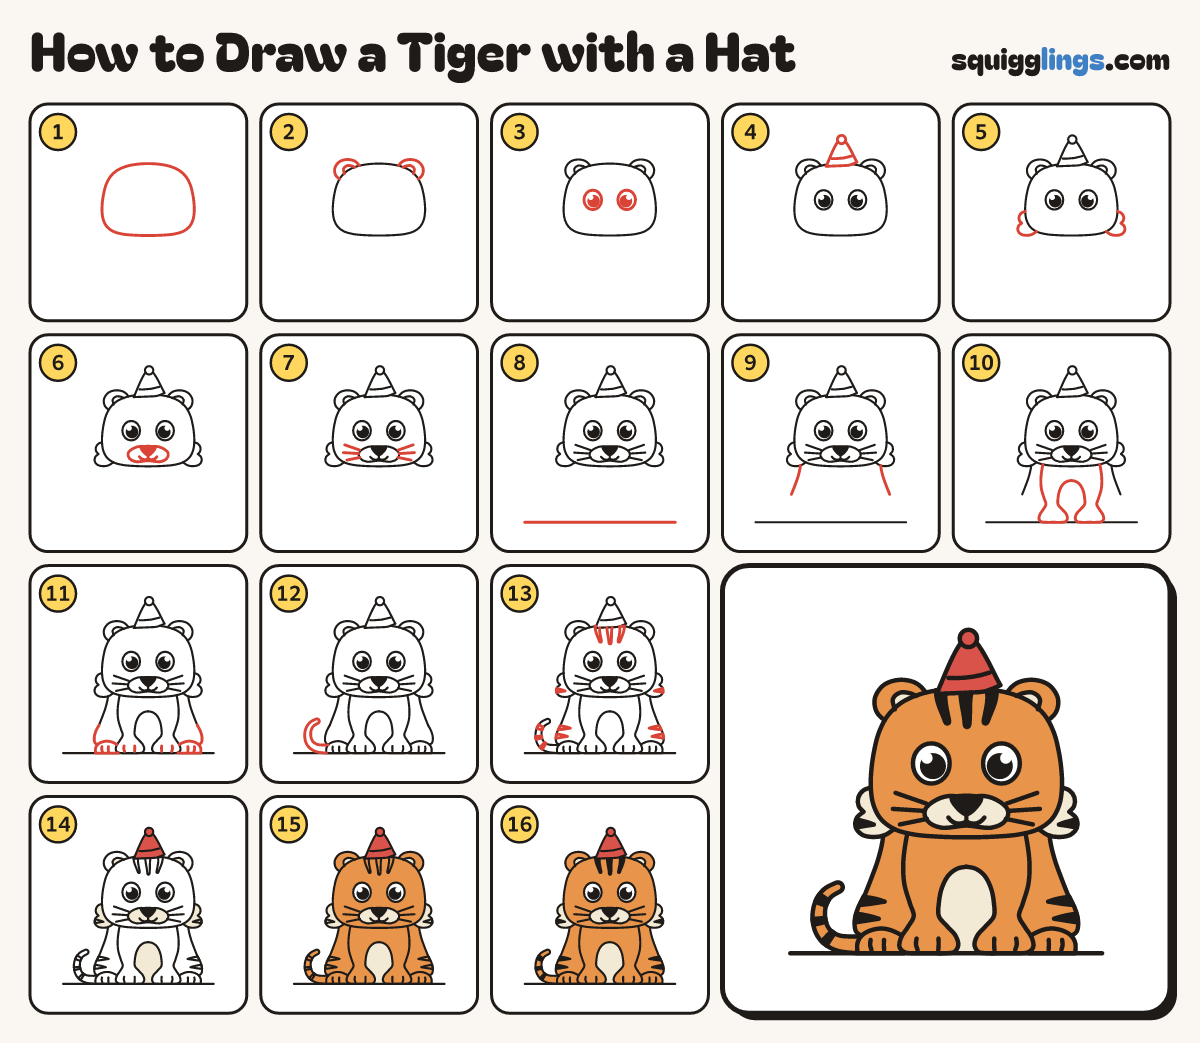
Draw a tiger with a hat in 16 steps, about 12 minutes. Free, with a printable worksheet.
Each picture adds one red line. Draw that line, then scroll to the next picture. Rub out any dashed helper lines at the end. First up: chubby head.
Step 1: Chubby head
Near the top, draw a big chubby head like a wide bean: flat top, big low cheeks, broad chin.
Tip Make it wider than it is tall.
Step 2: Round ears
Draw a round ear at each top corner of the head, with a smaller curve inside.
Step 3: Big eyes
Across the middle of the head, draw 2 big egg eyes, close together.
Tip Put a black dot and a white shine in each eye.
Step 4: Party hat
Between the ears, draw a tall pointy hat standing on the head.
Tip Add a round pompom on the tip and a band across the hat.
Step 5: Fluffy cheeks
Start on the side of the head, below the eyes. Draw 2 soft fluff bumps down to the jaw.
Tip Do both sides. The bottom bump is the bigger one.
Step 6: Nose and mouth
Draw a peanut snout under the eyes, with a black nose. From the nose, a line down to a w.
Tip Snout half as wide as the head. The w is wider than the nose.
Step 7: Whiskers
Draw 3 whiskers each side: start on the snout and flick out across the cheek, stopping inside the face.
Tip One a little up, one straight out, one a little down.
Step 8: Ground line
Rule a long flat ground line, about a head's height below the chin.
Step 9: Pear body
Start under each fluffy cheek. Draw a line that bows out like a pear, stopping at hip height.
Tip The body is narrower than the head at the top and wider at the bottom.
Step 10: Front legs
From under the chin, draw 2 front legs down to fat round paws. Join their insides with an arch.
Tip Thin at the wrist, round at the paw, flat on the ground.
Step 11: Back legs and toes
Start where each body line stopped. Draw a big round hip down to the ground, with a paw under it.
Tip Add 2 toe lines on each paw, starting on the ground.
Step 12: Curling tail
From behind the left back paw, draw a thick tail along the ground that curls up to a round tip.
Tip It gets thinner as it curls up, no higher than the tummy.
Step 13: Tiger stripes
Draw 3 forehead stripes, 1 on each fluffy cheek, 2 on each hip and 3 bands across the tail.
Tip Each stripe is fat where it starts on the edge and pointy at the other end.
Step 14: Cream and red
Colour the snout, inner ears, tummy and fluffy cheeks cream, around the cheek stripes. Colour the hat and pompom red.
Step 15: Orange fur
Colour the rest of the tiger orange, around the cream, the hat and the stripes. Leave the eyes white.
Step 16: Black stripes
Go over your lines. Colour all the stripes and tail bands black.
Your finished drawing
Follow the steps above and this is where you end up: a tiger with a hat, drawn by you.
Every step in one picture