Watch it draw itself · tap to replay
How to Draw the Statue of Liberty
Draw the Statue of Liberty in 13 easy steps, about 10 minutes. Free, with a printable worksheet.
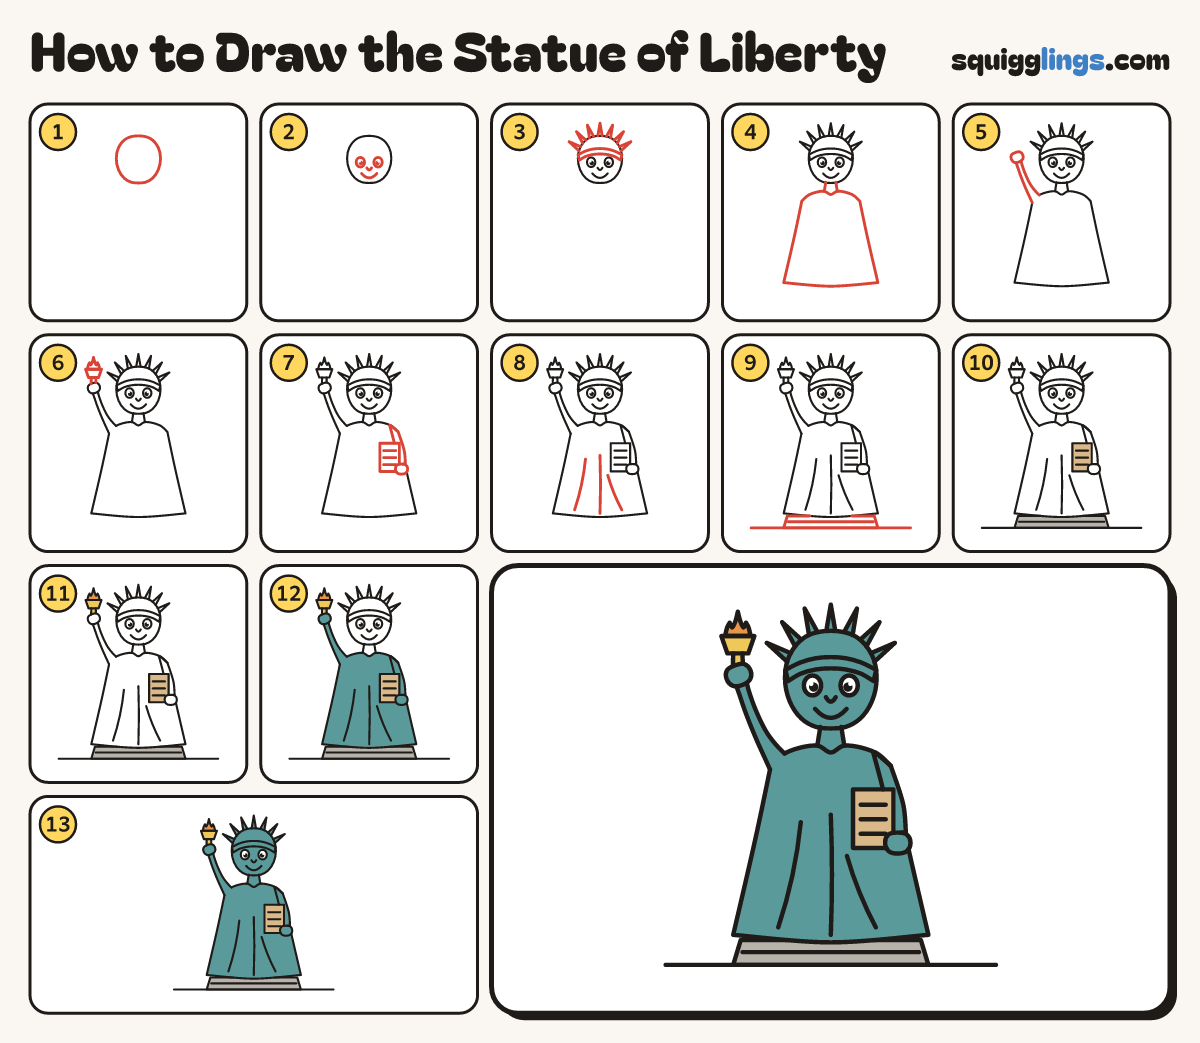
Each picture adds one red line. Draw that line, then scroll to the next picture. Rub out any dashed helper lines at the end. First up: egg head.
Step 1: Egg head
Near the top, in the middle, draw an egg for the head, narrower at the chin.
Tip Leave most of the page below for the long robe.
Step 2: Face
Draw 2 small oval eyes with black dots. Add a tiny nose and a smile.
Step 3: Spiky crown
Across the forehead draw a band of 2 lines. Add 7 spikes fanning up, starting and ending on the head.
Step 4: Neck and robe
Draw 2 neck lines. Start at the left one, draw a robe with a wide hem, stop at the right.
Step 5: Raised arm
From the left shoulder draw a sleeve reaching up, getting thinner. Add a round fist at the top.
Step 6: Torch
Out of the fist draw a short handle, a wider cup on top, and a flame with 3 tongues.
Step 7: Tablet
On the right draw a sleeve down to a fist. In front draw a tall tablet with 3 lines.
Step 8: Robe folds
Down the robe draw 3 long curved fold lines from the waist to the hem.
Step 9: Pedestal and ground
Under the hem draw a wide flat block, with a line across it. Add a ground line under it.
Step 10: Tan tablet, grey pedestal
Colour the tablet tan and the pedestal grey.
Step 11: Orange flame, gold torch
Colour the flame orange and the torch cup and handle yellow like gold.
Step 12: Green robe and arms
Colour the robe, both arms and the hands soft copper green, around the tablet.
Step 13: Green face and crown
Colour the face, neck and crown soft green. Leave the eyes white. Go over your lines and you're done!
Your finished drawing
Follow the steps above and this is where you end up: the Statue of Liberty, drawn by you.
Every step in one picture