Watch it draw itself · tap to replay
How to Draw a Sloth Sleeping
Draw a sloth sleeping in 12 easy steps, about 9 minutes. Free, with a printable worksheet.
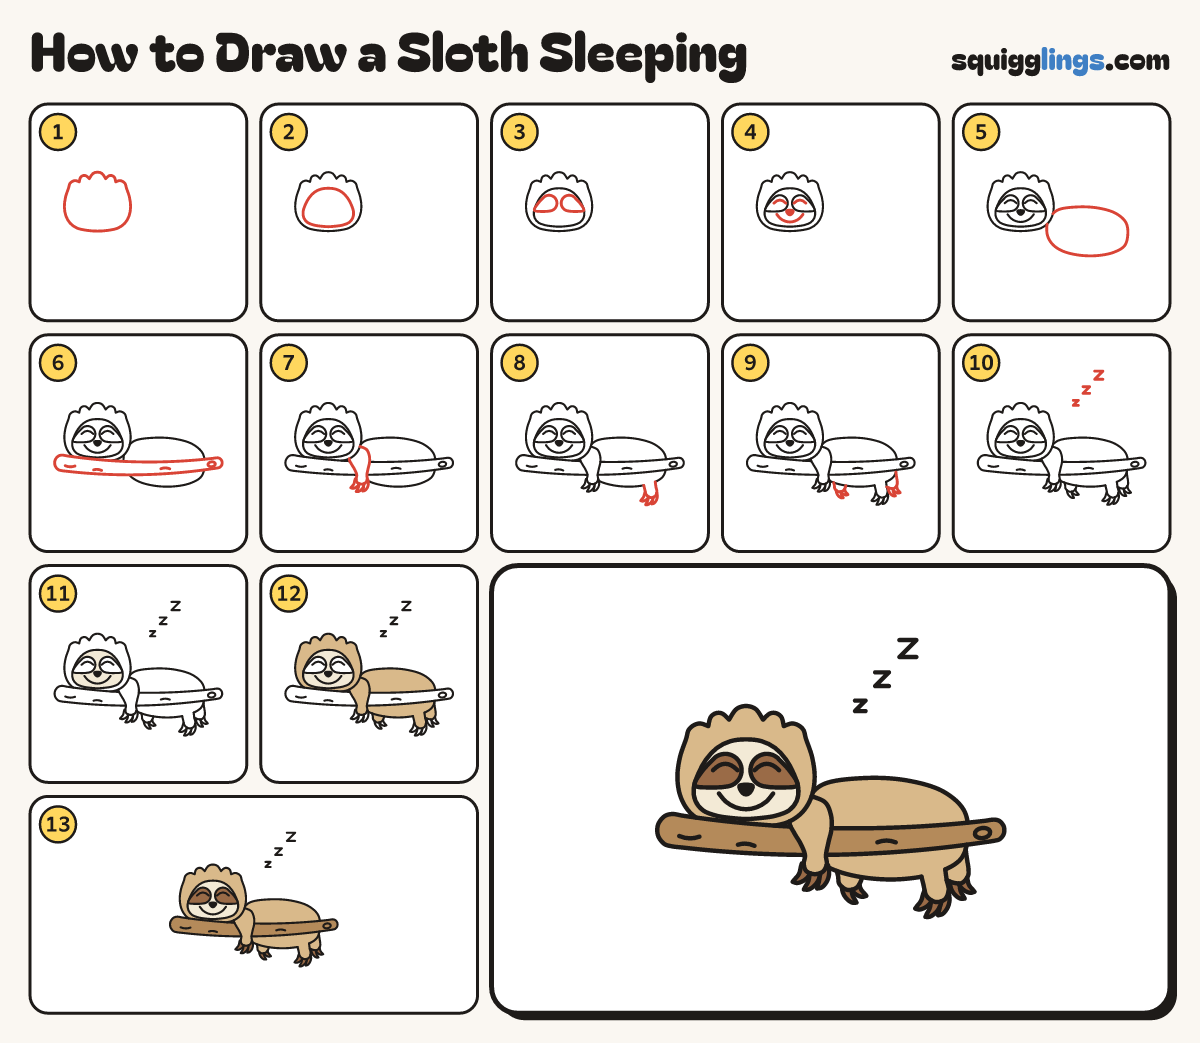
Each picture adds one red line. Draw that line, then scroll to the next picture. Rub out any dashed helper lines at the end. First up: the sleepy head.
Step 1: The sleepy head
On the left draw a round head with 5 soft fur hills on top. Leave room to the right.
Tip The middle hill is the tallest.
Step 2: The face
Inside the head draw a smaller face shape, wider at the cheeks, a finger inside the head line.
Step 3: Two dark eye patches
Above the middle of the face draw 2 teardrop eye patches, tails sweeping out to the edge of the face.
Step 4: Eyes, nose and smile
In each patch draw a short down-curve for a shut eye. Add a small black nose and a wide smile.
Tip A sleeping eye is just a smiley curve; no circle, no dot.
Step 5: The body
Start behind the right cheek. Draw a long round back to the right, down the bottom, then a flat line back.
Tip The body is a long low loaf, lower than the top of the head.
Step 6: The branch
Draw a long branch under the chin, almost edge to edge, 2 fingers thick. Add a knot near the end.
Step 7: Arm hugging the branch
From under the chin draw an arm down over the branch, ending under it. Add 3 long hooked claws.
Tip A sloth's claws stay curled like hooks, even in its sleep.
Step 8: The back leg
At the right end of the body draw a thick back leg hanging down over the branch. Add 3 hooked claws.
Tip Make the leg match the arm.
Step 9: Sleepy Zs
Above the body draw 3 Zs floating up to the right, each a little bigger than the last.
Step 10: Cream face
Colour the face cream, around the 2 eye patches.
Step 11: Tan fur
Colour the head, body, arm and leg tan, around the cream face.
Step 12: Brown patches and branch
Colour the eye patches and 6 claws brown, and the branch wood brown around the arm and leg.
Your finished drawing
Follow the steps above and this is where you end up: a sloth sleeping, drawn by you.
Every step in one picture