Watch it draw itself · tap to replay
How to Draw a Skeleton Dancing
Draw a skeleton dancing in 14 easy steps, about 11 minutes. Free, with a printable worksheet.
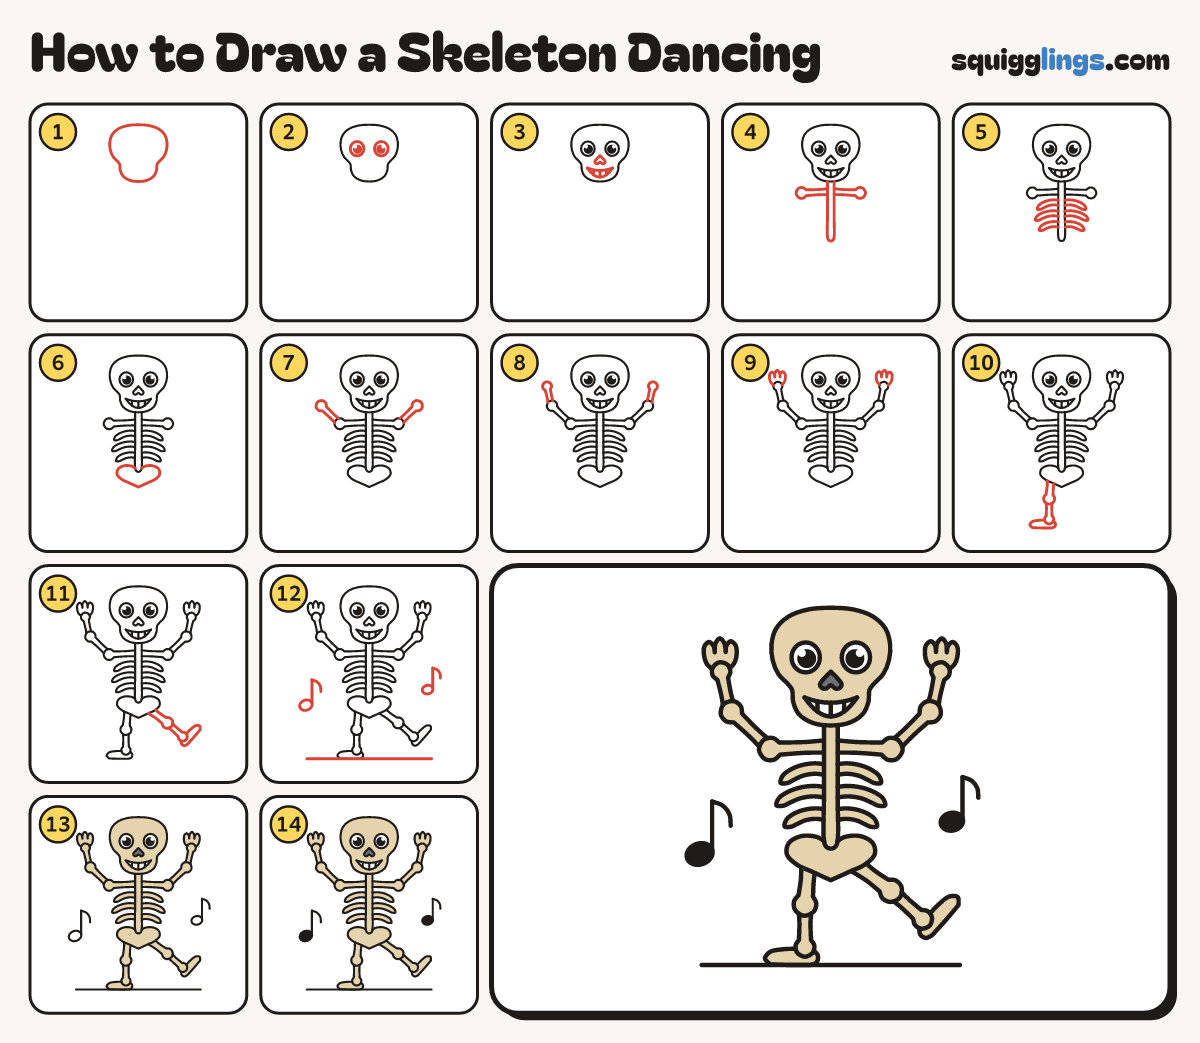
Each picture adds one red line. Draw that line, then scroll to the next picture. Rub out any dashed helper lines at the end. First up: skull.
Step 1: Skull
Near the top, draw a big skull: a round dome, tucked in at the cheeks, with a narrower jaw.
Tip Leave most of the page below for the dancing bones.
Step 2: Two big eyes
Across the middle of the skull, draw 2 big round eyes, each with a black dot and a shine.
Step 3: Nose and teeth
Under the eyes, draw a small upside-down heart nose. Below it draw a smile, a deeper curve and 3 teeth.
Step 4: Spine and shoulders
Under the chin draw a long thin spine. Near its top add a bone each side, ending in a ball.
Step 5: Ribs
Under the shoulder bones, draw 3 curved ribs on each side of the spine, each with a rounded end.
Step 6: Hip bone
At the bottom of the spine, draw a wide heart shape for the hip bone.
Step 7: Upper arms
From each shoulder ball, draw a thin bone sloping out and up to a round elbow ball.
Step 8: Lower arms
From each elbow ball, draw a thin bone straight up to a small round wrist ball.
Step 9: Bony hands
Above each wrist ball, draw a small hand with 3 round finger bumps along the top.
Step 10: Standing leg
From the hip bone's left side draw 2 bones down, a knee ball between. Add a foot pointing left.
Step 11: Kicking leg
From the hip bone's right side draw 2 bones slanting out to the right. Add a foot, toes up.
Step 12: Ground and notes
Draw a long ground line under the standing foot. Add a music note on each side.
Step 13: Sand bones, grey nose
Colour the heart nose dark grey. Colour all the bones sand around it. Leave the eyes and teeth white.
Step 14: Black notes
Colour the round note heads black. Your skeleton is dancing!
Your finished drawing
Follow the steps above and this is where you end up: a skeleton dancing, drawn by you.
Every step in one picture