Watch it draw itself · tap to replay
How to Draw a Scrapbook
Draw a scrapbook in 14 easy steps, about 11 minutes. Free, with a printable worksheet.
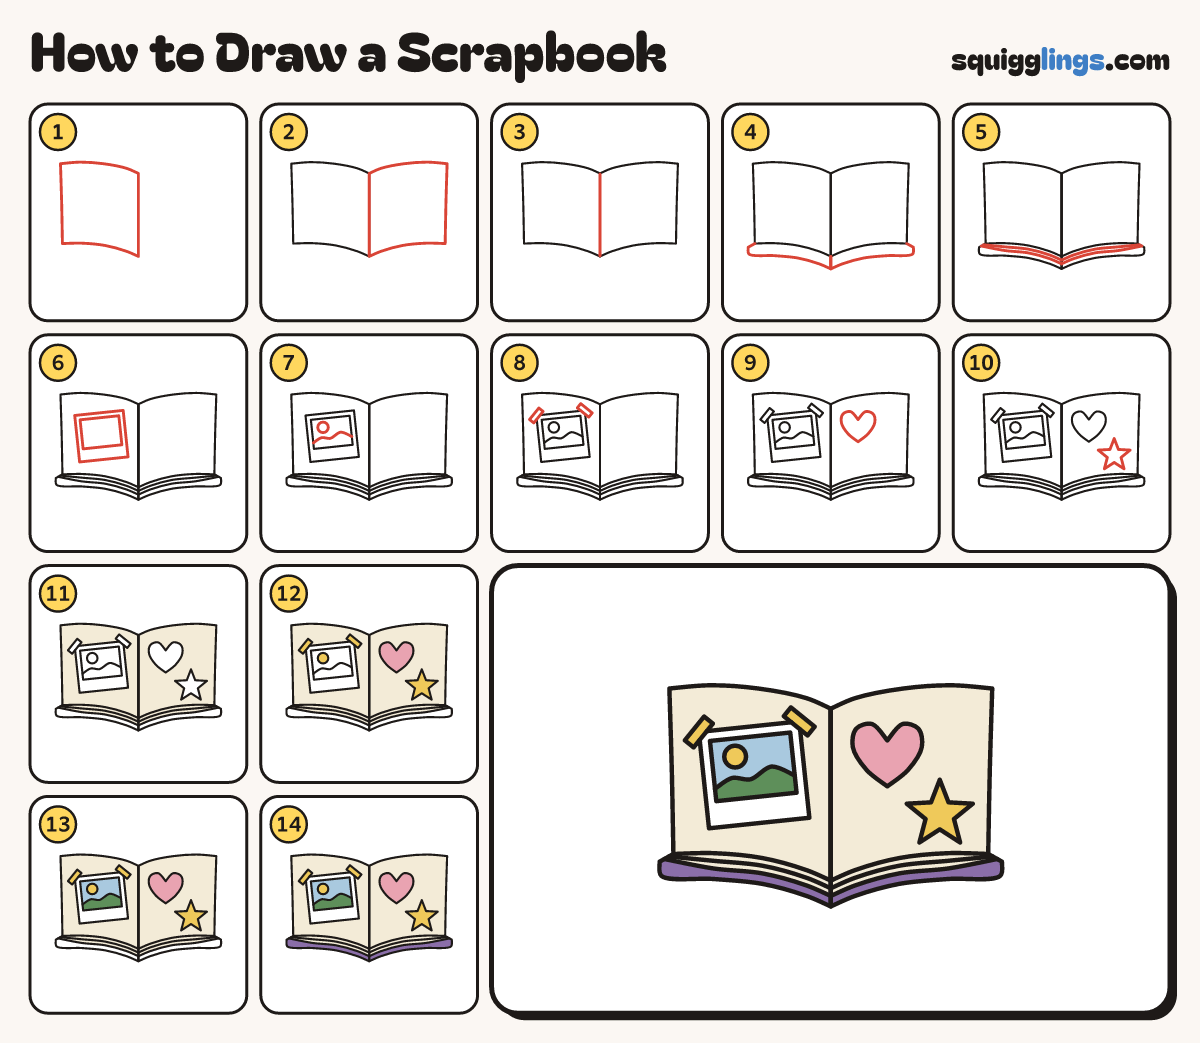
Each picture adds one red line. Draw that line, then scroll to the next picture. Rub out any dashed helper lines at the end. First up: left page.
Step 1: Left page
Start in the middle. Draw a wide page out to the left, bowed top and bottom. Stop at the middle.
Tip The pages bow because the book is open.
Step 2: Right page
Do the same on the right side, so the 2 pages match and meet in the middle.
Step 3: The spine
Draw a line straight down the middle where the pages meet, from top to bottom.
Step 4: The covers
Start at each page's outer corner. Draw a cover curving under it and stop on the spine.
Step 5: Page edges
Draw 2 curved lines under each page, following its bottom, from the outside corner to the spine.
Step 6: A photo
On the left page draw a big box, tipped a little. Draw a smaller box inside, near its top.
Tip Leave a wider strip under the small box, like an instant photo.
Step 7: Sun and hill
Inside the small box draw a round sun and a hill line from side to side.
Step 8: Sticky tape
Across each top corner of the photo draw a short strip of tape, like a little slanted box.
Step 9: A heart sticker
High on the right page draw a heart: start at the top dip, round and down to the point, and back.
Step 10: A star sticker
Lower on the right page draw a star with 5 points, about as big as the heart.
Step 11: Cream pages
Colour the pages and page edges cream, around the photo, the tape, the heart and the star.
Step 12: Yellow and pink
Colour the sun, the star and the 2 strips of tape yellow. Colour the heart pink.
Step 13: Blue sky, green hill
In the photo colour the sky blue around the sun, and the hill green. Leave the frame white.
Step 14: Purple cover
Colour the cover purple. Go over your lines and your scrapbook is done!
Your finished drawing
Follow the steps above and this is where you end up: a scrapbook, drawn by you.
Every step in one picture