Watch it draw itself · tap to replay
How to Draw a Qilin
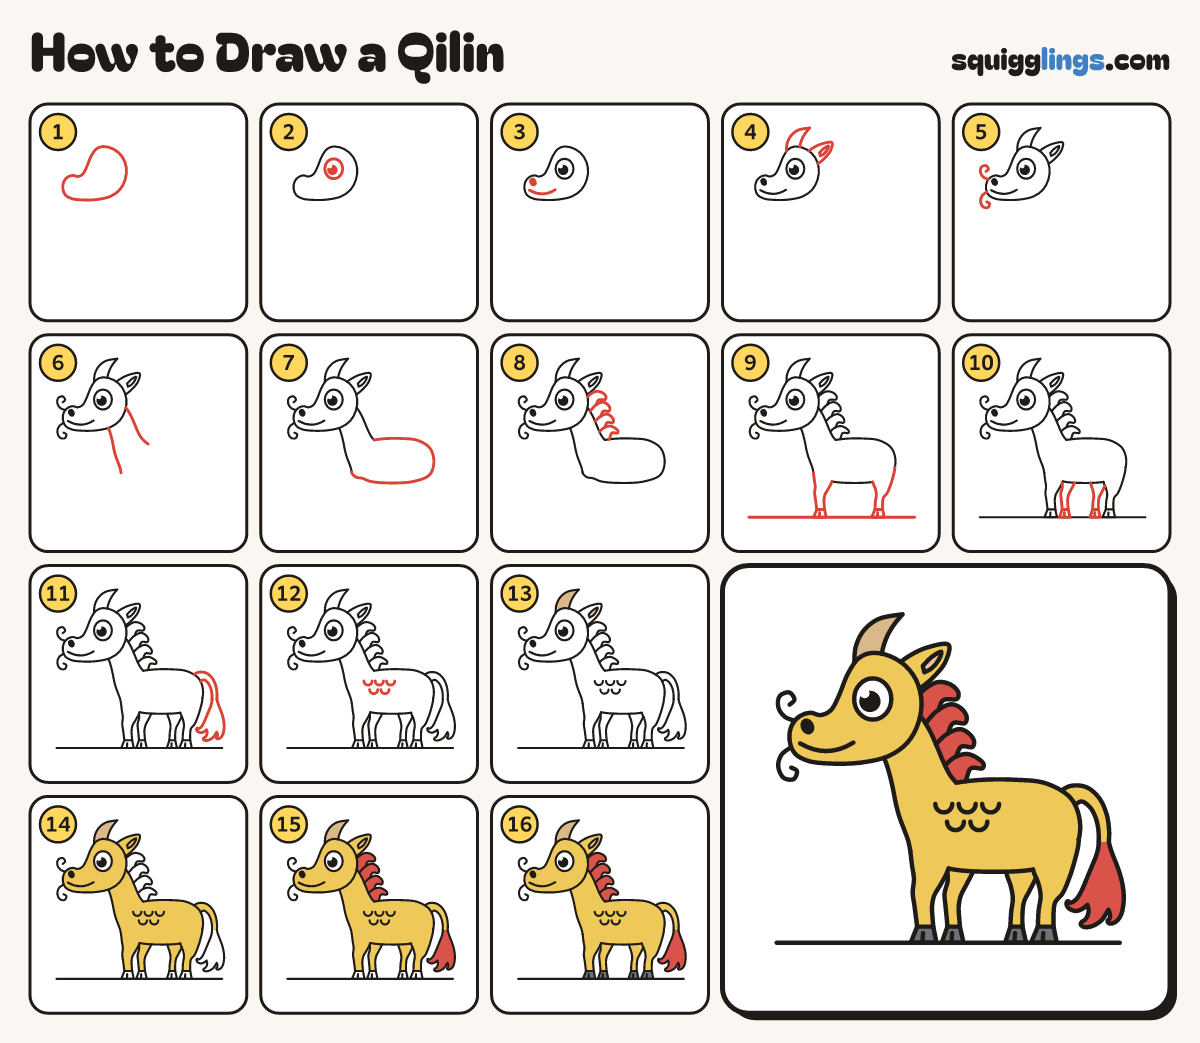
Draw a qilin in 16 steps, about 12 minutes. Free, with a printable worksheet.
Each picture adds one red line. Draw that line, then scroll to the next picture. Rub out any dashed helper lines at the end. First up: the head.
Step 1: The head
Near the top left draw a sideways head: a big round back and a short round snout on the left.
Tip Give the snout a little bump on top. Leave room on the right.
Step 2: One big eye
On the back of the head, above the middle, draw 1 big eye with a black dot and shine.
Tip We see the side, so only 1 eye.
Step 3: Nostril and smile
Draw a nostril under the bump. Start a long smile under it and stop below the eye.
Step 4: Horn and ear
On top of the head draw 1 horn curving back to a point. Add a small leaf ear behind it.
Tip Draw a smaller leaf inside the ear.
Step 5: Curly whiskers
From the front of the snout draw 2 wavy whiskers: one curls up, one curls down.
Step 6: The neck
Start behind the ear, slope down to the middle of the paper. Draw the front from cheek to chest.
Tip The neck gets wider as it goes down.
Step 7: The body
From the neck draw a long bean body: the back, a round bottom, then the tummy to the chest.
Tip Rub out the neck lines inside the body.
Step 8: Flame mane
Start at the back of the head. Draw 4 flames down the back of the neck, each a little smaller.
Tip Each flame is fat at the bottom, with a tip that curls back.
Step 9: Two legs
Draw a ground line. Add a slim front leg under the chest and a bent back leg under the bottom.
Tip Legs are thicker at the top. Each hoof is a little doorstop with a split.
Step 10: The far legs
Draw 2 thinner legs peeking out from behind: one by the front leg, one by the back leg.
Tip Only draw the parts you can see.
Step 11: Lion tail
From the top of the back end draw a long tail hanging down to a curly flame tuft.
Tip Thick at the body, thinner at the tuft. The 3 flame tips all curl the same way.
Step 12: Scales
On the front of the body draw 5 U scales: 3 in a row, then 2 under them.
Step 13: Peach ear, tan horn
Go over your lines. Colour the inside of the ear peach and the horn tan.
Step 14: Golden coat
Colour the head, ear, neck, body, legs and tail yellow, around the peach and tan.
Tip Leave the eye white.
Step 15: Red flames
Colour the flame mane and the tail tuft red.
Step 16: Slate hooves
Colour the 4 hooves slate grey. Your qilin is done!
Your finished drawing
Follow the steps above and this is where you end up: a qilin, drawn by you.
Every step in one picture