Watch it draw itself · tap to replay
How to Draw a Post Box
Draw a post box in 14 easy steps, about 11 minutes. Free, with a printable worksheet.
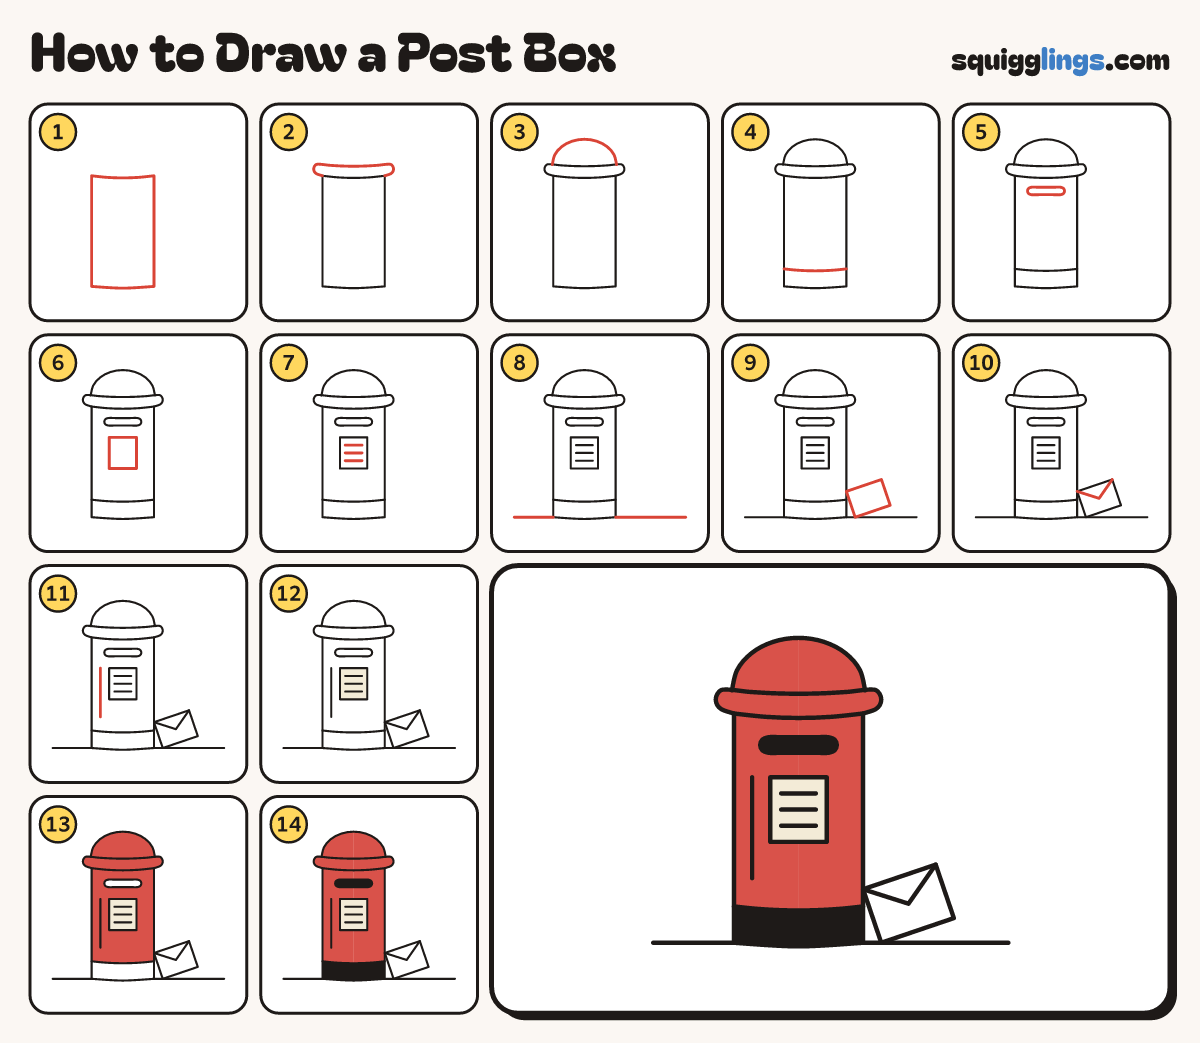
Each picture adds one red line. Draw that line, then scroll to the next picture. Rub out any dashed helper lines at the end. First up: the tall body.
Step 1: The tall body
In the middle of your page, draw a tall shape like a tin, with a gently curved top and bottom.
Tip Keep the two sides straight and the same length.
Step 2: The rim
Start at the top left corner. Draw a flat band sticking out each side. Stop at the top right corner.
Step 3: The domed cap
Start on the rim near its left end. Draw a tall rainbow over the top. Stop near the right end.
Tip Make the highest point right in the middle.
Step 4: The base
Start on the left side, near the bottom. Draw a gently curved line across. Stop on the right side.
Step 5: The letter slot
Just under the rim, draw a long thin slot with rounded ends. This is where letters go in.
Step 6: The little plate
Below the slot, draw an upright rectangle. On a real post box it tells you when the post is collected.
Step 7: Three small lines
Inside the plate, draw 3 short lines across, one under the other. No words needed.
Step 8: The ground
Start at the bottom of the base. Draw a straight ground line out to each side. Stop near the edge.
Step 9: A leaning letter
On the right, draw a rectangle standing on one corner. Lean it so its top corner touches the body.
Step 10: The flap
Start at a top corner of the letter. Draw a V to the middle. Stop at the other top corner.
Step 11: A shine line
Start level with the top of the plate. Draw one straight line down the left side. Stop above the base.
Step 12: Cream plate, white letter
Colour the little plate cream, around its 3 lines. Leave the letter white.
Step 13: Bright red
Colour the cap, the rim and the body red, around the slot and the plate. Leave the base white.
Step 14: Black base and slot
Colour the base and the letter slot black. Your post box is ready for letters!
Your finished drawing
Follow the steps above and this is where you end up: a post box, drawn by you.
Every step in one picture