Watch it draw itself · tap to replay
How to Draw a Pine Branch
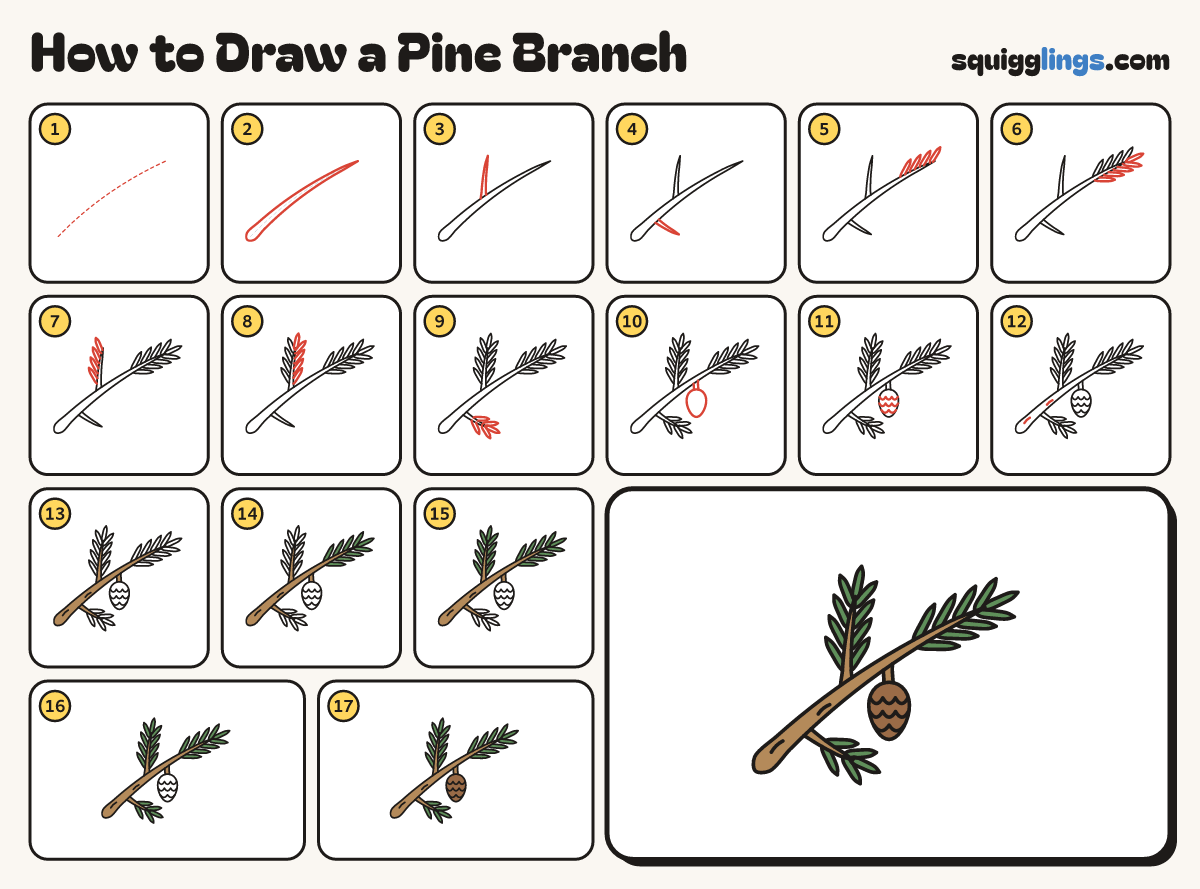
Draw a pine branch in 17 steps, about 13 minutes. Free, with a printable worksheet.
Each picture adds one red line. Draw that line, then scroll to the next picture. Rub out any dashed helper lines at the end. First up: bend line.
Step 1: Bend line
Start low on the left. Draw a light line bending up and over to the right side.
Step 2: The branch
Draw the branch around your line: fat and rounded on the left, thinning to a point on the right.
Step 3: Top twig
Rub out the light line. From the top of the branch, left of the middle, draw a pointed twig growing up.
Step 4: Lower twig
From the bottom of the branch, near the fat end, draw a shorter pointed twig going right.
Step 5: Top needles
Along the top of the thin end, draw 4 long pointed needles leaning towards the tip.
Step 6: Needles underneath
Draw 4 matching needles underneath, then one more needle straight out of the tip.
Step 7: Twig needles
On the left side of the top twig, draw 4 needles leaning up towards its point.
Step 8: More twig needles
Draw 4 matching needles on the right side of the twig, and one straight out of its point.
Step 9: Lower twig needles
On the lower twig, draw 2 needles on each side and one straight out of its point.
Step 10: A pine cone
Under the branch, right of the middle, draw a short stalk. Hang an egg on it, narrower at the bottom.
Step 11: Cone scales
Draw 3 rows of little U bumps across the cone, from edge to edge, for its scales.
Step 12: Bark marks
On the fat part of the branch, draw 2 short bark lines that follow its bend.
Step 13: Wood brown
Go over your lines. Colour the branch, the twigs and the cone stalk light brown.
Step 14: Green needles
Colour the needles at the end of the branch green, right out to their points.
Step 15: Green twig needles
Colour the needles on the top twig green.
Step 16: Last green needles
Colour the needles on the lower twig green too.
Step 17: Brown cone
Colour the pine cone dark brown, and your pine branch is done!
Your finished drawing
Follow the steps above and this is where you end up: a pine branch, drawn by you.
Every step in one picture