Watch it draw itself · tap to replay
How to Draw a Mushroom Forest
Draw a mushroom forest in 13 easy steps, about 10 minutes. Free, with a printable worksheet.
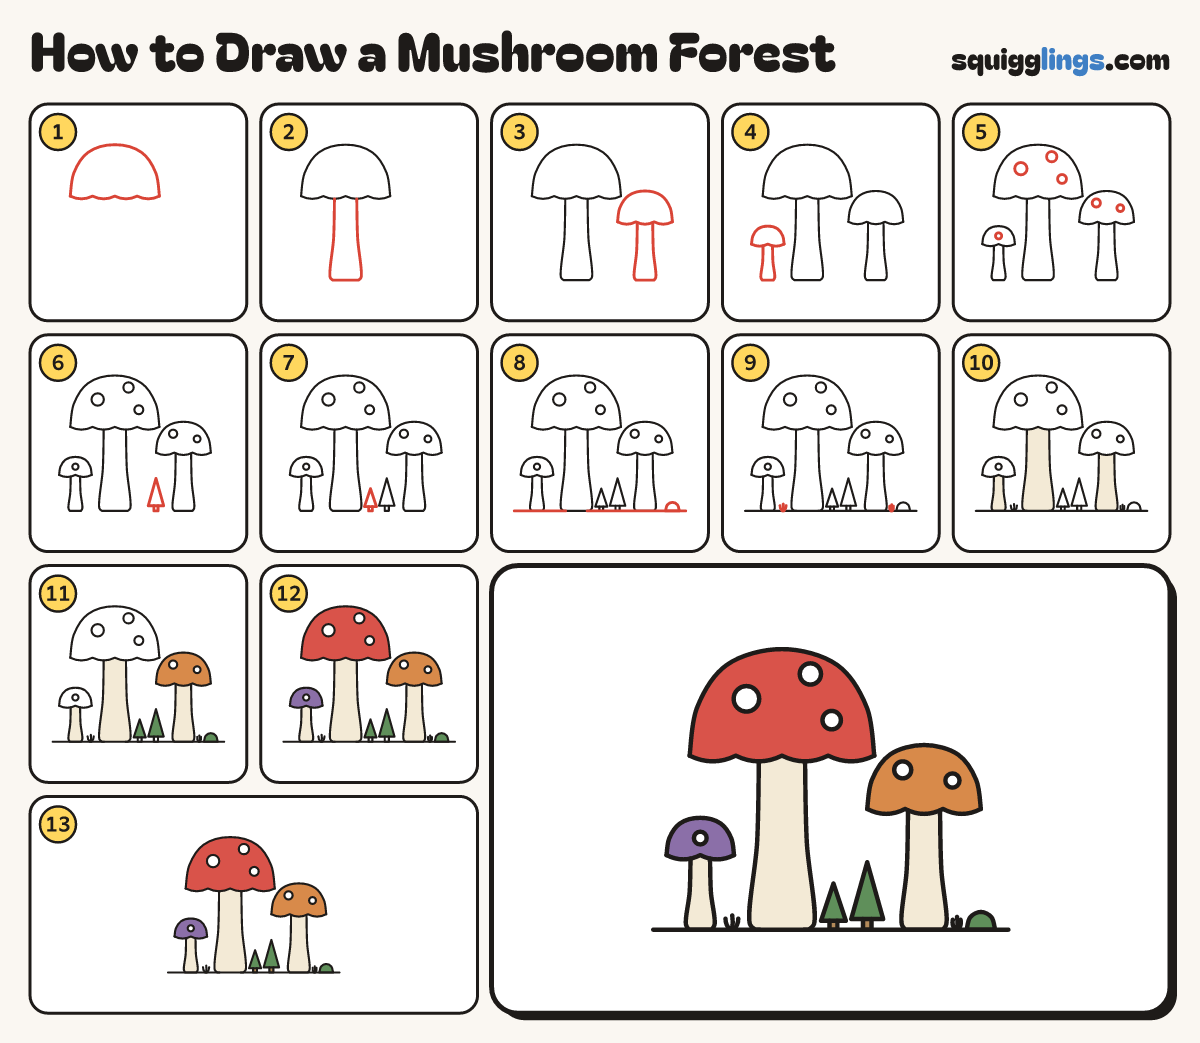
Each picture adds one red line. Draw that line, then scroll to the next picture. Rub out any dashed helper lines at the end. First up: the giant cap.
Step 1: The giant cap
Start on the left, above the middle. Draw a huge dome, then join its ends with 4 bumps hanging down.
Tip Make it as wide as your hand.
Step 2: Its stem
From the bumps under the middle, draw a fat stem down to the ground and back up to the bumps.
Step 3: A shorter mushroom
On the right, draw a smaller dome, 3 bumps under it, and a stem from them down to the ground.
Step 4: A little one
Far left, draw a little dome, 2 bumps under it, and a stem from them down to the ground.
Step 5: Spots
Dot round spots on the caps: 3 on the giant cap, 2 in the middle, 1 on the little cap.
Step 6: Tiny tree
Draw a tiny pine tree between the big stems, a triangle with a trunk from it down to the ground.
Step 7: Another tree
Add a smaller pine tree just left of it, with a trunk from it down to the ground.
Step 8: Bush and ground
Add a bush far right. Draw the ground line from left of the little stem, stopping past the bush.
Step 9: Grass tufts
Start on the ground and flick up 2 tufts of 3 blades, between the left stems and by the bush.
Step 10: Cream stems
Go over your lines, then colour the 3 stems cream.
Step 11: Ginger cap, green trees
Colour the middle cap ginger around its white spots. Colour the tiny trees and bush green.
Step 12: Red and purple caps
Colour the giant cap red and the little cap purple, around the white spots. Leave every spot white.
Step 13: Wood trunks
Colour the 2 tiny tree trunks wood brown. Your mushroom forest is done!
Your finished drawing
Follow the steps above and this is where you end up: a mushroom forest, drawn by you.
Every step in one picture