Watch it draw itself · tap to replay
How to Draw a Lion Cub
Draw a lion cub in 12 easy steps, about 9 minutes. Free, with a printable worksheet.
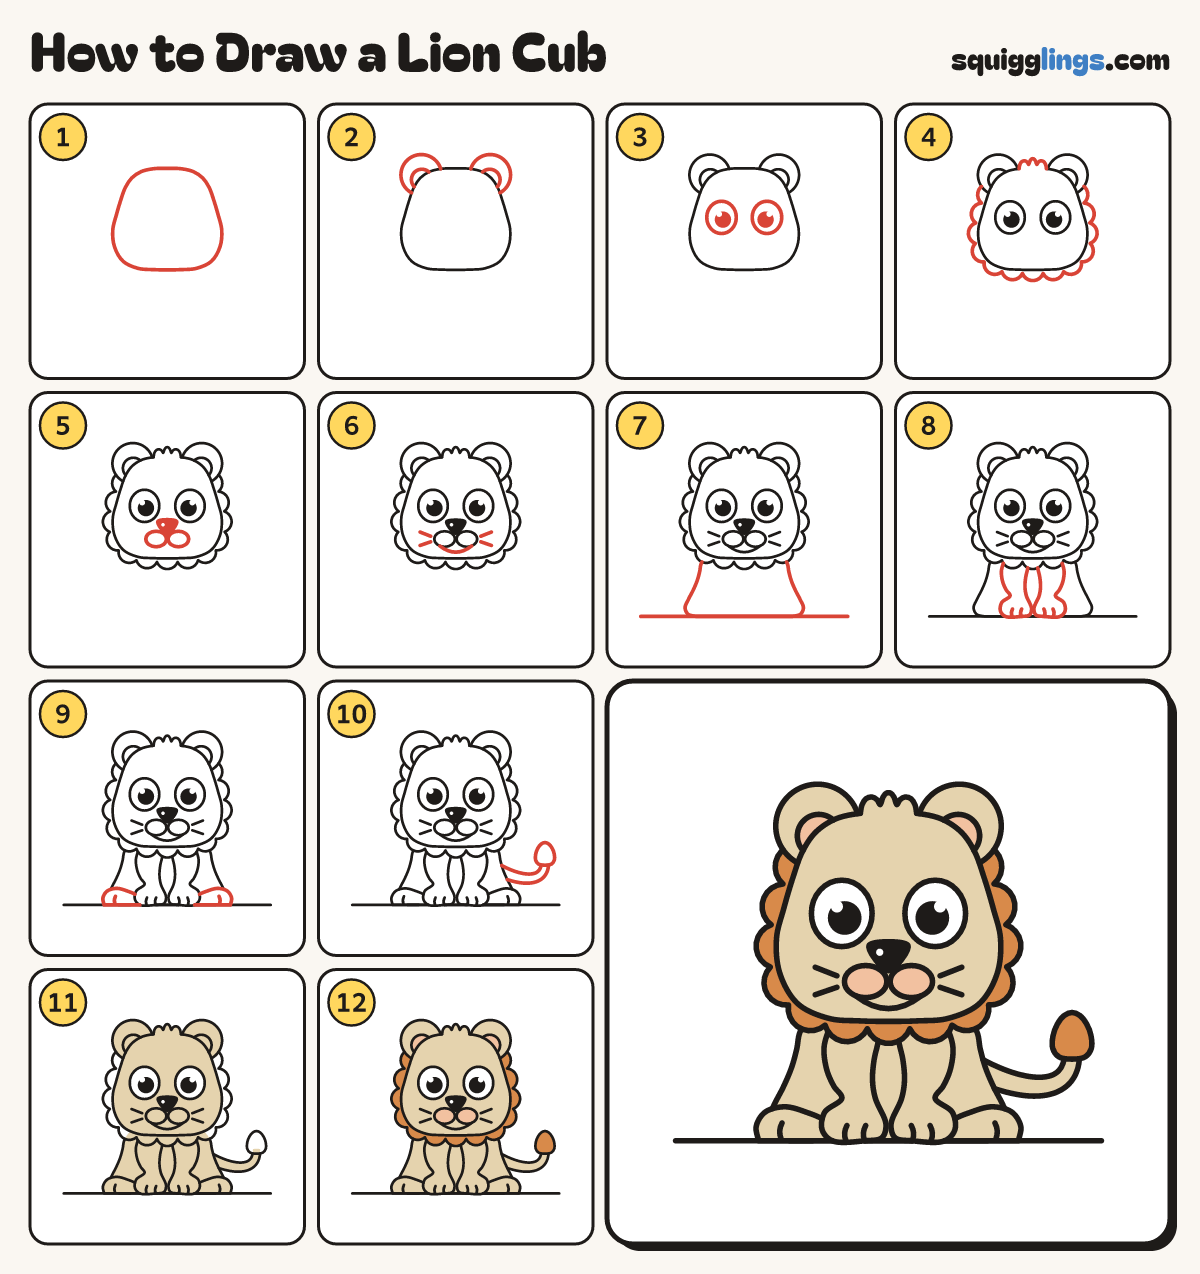
Each picture adds one red line. Draw that line, then scroll to the next picture. Rub out any dashed helper lines at the end. First up: the face.
Step 1: The face
Near the top of your paper draw an extra big fat egg face with a soft flat chin.
Tip The top is narrower than the cheeks. Leave room all round for the fluffy ruff.
Step 2: Round ears
Draw a rainbow ear on each top corner of the face. Add a smaller rainbow inside each ear.
Step 3: Big eyes
Across the middle of the face draw 2 big round eyes, each with a black dot and a shine.
Tip Leave the eyes white around the dots.
Step 4: Fluffy ruff
Add 3 soft tufts on top. From the left ear draw fluffy bumps round the chin to the right ear.
Tip Rub out the head line under the tufts. Keep the ruff bumps small and soft.
Step 5: Nose and cheek pads
A finger under the eyes draw a small black triangle nose. Under it draw 2 plump cheek pads touching.
Tip The nose point sits in the V between the pads.
Step 6: Smile and whiskers
Start under the left cheek pad. Draw a shallow smile, stopping under the right pad. Add 2 whiskers each.
Tip Whiskers go down and out, well away from the eyes.
Step 7: Ground and body
Draw a ground line far below the ruff. From under the ruff draw each body side down to the line.
Tip Let each side slope out to a plump bottom sitting flat on the ground.
Step 8: Front legs
From the ruff draw 2 legs down to mitten paws and back up to the ruff. Add 2 toes each.
Tip Wide at the top, thin at the wrist, a fat mitten on the ground.
Step 9: Back paws
Beside each front paw draw a plump bun paw on the ground, tucked behind it. Add 1 toe line.
Tip Rub out the body line inside it.
Step 10: Tail with a tuft
From the right hip draw a thick tail out and up, getting thinner. End it in a soft round tuft.
Tip Tuck the tail end into the tuft. The tuft is wide at the bottom and round on top.
Step 11: Sand fur
Colour the face, tufts, ears, body, legs, paws and tail sand, around the eyes, cheek pads and inner ears.
Step 12: Peach and ginger
Colour the cheek pads and inner ears peach. Colour the ruff around the face and the tail tuft ginger.
Your finished drawing
Follow the steps above and this is where you end up: a lion cub, drawn by you.
Every step in one picture