Watch it draw itself · tap to replay
How to Draw a Leatherback Turtle
Draw a leatherback turtle in 13 easy steps, about 10 minutes. Free, with a printable worksheet.
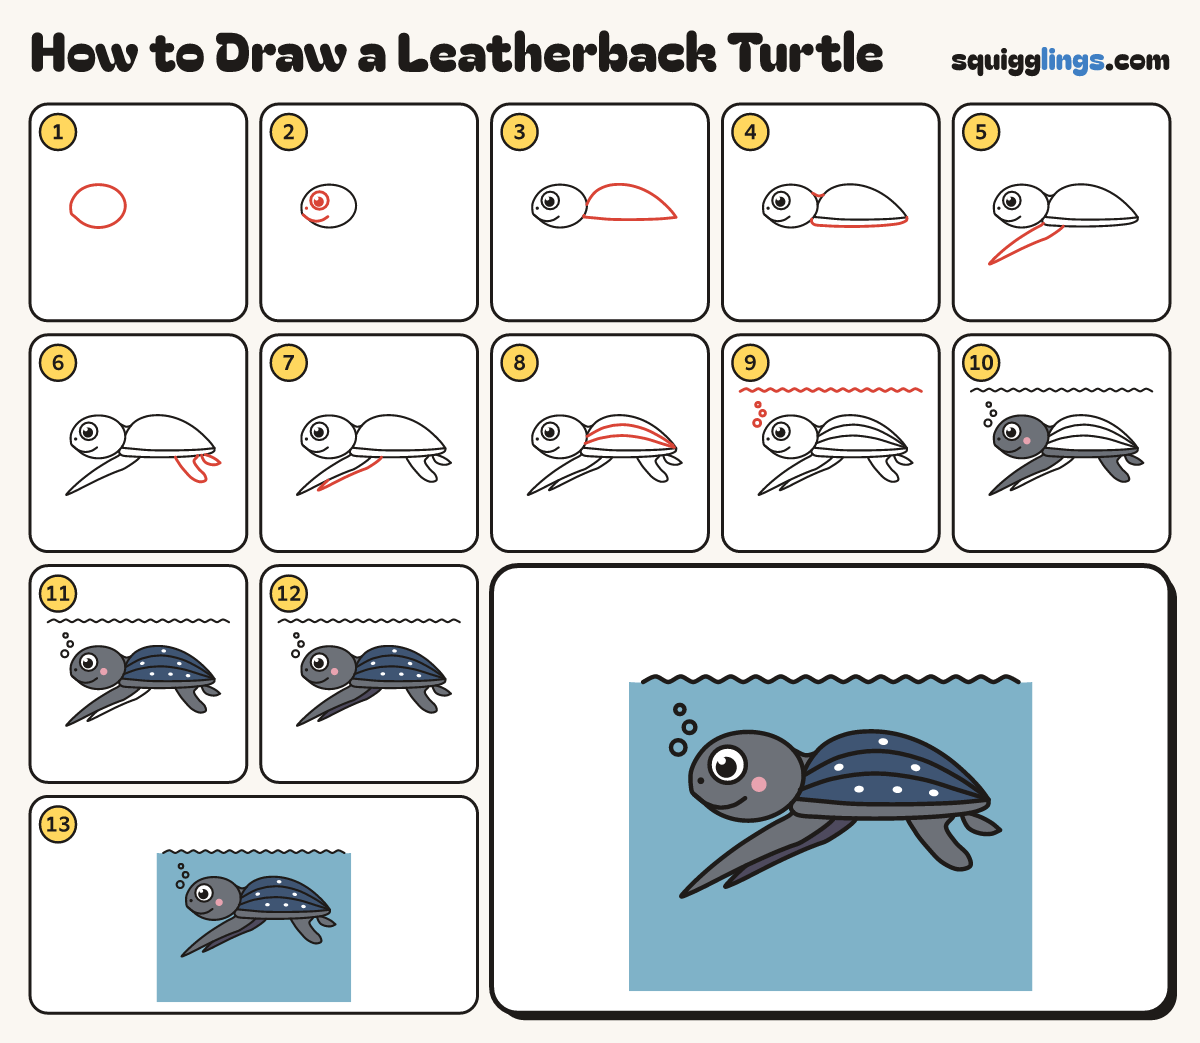
Each picture adds one red line. Draw that line, then scroll to the next picture. Rub out any dashed helper lines at the end. First up: egg head.
Step 1: Egg head
On the left, above the middle, draw a big egg head on its side, with a tiny beak bump.
Step 2: Eye, nose and smile
Draw a big round eye in the front of the head. Add a nostril dot and a wide smile.
Step 3: Long teardrop shell
Behind the head, draw a long shell: a smooth hump near the front, sloping back to a pointed tip.
Step 4: Rim and neck
From the shell's front corner, draw a thin band under it, back to the tip. Add a short neck.
Tip The neck is a little dip between the back of the head and the shell.
Step 5: Huge front flipper
Start on the band under the shell's front. Draw a huge wing flipper down and forward, back to the band.
Step 6: Back flipper and tail
Start on the band under the back. Draw a small flipper down and back, to the band. Add a tail.
Step 7: Far flipper
Start on the band behind the front flipper. Draw a thin far flipper along its back edge, stopping on it.
Step 8: Long ridges
On the shell, draw 2 long ridge lines from the front, sweeping back to near the pointed tip.
Step 9: Water and bubbles
Above the turtle, draw a wavy water line right across the paper. Add 3 bubbles above the nose.
Tip Make the bubbles smaller as they go up.
Step 10: Grey skin
Dab a pink cheek. Colour the head, neck, band, tail, front flipper and back flipper grey, around it.
Tip Leave the eye white.
Step 11: Navy shell
Colour the shell navy, leaving little white spots.
Step 12: Dark far flipper
Colour the far flipper dark grey.
Step 13: Blue water
Colour the water blue down to the bottom of the paper, around the turtle.
Your finished drawing
Follow the steps above and this is where you end up: a leatherback turtle, drawn by you.
Every step in one picture