Watch it draw itself · tap to replay
How to Draw a Koi
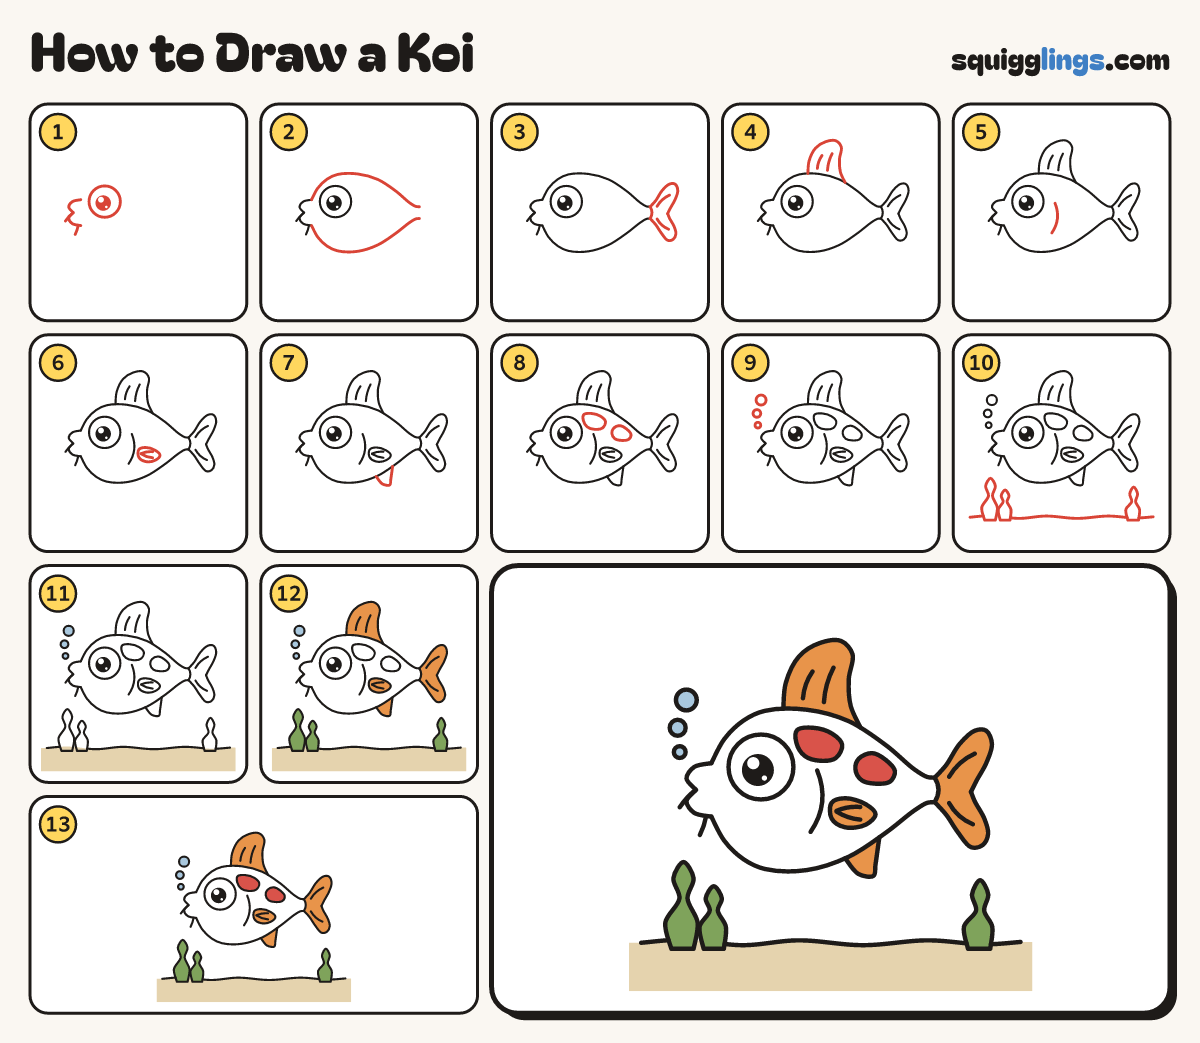
Draw a koi in 13 easy steps, about 10 minutes. Free, with a printable worksheet.
Each picture adds one red line. Draw that line, then scroll to the next picture. Rub out any dashed helper lines at the end. First up: eye, lips and whiskers.
Step 1: Eye, lips and whiskers
Draw a huge round eye. In front, start high, draw kissy lips like a sideways 3, stopping low. Add whiskers.
Tip Leave lots of room on the right for the body and tail.
Step 2: Fat egg body
Start at the lips. Draw a rainbow over the eye, ending at a short neck. Repeat for the belly.
Step 3: Bow-tie tail
Across the neck, draw a short curve. From its ends, draw 2 lobes meeting at a dent. Add 2 rays.
Tip A sideways bow tie: the neck is the knot.
Step 4: Top fin
Start on the back before the middle. Draw a tall sail leaning back, down to the back past the middle.
Step 5: Gill
A finger behind the eye, start below the back and draw a short C, stopping above the belly.
Step 6: Side fin
Behind the gill draw a leaf lying on its side, pointing at the tail. Add 2 rays from its base.
Step 7: Belly fin
Start on the belly behind the side fin. Draw a small sail down to a tip, up to the belly.
Step 8: Two big patches
Draw 2 big soft blobs: one on the head behind the eye, one on the side above the side fin.
Step 9: Bubbles
In front of the lips draw 3 bubbles floating up, small to big.
Step 10: Sand and seaweed
Draw a wavy sand line from edge to edge. Grow 3 wiggly seaweed blades up from it.
Step 11: Sandy floor, blue bubbles
Colour the sand under the line sandy yellow, and the 3 bubbles light blue.
Step 12: Orange fins, green seaweed
Colour the tail and all 3 fins orange, and the seaweed green.
Step 13: White koi, red patches
Colour both patches red. Leave the body and the eye white.
Your finished drawing
Follow the steps above and this is where you end up: a koi, drawn by you.
Every step in one picture