Watch it draw itself · tap to replay
How to Draw a Knight on a Horse
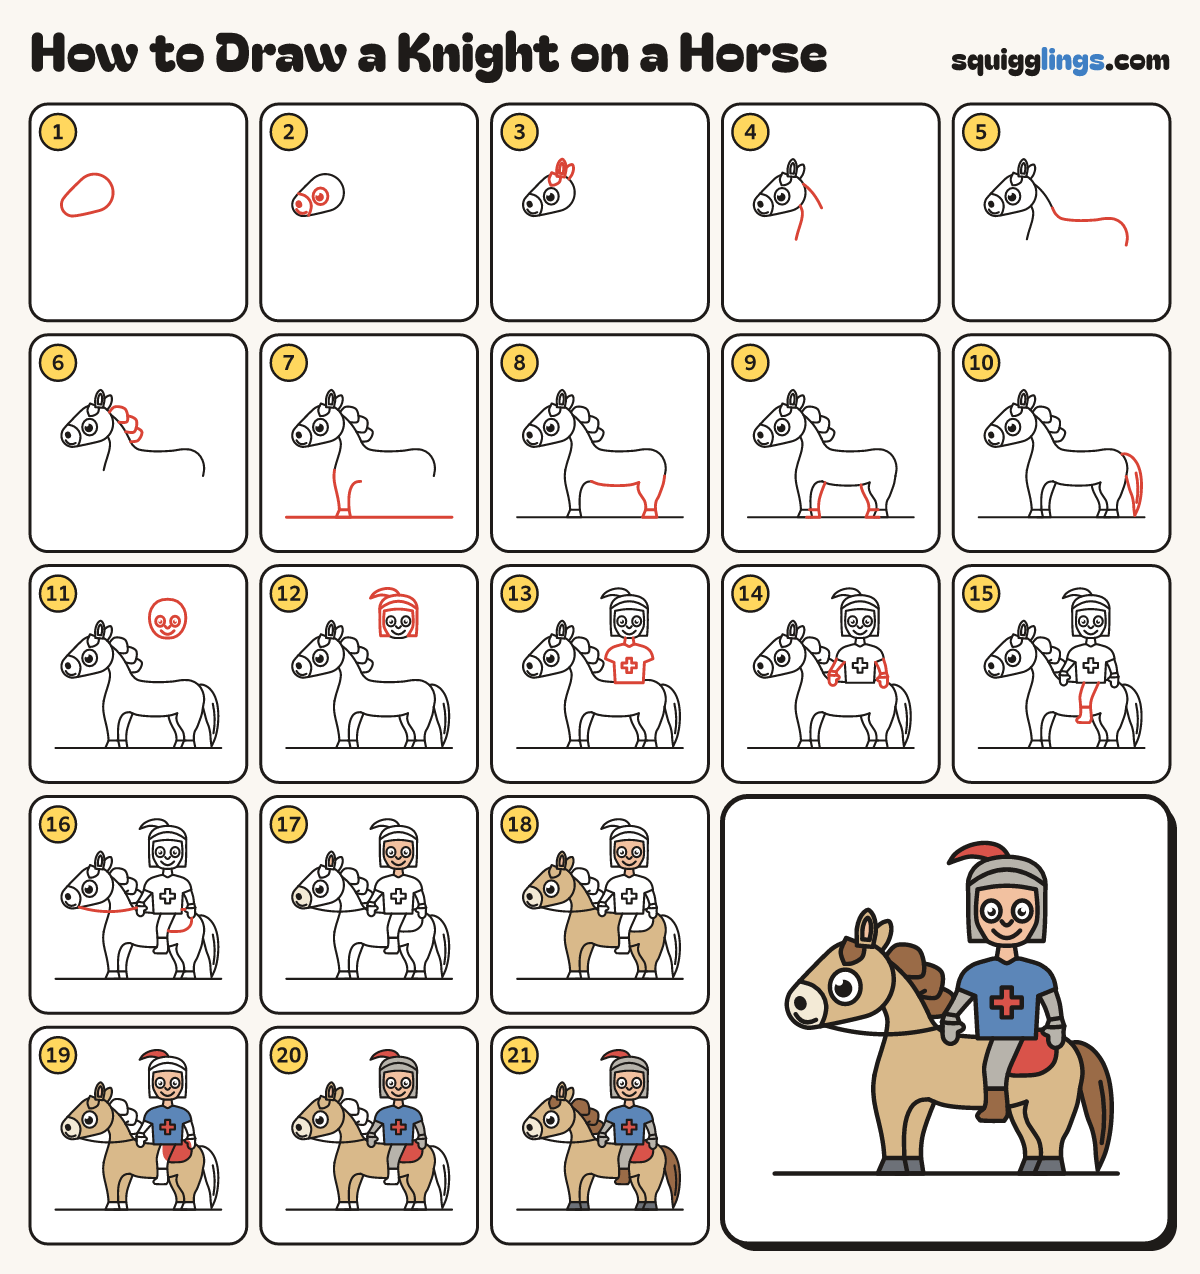
Draw a knight on a horse in 21 steps, about 16 minutes. Free, with a printable worksheet.
Each picture adds one red line. Draw that line, then scroll to the next picture. Rub out any dashed helper lines at the end. First up: horse head.
Step 1: Horse head
Near the left, halfway down, draw a sideways head like a fat peanut: big round cheek, smaller nose end.
Tip The nose end leans down to the left. Leave room above and on the right for the knight.
Step 2: Eye and nose
Draw 1 big eye. From the nose top, curve a line down to the chin. Add a nostril and smile.
Tip Give the eye a black dot and a white shine.
Step 3: The ears
On top of the head draw a pointed leaf ear with a smaller leaf inside, and a second ear behind.
Tip Add a fat lock of hair flopping forward over the forehead.
Step 4: The neck
Behind the ear, curve the neck's back line down to the right. From under the cheek, draw the front down.
Tip The neck is thick and gets wider as it goes down.
Step 5: Long back
Carry on from the neck's back line. Draw a long back, curl round the bottom and stop.
Tip Make the back long: the knight sits in the middle of it.
Step 6: The mane
Start at the ears. Draw 3 fat petal locks along the neck, down to the shoulders.
Tip Each lock tucks behind the one above, like roof tiles.
Step 7: Front leg
Draw a ground line low down. From the chest, draw a leg down to a hoof, then back up.
Tip The leg gets thinner as it goes down. The hoof is a flat doorstop.
Step 8: Tummy and back leg
From the front leg draw the tummy. Then a big thigh down to a hoof and up to the bottom.
Tip The back leg is wide at the top and bends halfway down.
Step 9: Far legs
Behind each leg draw another leg peeking out, with its hoof on the ground.
Tip Only draw the part you can see.
Step 10: The tail
From the top of the bottom draw a long flowing tail down to a point. Add a hair line inside.
Tip Thick where it grows from the bottom, pointed at the tip.
Step 11: Knight's head
High above the middle of the back, draw an egg head. Add 2 round eyes, a tiny nose and a smile.
Tip Leave a gap under the chin for the knight's body.
Step 12: Helmet and plume
Draw a round helmet over the head, down past both cheeks. Add a line across it and a feather on top.
Tip The feather sweeps to the left, the way the horse is facing.
Step 13: The tunic
Draw 2 neck lines. Draw a short-sleeved tunic from the neck down to the horse's back. Add a fat cross.
Tip The tunic's flat bottom edge sits on the horse's back.
Step 14: Arms and gloves
From each sleeve draw 2 arm lines to a glove. One glove reaches forward, one rests behind.
Tip Each glove has a wide cuff and a thumb.
Step 15: Leg and boot
Start at the tunic's bottom. Draw a bent leg down the horse's side and stop at a boot, toe forward.
Tip The boot hangs just below the horse's tummy.
Step 16: Saddle and rein
Behind the leg draw a round saddle blanket. Curve a rein from the horse's chin to the front glove.
Step 17: Cream and peach
Go over your lines. Colour the horse's nose cream and its ear inside peach. Colour the knight's face peach. Leave the eyes white.
Step 18: Tan horse
Colour the horse's head, ears, neck, body and legs tan, around the nose, the knight and the saddle.
Step 19: Red and blue
Colour the feather, the cross and the saddle blanket red. Colour the tunic blue around the cross.
Step 20: Grey armour
Colour the helmet grey around the face. Colour both sleeves, both gloves and the leg grey.
Step 21: Brown and dark grey
Colour the mane, the tail and the boot brown. Colour the 4 hooves dark grey. Your knight is ready to ride!
Your finished drawing
Follow the steps above and this is where you end up: a knight on a horse, drawn by you.
Every step in one picture