Watch it draw itself · tap to replay
How to Draw a Hot Spring
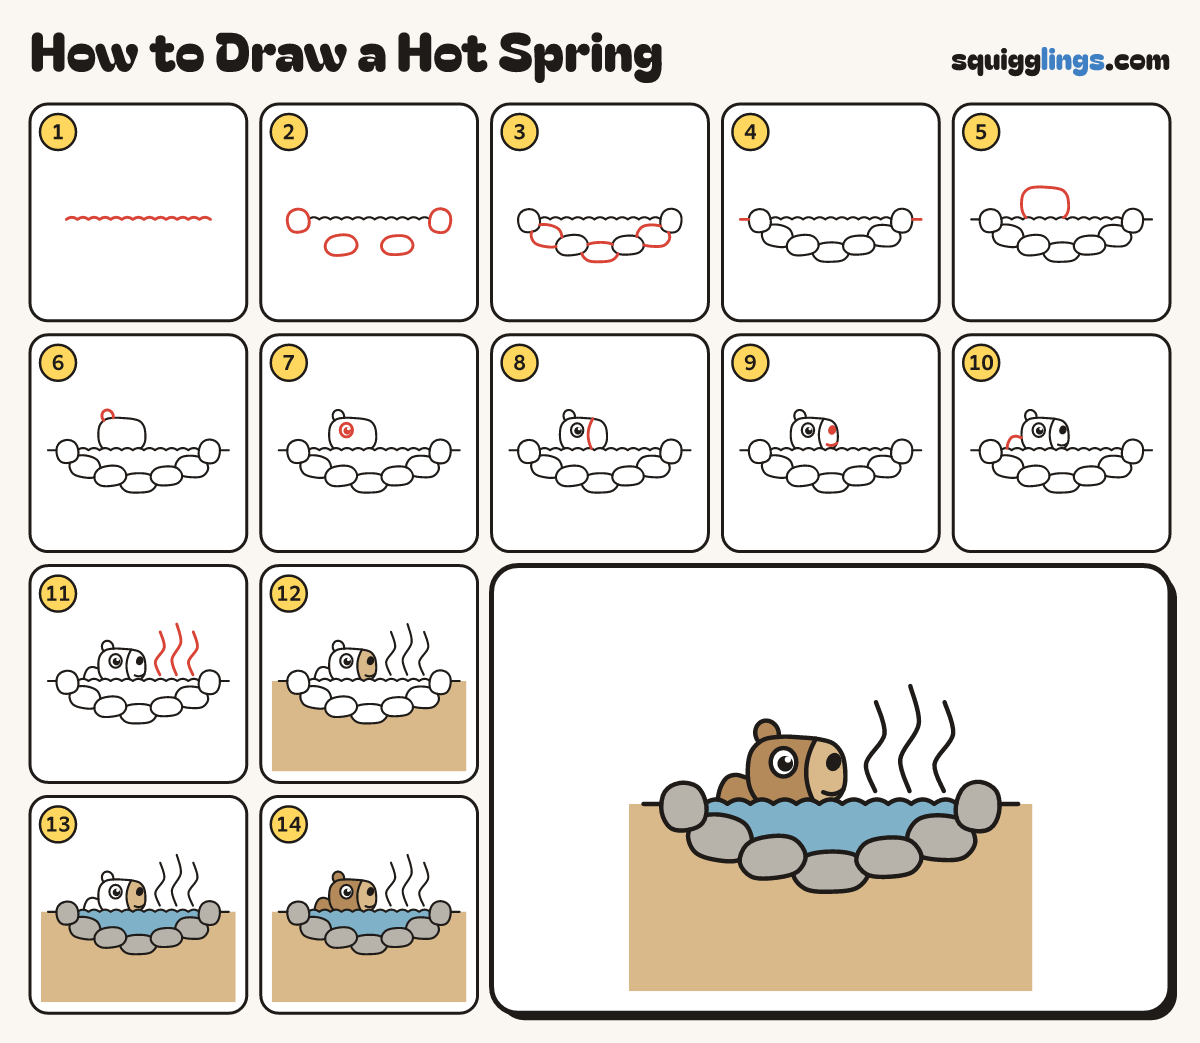
Draw a hot spring in 14 easy steps, about 11 minutes. Free, with a printable worksheet.
Each picture adds one red line. Draw that line, then scroll to the next picture. Rub out any dashed helper lines at the end. First up: wavy water.
Step 1: Wavy water
Below the middle, start a hand from the left edge. Draw little waves across, stopping a hand from the right.
Step 2: Four big rocks
Draw 4 big round rocks in a curved row under the waves: one on each end, 2 lower in between.
Tip Leave a gap between the rocks: more rocks go there next.
Step 3: Rocks in the gaps
In each gap, draw one more round rock tucked behind the rocks on either side.
Tip Only draw the part of each rock you can see.
Step 4: Flat ground
Start at the side of each end rock. Draw a flat ground line out to the edge of your paper.
Step 5: Boxy head
On the left, draw a boxy head with a flat top and blunt nose, starting and stopping on the waves.
Tip Point the nose to the right, and let the chin sink under the waves.
Step 6: Small round ear
At the back of the head top, draw a small round ear, starting and stopping on the head line.
Step 7: One round eye
High on the head, draw one round eye. Colour a black dot in it and leave a white shine.
Tip We see the capybara from the side, so only 1 eye shows.
Step 8: The snout
Start on the head top in front of the eye. Draw a gentle curve down to the waves.
Step 9: Nose and smile
Colour a black nostril high on the snout. From low on the front, draw a short smile.
Step 10: Low round back
Start behind the head. Draw a low round back, stopping on the waves before the rocks.
Tip The rest of the capybara is under the water.
Step 11: Steam
Just above the waves on the right, draw 3 tall wiggly steam lines going up, the middle one tallest.
Tip Leave a little gap above the waves, and keep the steam away from the capybara.
Step 12: Tan ground and snout
Colour the ground tan, all the way to the edges of your paper. Colour the snout tan too.
Step 13: Blue water, grey rocks
Colour the water blue, going around the rocks. Colour the rocks grey.
Step 14: Brown capybara
Colour the head, ear and back brown, around the tan snout. Leave the eye white. Your hot spring is done!
Your finished drawing
Follow the steps above and this is where you end up: a hot spring, drawn by you.
Every step in one picture