Watch it draw itself · tap to replay
How to Draw a Food Cart
Draw a food cart in 14 easy steps, about 11 minutes. Free, with a printable worksheet.
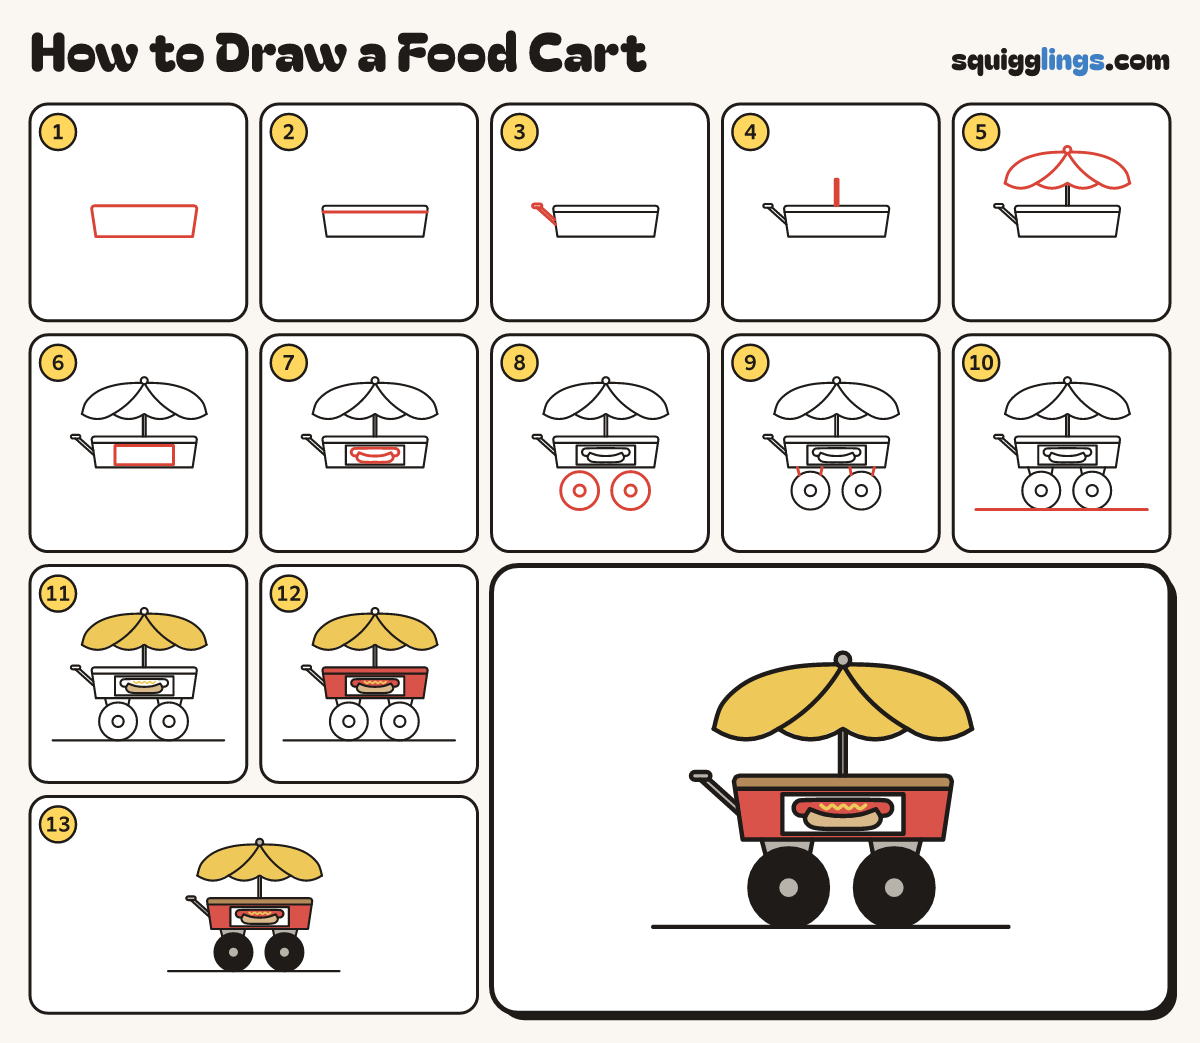
Each picture adds one red line. Draw that line, then scroll to the next picture. Rub out any dashed helper lines at the end. First up: the cart box.
Step 1: The cart box
Below the middle of your page, draw a wide box with soft corners.
Tip The box is nearly 3 times as wide as it is tall.
Step 2: The counter
Across the top of the box, draw a long thin slab that sticks out past both ends.
Step 3: Push handle
From the right side of the box, draw a short bar sticking out with a round knob on its end.
Step 4: Wheels and ground
Under the box draw 2 big wheels peeking out, a small circle in each, and a ground line under them.
Tip Both wheels are the same size and sit on the ground.
Step 5: Two posts
On each end of the counter, draw a tall thin post standing straight up.
Step 6: The awning
Across the post tops draw a long flat roof, wider at the bottom, with 7 hanging bumps.
Tip The awning is wider than the counter, so it shades the whole cart.
Step 7: Awning stripes
Start on the top edge. Draw 6 lines down the awning. Stop each one where 2 bumps meet.
Step 8: Cooking pot
On the middle of the counter, draw a pot with a round lid, a knob and 2 small handles.
Step 9: Steam
Start just above the lid. Draw 2 wavy lines going up. Stop below the awning.
Step 10: Menu board
On the front of the box, draw a wide board with soft corners for the menu.
Step 11: Menu pictures
On the menu draw 3 small foods: a ring doughnut, a burger and a cup with a straw.
Tip Keep each picture small, with a gap between them.
Step 12: Cream and brown
Colour the menu board cream around the pictures. Colour the counter, the buns and the doughnut brown.
Tip Leave the cup and the burger middle white for now.
Step 13: Red and blue
Colour 4 awning stripes, the cup and the burger middle red. Colour the box blue around the menu board.
Tip Leave the 3 stripes in between white.
Step 14: Grey and black
Colour the posts, pot, handle and wheel middles grey. Colour the wheels black around the middles.
Your finished drawing
Follow the steps above and this is where you end up: a food cart, drawn by you.
Every step in one picture