Watch it draw itself · tap to replay
How to Draw a Euphonium
Draw a euphonium in 17 steps, about 13 minutes. Free, with a printable worksheet.
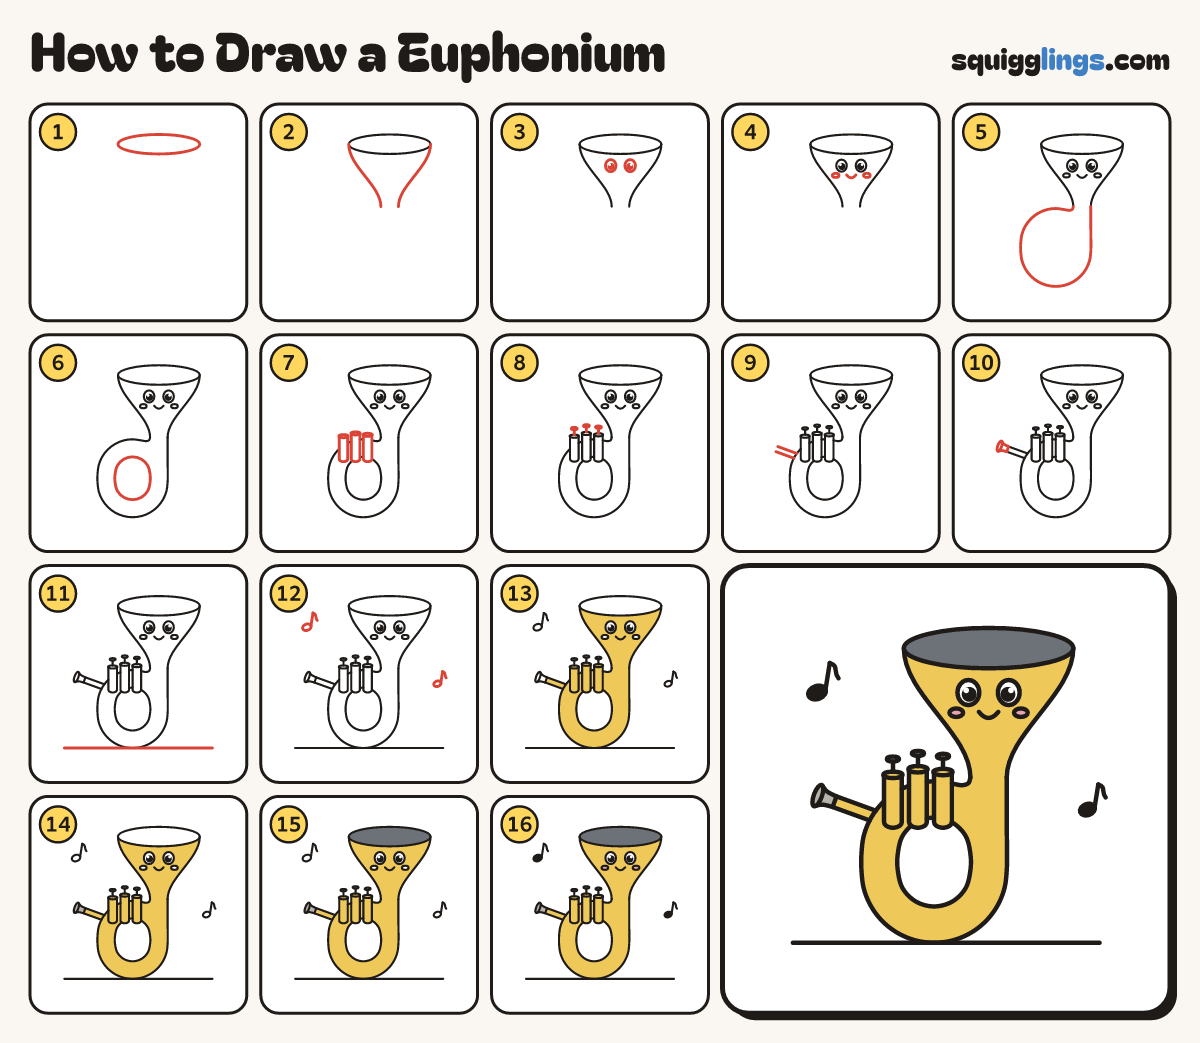
Each picture adds one red line. Draw that line, then scroll to the next picture. Rub out any dashed helper lines at the end. First up: bell opening.
Step 1: Bell opening
Near the top right draw a wide flat oval, about half the page wide, for the bell opening.
Tip A euphonium is a small tuba with its bell pointing up.
Step 2: Bell sides
From both ends of the oval swoop a line down and in to a neck. Stop halfway down the page.
Step 3: Two eyes
On the wide bell draw 2 big oval eyes with a gap, each with a black dot and a shine.
Step 4: Smile and cheeks
Under the eyes draw a U smile. Add a small oval cheek on each side of it.
Step 5: The big loop
Start at the right of the neck. Loop down, round the bottom, up the left and over into the neck.
Tip The bell and the loop are one long tube, bent round.
Step 6: Inside the loop
Inside the loop draw a tall oval, half a finger in from the edge, making the loop a fat tube.
Step 7: Second tube
Inside that oval draw a smaller oval close to it. Now a thin second tube runs round inside.
Step 8: Three valves
Across the top of the loop draw 3 tall tins standing in a row, each with a flat oval lid.
Step 9: Valve buttons
From the middle of each lid draw a short stick up, ending in a small flat button.
Step 10: Mouthpipe
Start on the loop just left of the valves. Draw a thin tube slanting up left, stopping a finger away.
Step 11: Mouthpiece
On the end of the tube draw a little cup that gets wider at the tip, with an oval rim.
Step 12: Ground line
Under the loop draw a straight ground line. Start left of the mouthpiece and stop right of the bell.
Step 13: Music notes
Draw a music note high on the left and a lower one on the right: a dot, stem and flag.
Step 14: Brass yellow
Colour the bell, both tubes, the valves and the pipe yellow. Leave the eyes, the cheeks and the middle white.
Step 15: Grey mouthpiece
Colour the mouthpiece and the 3 valve buttons grey, like silver.
Step 16: Dark opening
Colour inside the bell opening dark slate, right up to the oval line.
Step 17: Pink cheeks, black notes
Colour the cheeks pink and the note heads black. Your euphonium is ready to play!
Your finished drawing
Follow the steps above and this is where you end up: a euphonium, drawn by you.
Every step in one picture