Watch it draw itself · tap to replay
How to Draw an Enchanted Rose
Draw an enchanted rose in 13 easy steps, about 10 minutes. Free, with a printable worksheet.
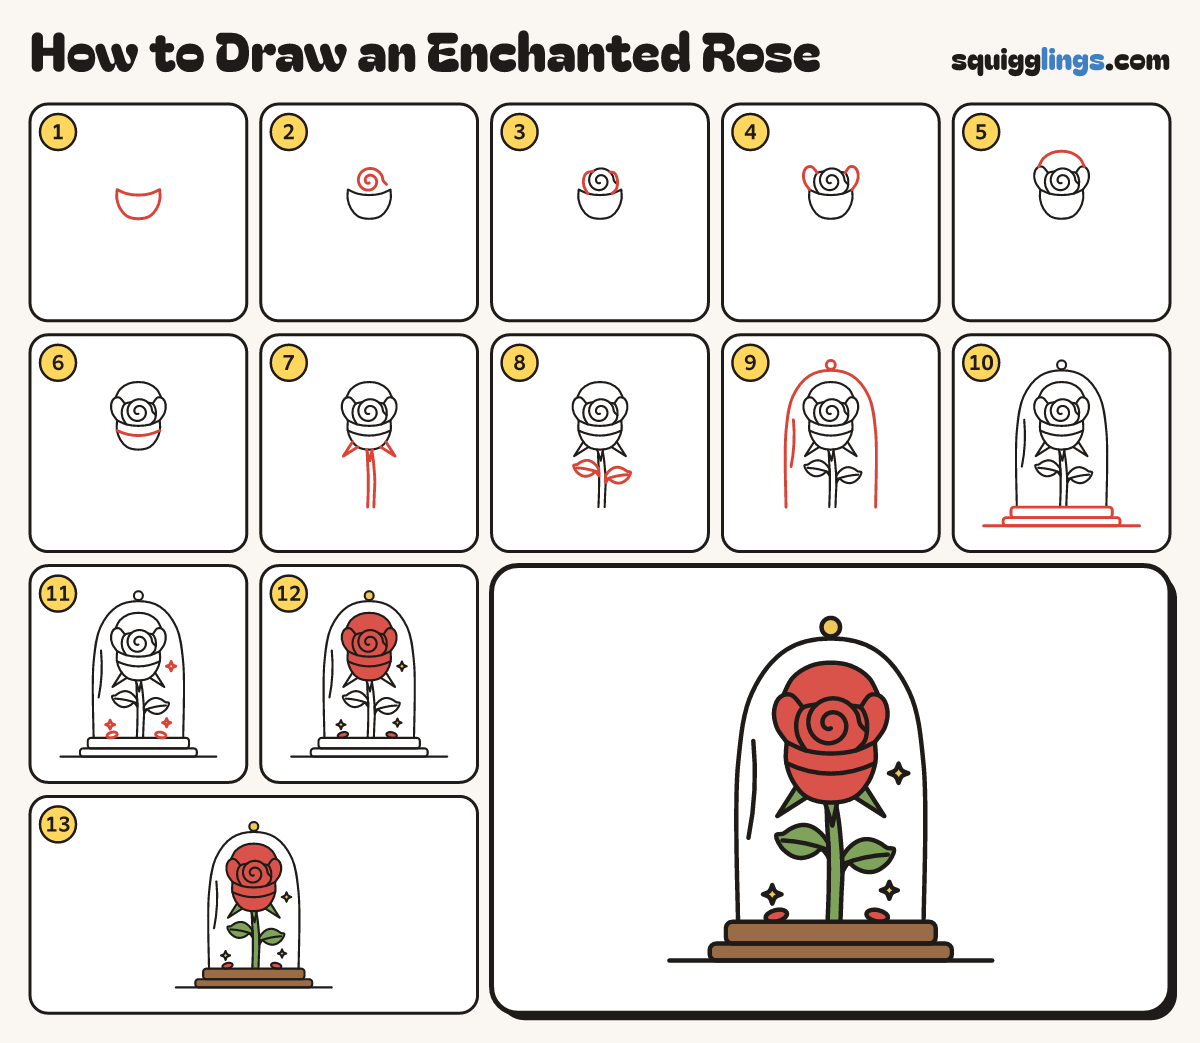
Each picture adds one red line. Draw that line, then scroll to the next picture. Rub out any dashed helper lines at the end. First up: the cup.
Step 1: The cup
Near the top of your paper draw a rounded cup for the bud: a sagging rim and a round bottom.
Step 2: Swirl bud
On top of the cup draw a swirl: start in the centre, go round 2 turns, end on the right.
Step 3: Petals round the bud
Start on the rim, left of the swirl. Draw a C up its side, stop on the swirl. Repeat right.
Step 4: Two big petals
Start at the left rim corner. Bow out and up round a soft top, back in to the left C.
Step 5: Petal behind
Start on the outside of the left petal. Draw a tall rainbow over, down to the right petal.
Step 6: Petal fold
Start on the left wall below the rim. Draw a soft curve sagging across, stop on the right wall.
Step 7: Sepals and stem
Draw 3 pointy leaves under the cup like a star. From them draw 2 stem lines, stop near the bottom.
Tip Let the stem get a little wider as it goes down.
Step 8: Leaves with veins
On each side of the stem draw a fat leaf out to a point and back. Add a vein.
Step 9: Glass dome
From low left, draw a tall rainbow over the rose, down to the right. Add a knob and shine line.
Tip Start level with the stem's bottom. The dome does not touch the petals or leaves.
Step 10: Wooden base
Under the dome draw a long flat slab with round corners, then a wider slab under it. Add ground.
Step 11: Fallen petals, sparkles
On the top slab, inside the dome, draw a tiny flat oval each side of the stem. Add 3 sparkles.
Step 12: Yellow sparkles, red rose
Colour the 3 sparkles and the knob yellow. Colour the whole bloom red, fallen petals too.
Step 13: Green leaves, wooden base
Colour the sepals, stem and leaves green, and the base brown. Go over your lines and your rose is done!
Your finished drawing
Follow the steps above and this is where you end up: an enchanted rose, drawn by you.
Every step in one picture