Watch it draw itself · tap to replay
How to Draw a Condor
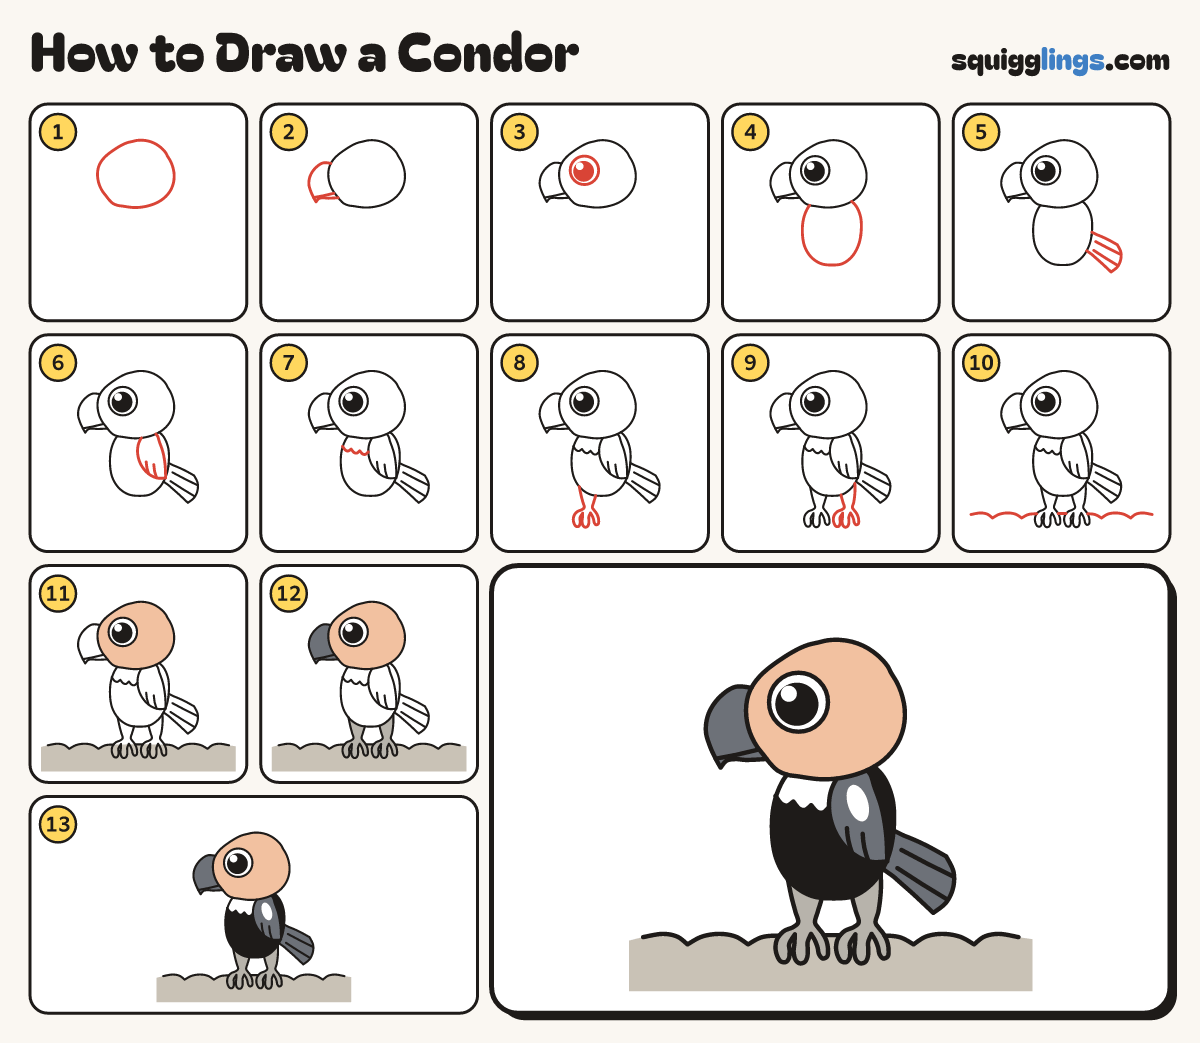
Draw a condor in 13 easy steps, about 10 minutes. Free, with a printable worksheet.
Each picture adds one red line. Draw that line, then scroll to the next picture. Rub out any dashed helper lines at the end. First up: round head.
Step 1: Round head
Near the top of your paper draw a big round head, a little wider than tall.
Tip Leave room below for the body and the rocky ledge.
Step 2: Big hooked beak
Start on the front of the head. Draw a hook out and down to a point, back to the chin.
Step 3: One big eye
Behind the beak draw a big round eye. Fill it with a black dot, leaving a shine.
Step 4: Plump body
Start on the back of the head. Curve down the back, round a fat belly, and stop under the beak.
Tip A plump egg hanging under the head, narrower than the head.
Step 5: Fan tail
Start on the back end of the body. Draw a fan pointing down and back, then back to the tummy.
Step 6: Long folded wing
Start under the back of the head. Draw a shoulder forward, then sweep back to a point by the tail.
Step 7: Fluffy ruff
A finger under the head, start on the chest. Draw 3 little round bumps across to the wing.
Step 8: Front leg and toes
Start under the front of the tummy. Draw a short leg with 3 chubby toes, back to the tummy.
Step 9: Back leg and toes
A thumb behind the first leg draw a second leg the same way, starting and stopping on the tummy.
Step 10: Rocky ledge
Start at the left edge. Draw a bumpy rock top behind the toes, over to the right edge.
Step 11: Peach head, stone ledge
Colour the bald head peach and the rocky ledge pale stone. Leave the eye and the ruff white.
Step 12: Grey legs, dark beak
Colour the legs and toes grey. Colour the hooked beak dark grey.
Step 13: Dark wing, black body
Colour the wing and fan tail dark grey, leaving a white patch. Colour the body black around them.
Your finished drawing
Follow the steps above and this is where you end up: a condor, drawn by you.
Every step in one picture