Watch it draw itself · tap to replay
How to Draw an Ant Colony
Draw an ant colony in 16 steps, about 12 minutes. Free, with a printable worksheet.
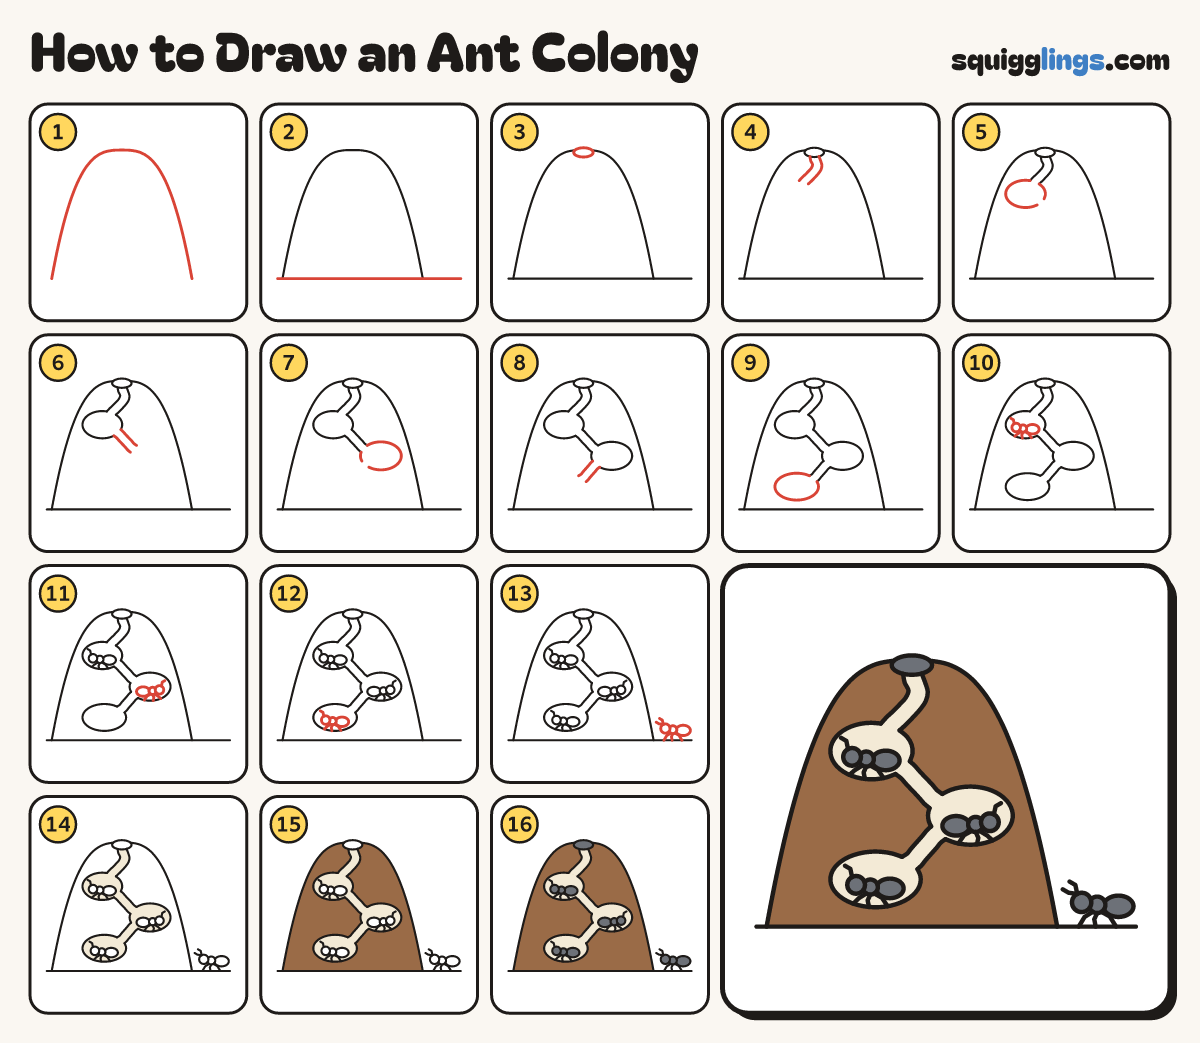
Each picture adds one red line. Draw that line, then scroll to the next picture. Rub out any dashed helper lines at the end. First up: the big hill.
Step 1: The big hill
Start low on the left. Draw a big rounded hill up, over the top and down to the same height.
Tip Make the hill wide and tall. All the tunnels go inside it.
Step 2: The ground
Draw a straight ground line from the left edge, under the hill, to the right edge.
Step 3: The door
Draw a small flat oval sitting on the very top of the hill. This is the door.
Step 4: First tunnel
Start under the door. Draw 2 wavy lines side by side, going down. Stop a third of the way down.
Tip We are looking inside the hill, as if it were cut open.
Step 5: Top room
Start at one tunnel line. Draw an oval room round to the other, leaving a small gap bottom right.
Step 6: Second tunnel
Start at the gap. Draw 2 lines side by side, down to the right. Stop near the hill's middle.
Step 7: Middle room
Start at one tunnel line. Draw a bigger oval room round to the other, leaving a gap bottom left.
Step 8: Third tunnel
Start at the new gap. Draw 2 short lines side by side, down to the left. Stop above the ground.
Step 9: Bottom room
Start at one tunnel line. Draw the biggest oval room round to the other line, well above the ground.
Step 10: Top room ant
In the top room draw a small ant: round head, little ball, bigger egg, 3 bent legs and a feeler.
Tip The 3 legs all start under the little middle ball.
Step 11: Middle room ant
In the middle room draw another small ant the same way, facing right, standing on the floor.
Step 12: Bottom room ant
In the bottom room draw a third small ant, facing left, with its feet on the floor.
Step 13: Ant outside
On the ground by the hill draw a bigger ant walking home, with 3 bent legs and 2 feelers.
Step 14: Pale tunnels and rooms
Go over your lines. Colour the 3 tunnels and the 3 rooms cream, around the ants.
Step 15: Brown hill
Colour the hill brown around the tunnels, the rooms and the door.
Step 16: Dark ants and door
Colour all 4 ants and the door dark grey. Your ant colony is done!
Your finished drawing
Follow the steps above and this is where you end up: an ant colony, drawn by you.
Every step in one picture