Watch it draw itself · tap to replay
How to Draw an Amphibious Car
Draw an amphibious car in 13 easy steps, about 10 minutes. Free, with a printable worksheet.
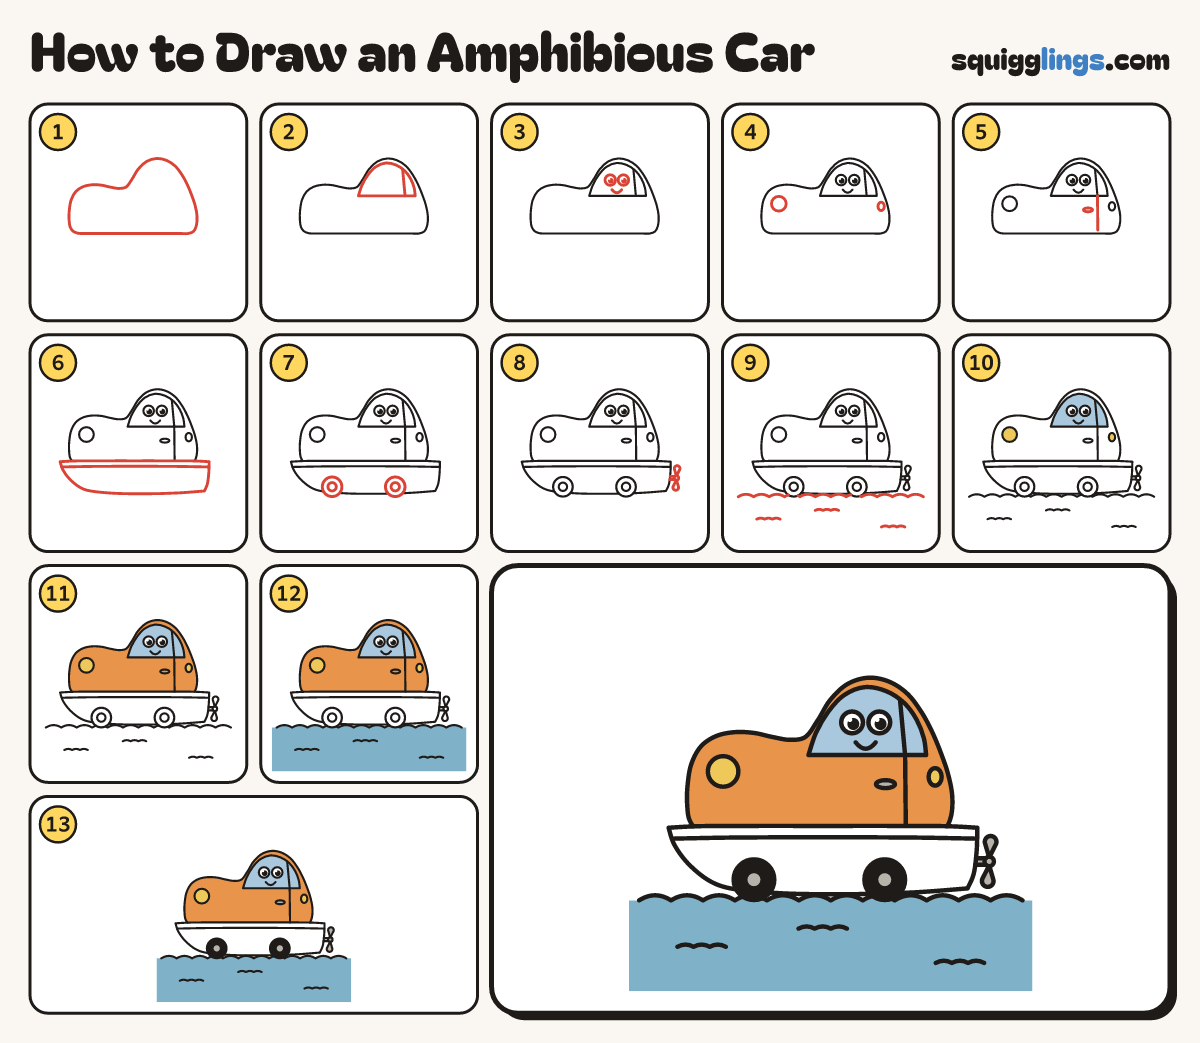
Each picture adds one red line. Draw that line, then scroll to the next picture. Rub out any dashed helper lines at the end. First up: car top.
Step 1: Car top
A hand above the middle, draw one big smooth hill for the car: stubby nose, flat bonnet, round roof.
Step 2: Windscreen
Inside the roof, draw a flat-bottomed rainbow. Near its back, add a line from the curve down to the bottom.
Step 3: Eyes and smile
Inside the windscreen, draw 2 big round eyes, each with a dot and shine, and a U smile below.
Step 4: Two lights
Draw a big round headlight on the nose and a small oval tail light on the back.
Step 5: Door and handle
From the windscreen's back line, draw a door line down, stopping near the bottom. Add a small oval handle.
Step 6: Boat hull
Under the car, draw a boat hull: pointy front, flat back, round bottom. Add a line under its top.
Tip Make the boat wider than the car, so the whole bottom of the car sits inside it.
Step 7: Two wheels
Draw 2 round wheels low on the hull, poking just below the bottom. Add a small circle in each.
Step 8: Propeller
On the back of the hull, draw a stub with a small circle. Add a blade above and below.
Step 9: Waves and ripples
Under the boat, draw wave bumps from edge to edge, touching the hull and wheels. Add 3 ripples below.
Tip The waves touch the hull, so the car floats, not flies.
Step 10: Yellow lights, sky windscreen
Colour the headlight and tail light yellow, and the windscreen sky blue around the eyes. Leave the eyes white.
Step 11: Orange car
Colour the car orange around the windscreen, lights and handle. Stop at the top of the boat.
Step 12: Blue sea
Colour the sea blue from the wave line down to the bottom edge.
Step 13: Grey and black
Colour the hubs, handle and propeller grey, then the tyres black around the hubs. Leave the boat white.
Your finished drawing
Follow the steps above and this is where you end up: an amphibious car, drawn by you.
Every step in one picture