Watch it draw itself · tap to replay
How to Draw a Violin
Draw a violin in 13 easy steps, about 10 minutes. Free, with a printable worksheet.
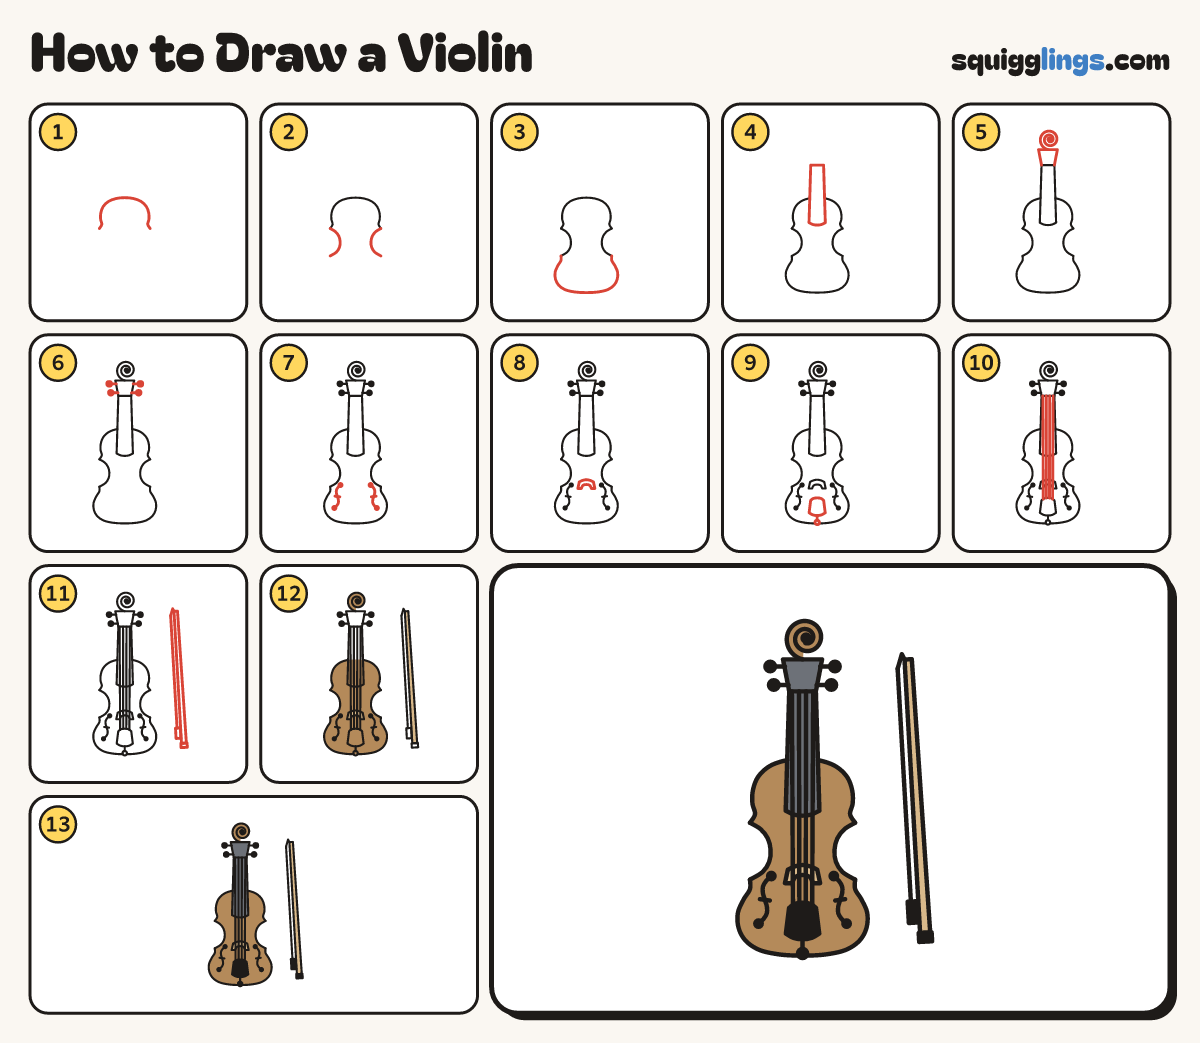
Each picture adds one red line. Draw that line, then scroll to the next picture. Rub out any dashed helper lines at the end. First up: the top bump.
Step 1: The top bump
Start below the middle, on the left. Draw a rounded bump up and over, and stop on a tiny corner.
Step 2: Two C scoops
Start on the left corner. Draw a smooth C scooping in, and stop on a second corner lower. Same right.
Tip The 4 little corners make it a violin, not a guitar.
Step 3: Big bottom bump
Start on the right lower corner. Swing one big round U down and back up to the left lower corner.
Step 4: The long neck
From the top bump draw 2 long lines straight up, close together. Join the tops with a short flat line.
Tip The neck is as long as the top bump is tall.
Step 5: Peg box and snail
On the neck draw a flared box. From its top draw a swirl curling round twice, ending in a dot.
Tip Make the snail fat and round. This is the part everyone recognises.
Step 6: Four tuning pegs
Draw 2 pegs on each side of the peg box: start on the box, a line out, stop. Add dots.
Step 7: Two f-holes
Below the waist draw 2 curly f shapes: a long leaning S, a dot at each end, a dash across.
Step 8: The bridge
Between the f-holes draw a little bridge standing up: a rounded hill with a small arch cut out underneath.
Step 9: The tailpiece
Below the bridge draw a rounded tie shape. From its end draw a short line down to a button.
Step 10: The strings
Draw 4 long thin strings: start each on the top of the neck and run it down to the tailpiece.
Step 11: The bow
To the right draw the bow: start near the top, a long thin stick down to a block. Add hair.
Tip The bow is nearly as tall as the violin.
Step 12: Warm wood
Colour the whole body and the snail wood brown, going round the f-holes. Colour the bow stick and bridge tan.
Step 13: Dark fittings
Colour the neck and peg box slate grey, leaving the strings showing. Colour the tailpiece, button and bow block black.
Your finished drawing
Follow the steps above and this is where you end up: a violin, drawn by you.
Every step in one picture