Watch it draw itself · tap to replay
How to Draw a Uromastyx
Draw a uromastyx in 13 easy steps, about 10 minutes. Free, with a printable worksheet.
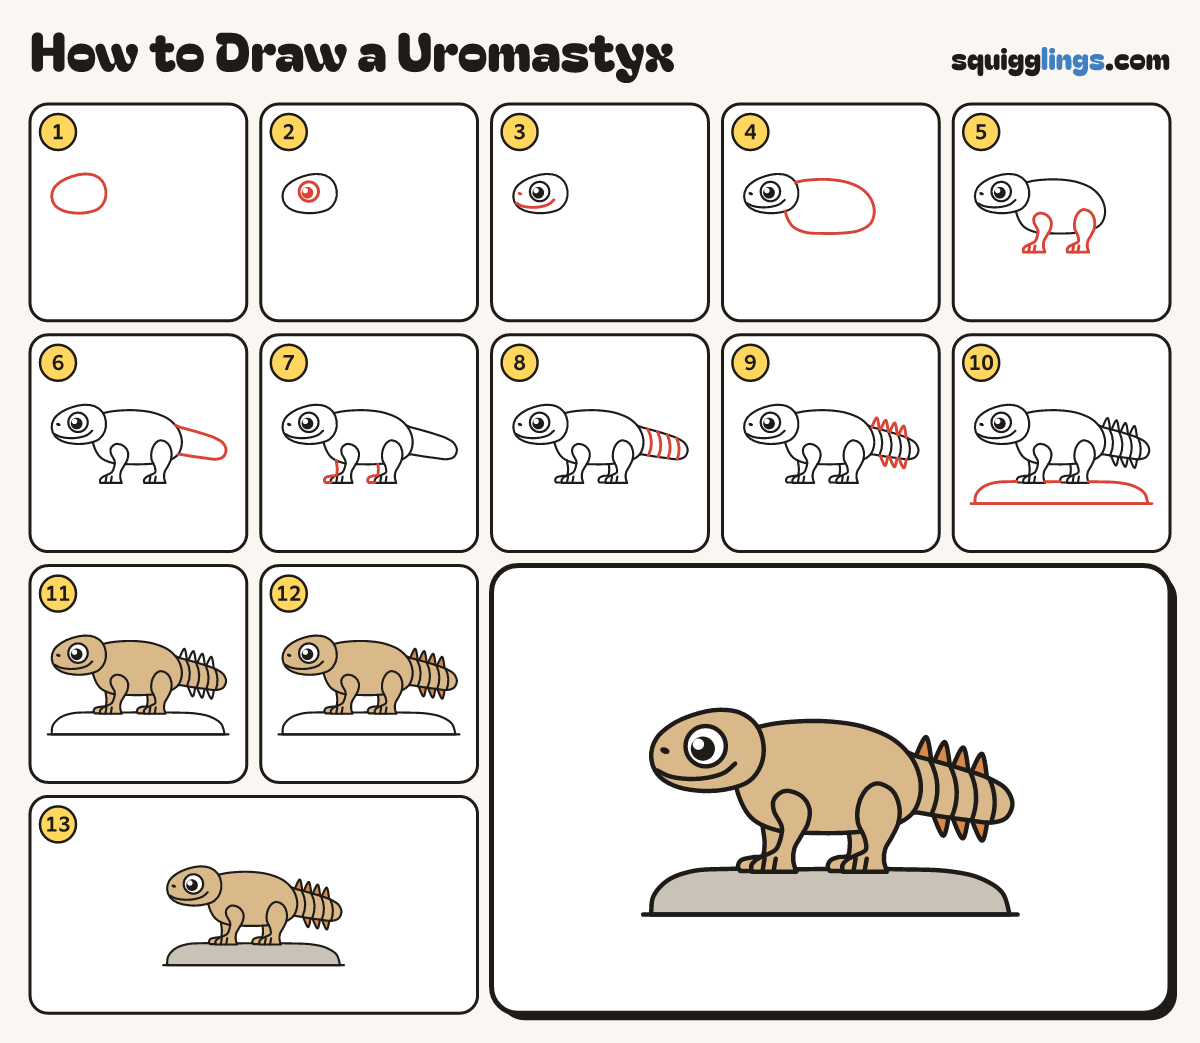
Each picture adds one red line. Draw that line, then scroll to the next picture. Rub out any dashed helper lines at the end. First up: the head.
Step 1: The head
On the left, draw a short round head: a blunt nose at the front and a big round back.
Tip A uromastyx has a short, blunt head, a bit like a tortoise.
Step 2: The big eye
In the middle of the head, draw one big circle eye with a big black dot and a white shine.
Step 3: Smile and nostril
Start at the nose. Draw a smile back under the eye, turning up at the end. Dot a nostril.
Step 4: Plump body
From the back of the head, draw a long plump body with a round bottom, ending under the chin.
Tip Keep it long and low, like a fat bean.
Step 5: Two near legs
On the chest and hip, draw a round shoulder. Bend each leg down to a foot with 2 toe lines.
Tip Rub out the tummy line inside each leg.
Step 6: Fat tail
From the end of the back, draw a FAT tail out to a round tip, then back to the tummy.
Tip The tail stays thick all the way: a club, not a whip.
Step 7: Two far legs
In front of each leg, draw the far leg peeking out: a thin strip down to a small toe tip.
Step 8: Tail rings
Across the tail, draw 4 curved lines from the top edge to the bottom edge.
Step 9: Tail spikes
Along the top of the tail, draw 4 little spikes. Add 3 more underneath.
Tip The spiky tail is what makes it a uromastyx.
Step 10: Flat rock
Under the feet, draw a long low rock with a flat bottom. Add a ground line under it.
Step 11: Tan lizard
Go over your lines. Colour the head, body, legs and tail tan. Leave the eye white.
Step 12: Orange spikes
Colour all 7 tail spikes orange.
Step 13: Grey rock
Colour the rock grey, around the feet. Your uromastyx is done!
Your finished drawing
Follow the steps above and this is where you end up: a uromastyx, drawn by you.
Every step in one picture