Watch it draw itself · tap to replay
How to Draw a Refrigerated Truck
Draw a refrigerated truck in 13 easy steps, about 10 minutes. Free, with a printable worksheet.
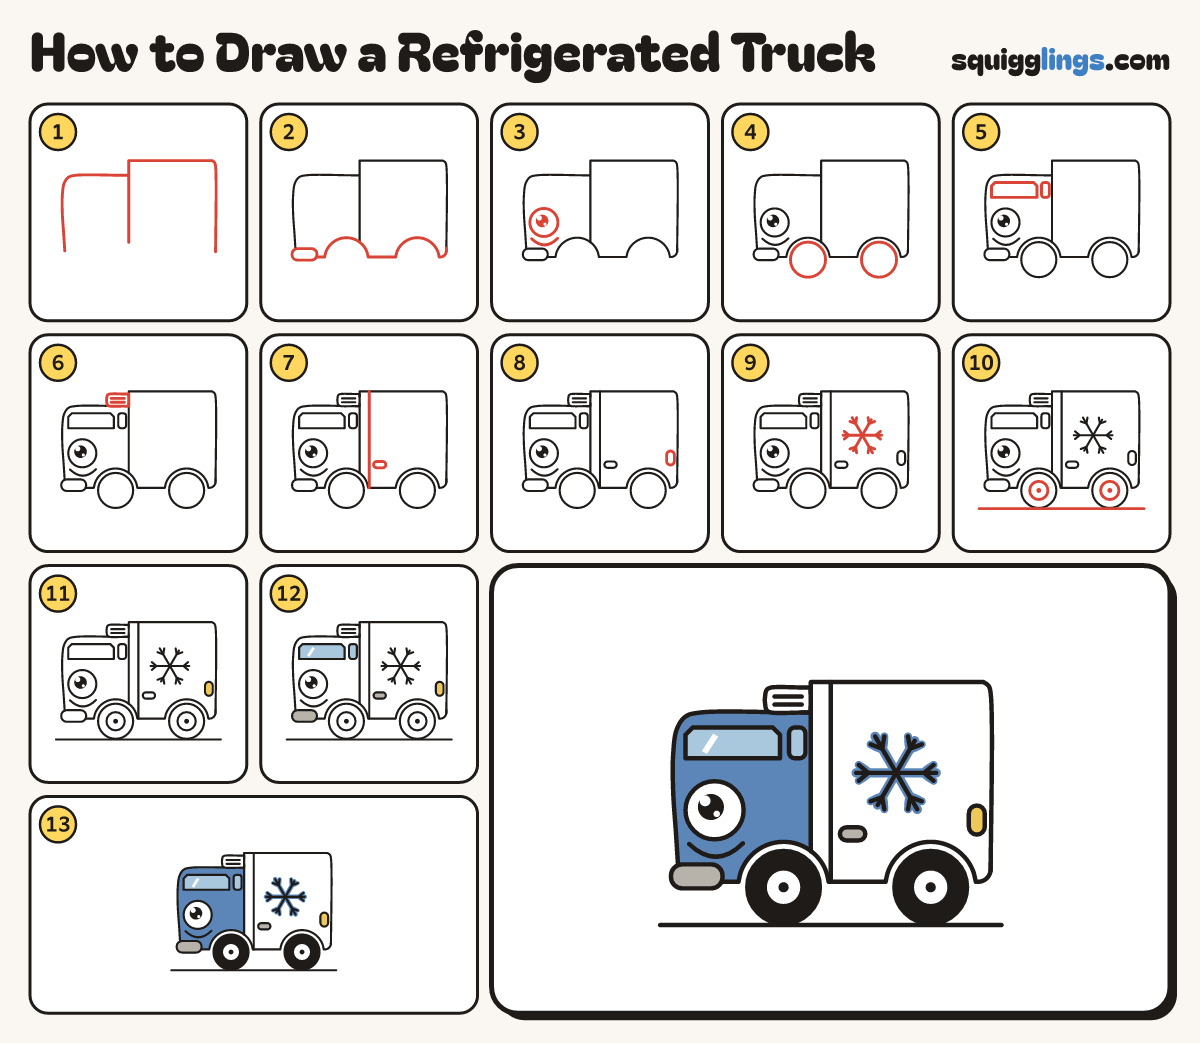
Each picture adds one red line. Draw that line, then scroll to the next picture. Rub out any dashed helper lines at the end. First up: cab and cold box.
Step 1: Cab and cold box
Start low left. Up the front, over the cab roof, down its back, up to the box roof and down.
Tip A short cab with a TALL cold box, like a fridge on wheels.
Step 2: Floor and bumper
Start at the front corner. Draw the floor with 2 big rainbow bumps, stopping at the back. Add a bumper.
Tip The bumps are big: each nearly a quarter of the truck long.
Step 3: Headlight eye and smile
Draw a big circle eye on the front. Under it, draw a smile that stops before the wheel bump.
Tip Start the smile a finger in from the front edge.
Step 4: 2 fat tyres
Under each bump draw a big circle tyre, a little smaller than the bump. Start and finish at the floor.
Tip Both tyres are the same size, with bottoms level.
Step 5: The windows
Draw a wide rounded windscreen on the cab, and a small tall window behind it, the same height.
Tip The windscreen is the biggest window, wider than it is tall.
Step 6: The fridge unit
On the cab roof, against the big box, draw a small box. Add 2 vent lines.
Tip That little box is the refrigerator that keeps the cargo cold.
Step 7: Door and handle
On the box behind the cab, draw a door line from the roof down to the floor. Add a handle.
Step 8: Tail light
At the back of the box, low down, draw a small tall rounded tail light.
Step 9: Big snowflake
On the back draw a big snowflake: 3 long lines crossing in the middle, with a V at each end.
Tip Keep it clear of the wheel bump below.
Step 10: Hubcaps and road
Draw a hubcap in each tyre. From in front of the truck draw a straight road under it, stopping behind.
Tip Keep each hubcap right in the centre of its tyre.
Step 11: White box, yellow light
Go over your lines. Leave the box, fridge unit, eye and hubcaps white. Colour the tail light yellow.
Step 12: Sky windows, grey bumper
Colour the windows sky blue with a white shine, and the handle and bumper grey.
Step 13: Blue cab, black tyres
Colour the cab blue around the eye and windows. Go over the snowflake in blue and colour the tyres black.
Tip Colour the tyres around the white hubcaps. Your truck is done!
Your finished drawing
Follow the steps above and this is where you end up: a refrigerated truck, drawn by you.
Every step in one picture