Watch it draw itself · tap to replay
How to Draw an Owl Wizard
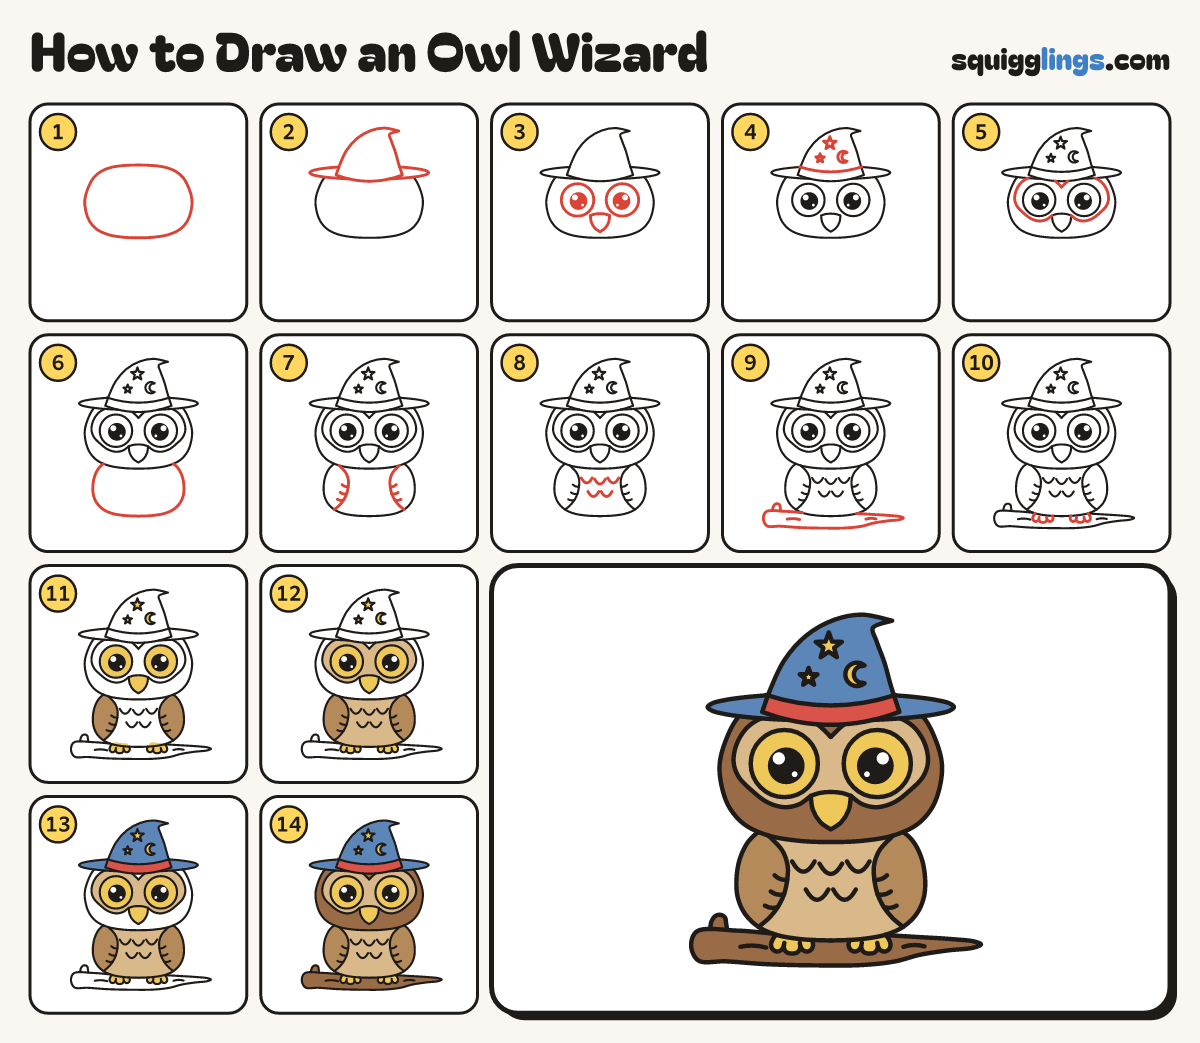
Draw an owl wizard in 14 easy steps, about 11 minutes. Free, with a printable worksheet.
Each picture adds one red line. Draw that line, then scroll to the next picture. Rub out any dashed helper lines at the end. First up: domed head.
Step 1: Domed head
Near the top, draw a big soft egg head on its side, wider than tall, with fat cheeks.
Step 2: Wizard hat
On the head, draw a tall pointy hat, tip flopping right. Add a long thin oval brim across its bottom.
Step 3: Huge eyes and beak
Under the brim, draw 2 huge circle eyes with black dots. Under the gap, hang a teardrop beak pointing down.
Tip Owl eyes are enormous: each nearly a third of the head wide.
Step 4: Band, stars and moon
Draw a curved band across the hat above the brim. Add 2 stars and a little moon above it.
Step 5: Heart face
From the beak's left, draw a big heart around both eyes, dipping between them, ending at the beak's right.
Tip The heart is the owl's light face. Keep it a finger inside the head.
Step 6: The body
From under each cheek, draw a big C down and out, curving in to meet at the bottom middle.
Tip The body is narrower than the head and fattest near the bottom.
Step 7: Folded wings
From each shoulder, draw a fat leaf wing bowing in toward the tummy, ending on the body near the bottom.
Step 8: Feathery tummy
Between the wings, under the head, draw 3 little U's in a row, then 2 more below in the gaps.
Step 9: The branch
From the left, draw a wobbly branch under the tummy, getting thinner, ending in a pointy tip on the right.
Tip The tummy sits in front, so no branch line goes through it.
Step 10: Two gripping feet
Under each eye, draw a foot from the tummy down to the branch, with 3 round toes gripping it.
Step 11: Light wings, yellow eyes
Colour the wings light brown. Colour the eyes, beak, feet, stars and moon yellow.
Step 12: Tan face and tummy
Colour the heart face and tummy tan, around the eyes, beak and wings.
Step 13: Blue hat, red band
Colour the hat and its brim blue, around the stars and moon, and the band red.
Step 14: Brown owl
Go over your lines. Colour the head, body and branch brown, around the hat, face, tummy, wings and feet.
Your finished drawing
Follow the steps above and this is where you end up: an owl wizard, drawn by you.
Every step in one picture