Watch it draw itself · tap to replay
How to Draw a Log Cabin
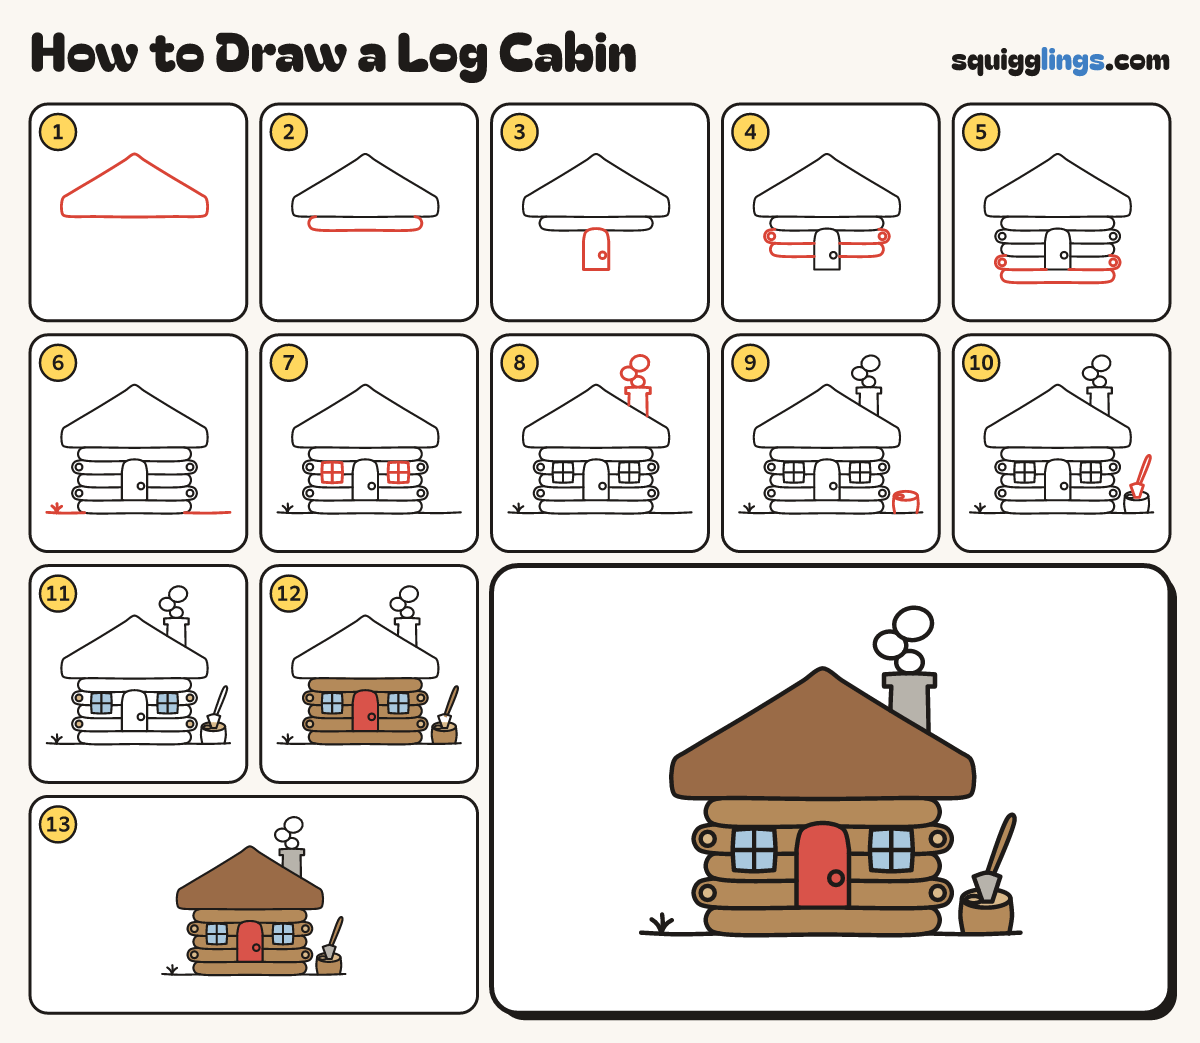
Draw a log cabin in 13 easy steps, about 10 minutes. Free, with a printable worksheet.
Each picture adds one red line. Draw that line, then scroll to the next picture. Rub out any dashed helper lines at the end. First up: the roof.
Step 1: The roof
Near the top of your paper draw a wide pointy roof. The bottom edge is a thick brim.
Tip A cabin roof is lower and wider than a cottage roof.
Step 2: The top log
Under the brim draw the first log: a long flat loaf across, rounded on both ends, 2 fingers thick.
Step 3: The door
In the middle, under the top log, draw a door with a rainbow top. Add a round knob.
Step 4: Two more logs
Stack 2 more logs, skipping the door. The first pokes out, with a ring in each end.
Step 5: Two last logs
Stack 2 last logs, one poking out with a ring in each end, and one tucked in under the door.
Step 6: The ground
Start at each bottom corner and draw a ground line out to the edge. Add a small grass tuft.
Step 7: Two windows
On each side of the door draw a square window across the middle logs. Give each a plus sign inside.
Step 8: Chimney and smoke
Start on the right roof slope, draw a chimney with a wider cap. Add 3 smoke puffs above it.
Step 9: A chopping stump
Right of the cabin, start on the ground and draw 2 lines up. Join the tops with a fat oval.
Step 10: The axe
Draw a wedge standing up out of the stump top. Add a long thin handle leaning up to the right.
Step 11: Sky and tan
Go over your lines. Colour the windows sky blue, and the log rings and stump top tan.
Step 12: Logs and door
Colour the logs, stump and axe handle wood brown, going around the blue and tan. Colour the door red.
Step 13: Chimney and roof
Colour the chimney and axe head grey, and the roof brown. Leave the smoke white.
Your finished drawing
Follow the steps above and this is where you end up: a log cabin, drawn by you.
Every step in one picture