Watch it draw itself · tap to replay
How to Draw a Candy Bowl
Draw a candy bowl in 13 easy steps, about 10 minutes. Free, with a printable worksheet.
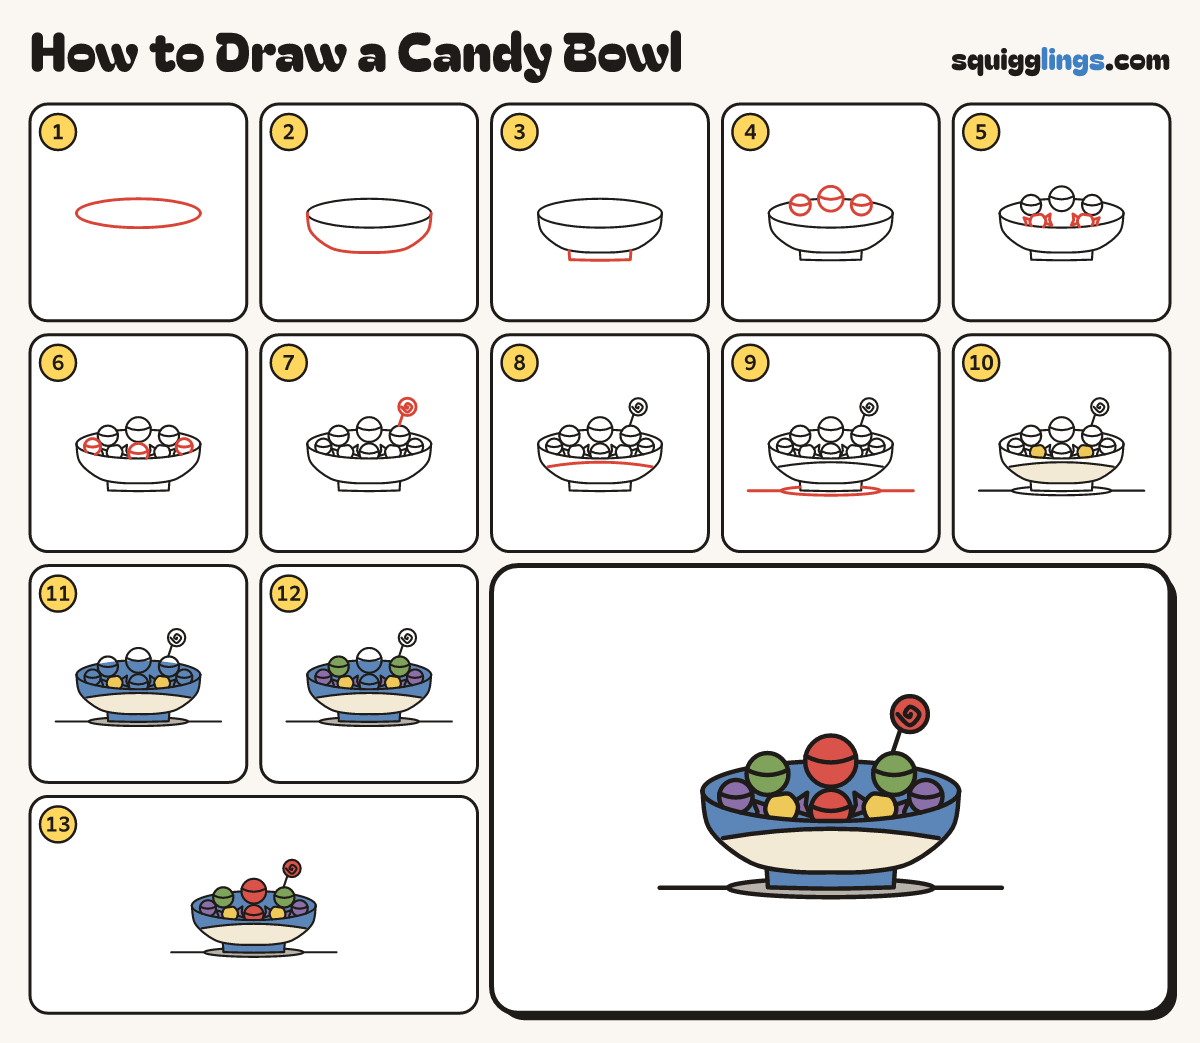
Each picture adds one red line. Draw that line, then scroll to the next picture. Rub out any dashed helper lines at the end. First up: the rim.
Step 1: The rim
Start at the left, draw a big wide oval across the middle of the paper, back to the start.
Tip The candies will sit inside the rim and pile up above it.
Step 2: The bowl
Start at the left end of the oval. Draw a big U down and round, up to the right end.
Step 3: The foot
Draw a short flat foot under the bowl: start on the bowl, go down, across, and back up to it.
Step 4: Three round candies
In the rim, draw 3 overlapping round candies, the biggest in the middle. Give each a curved band.
Step 5: Wrapped candies
Lower down, draw 2 wrapped candies, an oval with a twist at each end. Stop at the rim's front line.
Step 6: Front candies
Between and beside the wrapped candies, draw 3 small round candies with bands, tucked behind the others.
Step 7: A lollipop
At the back right, draw a round lollipop with a swirl inside and a stick slanting down behind the candies.
Step 8: A stripe
Near the bottom of the bowl, draw a gentle curve from one side to the other.
Step 9: Table and shadow
Draw a thin shadow oval round the bottom of the foot. Add a table line out from each side.
Step 10: Cream and yellow
Go over your lines. Colour the bowl under the stripe cream and the wrapped candies yellow.
Step 11: Blue bowl, grey shadow
Colour the bowl down to the stripe, the foot and the inside blue around the candies, and the shadow grey.
Step 12: Purple and green
Colour the 2 small end candies and the wrappers purple, and the 2 back side candies green.
Step 13: Red candies
Colour the 2 middle candies and the lollipop red, and your candy bowl is done!
Your finished drawing
Follow the steps above and this is where you end up: a candy bowl, drawn by you.
Every step in one picture