Watch it draw itself · tap to replay
How to Draw a Bee on a Flower
Draw a bee on a flower in 13 steps, about 10 minutes. Free, with a printable worksheet.
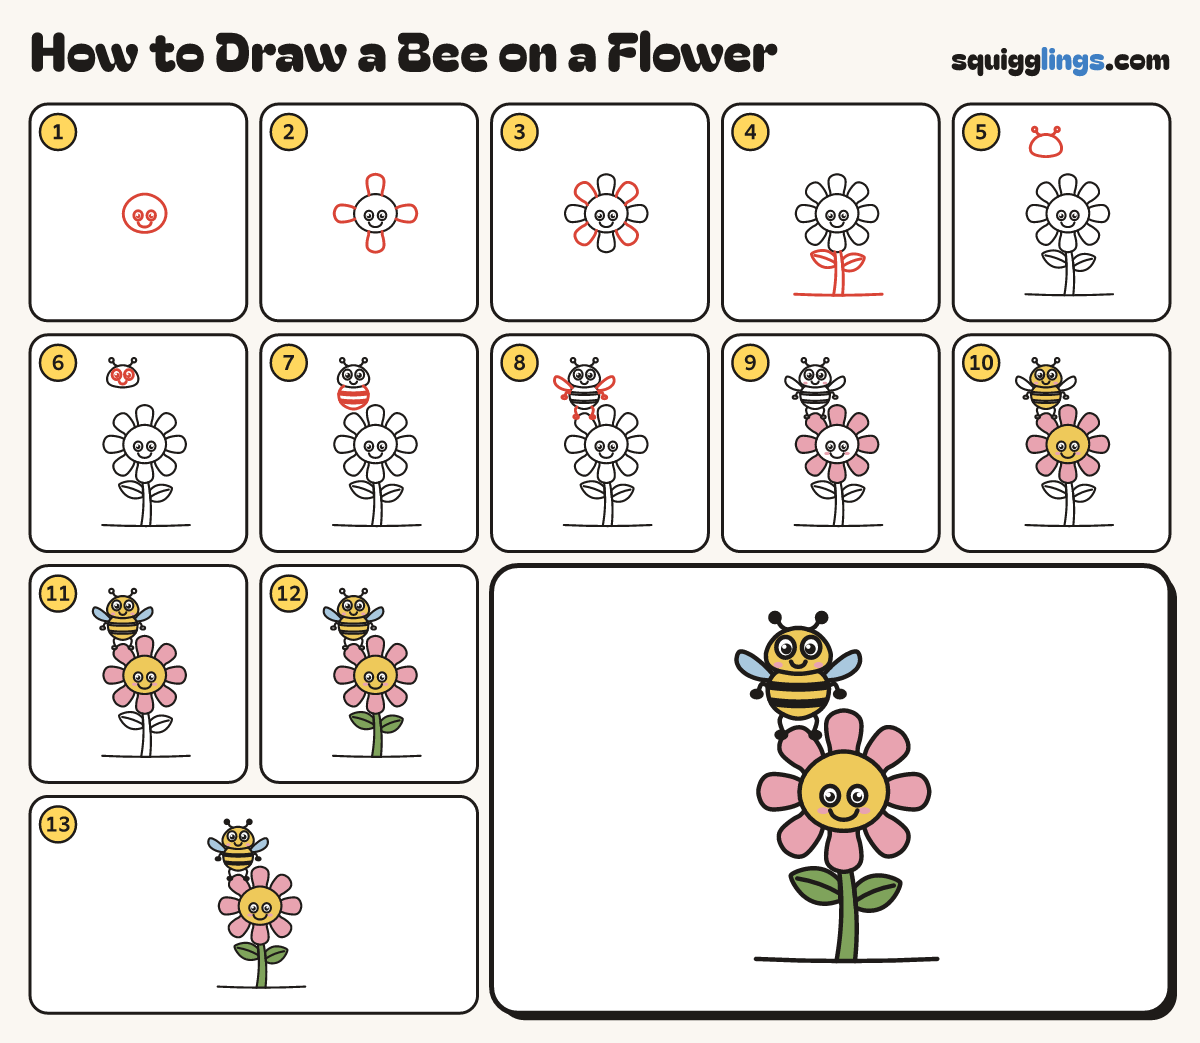
Each picture adds one red line. Draw that line, then scroll to the next picture. Rub out any dashed helper lines at the end. First up: flower's middle.
Step 1: Flower's middle
Just right of the middle, draw a big circle. Add 2 oval eyes and a small U smile.
Step 2: Four petals
Round the middle, draw 4 fat petals: top, bottom, left, right. Start each on the middle and stop on it.
Step 3: Four more petals
In each gap, draw another petal the same size, from the middle back to the middle. Now there are 8.
Step 4: Stem, leaves, ground
From the bottom petal, draw 2 curving stem lines down to a ground line. Add a leaf each side.
Tip Let the stem get a little wider near the ground.
Step 5: Bee's head
High above the top-left petal, draw a small wide egg head. From its top, draw 2 antennae ending in balls.
Step 6: Bee's face
Above the middle of the head, draw 2 big egg eyes with black dots. Add a small U smile below.
Step 7: Bee's body
Under the head, draw a plump egg body just above the petal. Add 2 stripes, each 2 close lines.
Step 8: Wings and legs
Draw a wing each side. From the body, draw 4 bent legs down to tiny feet, 2 on the petal.
Tip Make each wing a fat teardrop leaning up.
Step 9: Pink petals and cheeks
Colour all 8 petals pink. Add soft pink cheeks beside both smiles, on the flower and the bee.
Step 10: Yellow middle and bee
Colour the flower's middle and the bee's head and body yellow, around the cheeks and stripes.
Tip Leave all the eyes white.
Step 11: Sky blue wings
Colour the bee's 2 wings light sky blue.
Step 12: Green stem and leaves
Colour the stem and both leaves green.
Step 13: Black stripes and feet
Colour the bee's 2 stripes, antenna balls and tiny feet black.
Your finished drawing
Follow the steps above and this is where you end up: a bee on a flower, drawn by you.
Every step in one picture