Watch it draw itself · tap to replay
How to Draw a Pike
Draw a pike in 13 easy steps, about 10 minutes. Free, with a printable worksheet.
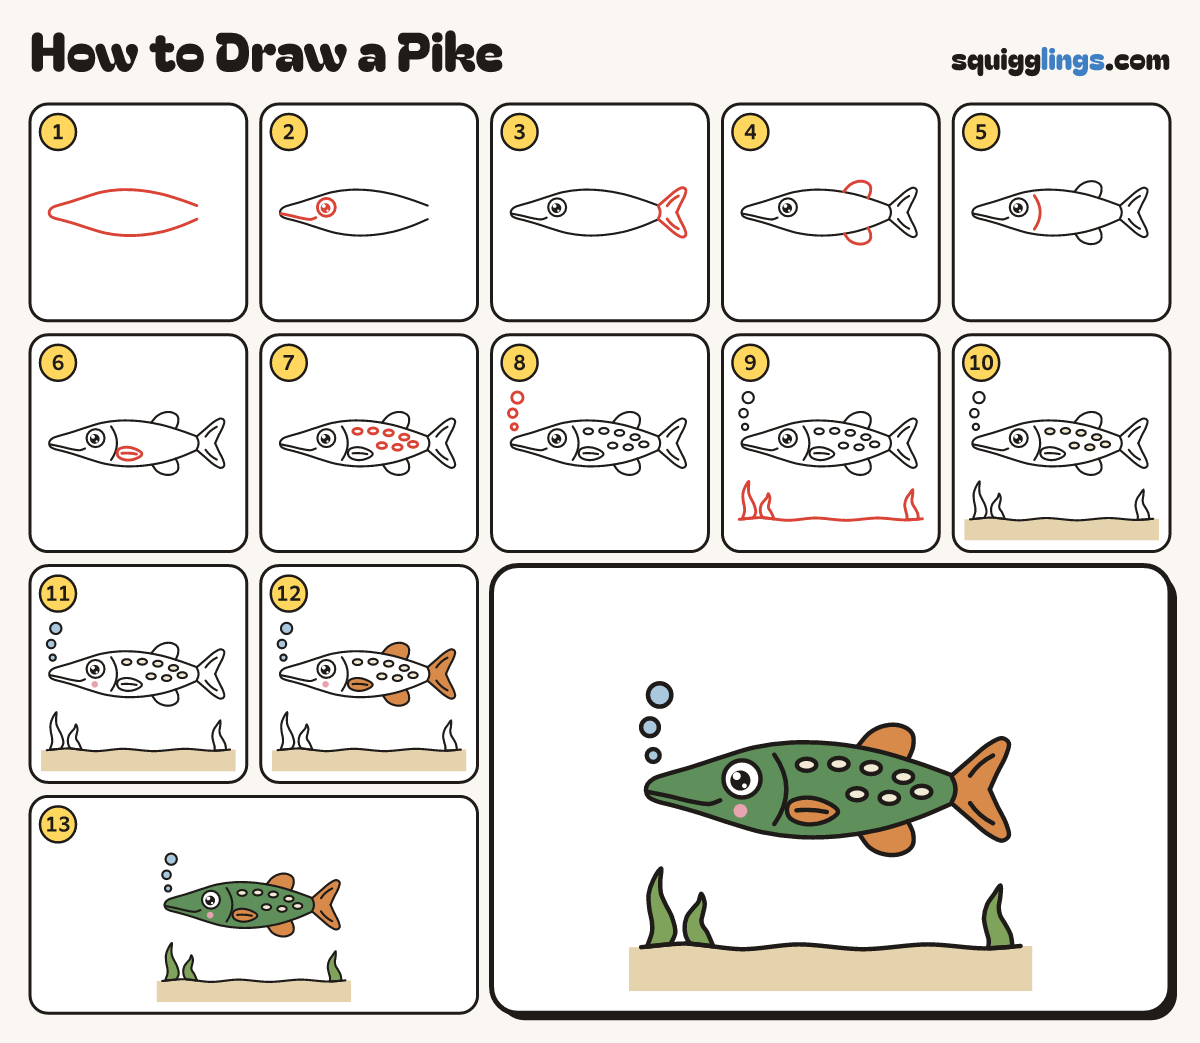
Each picture adds one red line. Draw that line, then scroll to the next picture. Rub out any dashed helper lines at the end. First up: long body, duck-bill nose.
Step 1: Long body, duck-bill nose
Start on the right. Draw a long back out to a blunt duck-bill nose, then the tummy back.
Tip A pike is 5 times longer than tall. Leave the right end open.
Step 2: Eye and mouth
Far back on the head draw a big eye. From the nose draw a long smile, stopping under the eye.
Step 3: Forked tail
Close the open end with a small curve. From its ends draw 2 rounded lobes that meet in a dent.
Tip Add one short line inside each lobe.
Step 4: Fins near the tail
Start on the back near the tail and draw a low round fin, ending on the back. Match it underneath.
Tip Pike fins sit far back, right next to the tail.
Step 5: Gill
Behind the eye, start below the back line and draw a short C for the gill. Stop above the belly.
Step 6: Side fin
Behind the gill, below the middle, draw a small leaf fin pointing back, with one line inside.
Step 7: Pale spots
Behind the gill draw 7 little bean spots in 2 rows: 4 on top, 3 below. Keep off the fins.
Step 8: Bubbles
In front of the nose draw 3 bubbles floating up: small, bigger, biggest.
Step 9: Sand and seaweed
Draw a wavy sand line almost from edge to edge. Draw 3 wiggly seaweed leaves growing up from it.
Step 10: Cream spots, sandy floor
Colour the 7 spots cream. Colour the floor under the sand line sandy.
Step 11: Blue and pink
Colour the 3 bubbles light blue. Add a soft pink dot under the eye.
Step 12: Orange fins
Colour the tail and all 3 fins orange.
Step 13: Green pike
Colour the body green, around the spots, side fin and pink dot. Colour the seaweed too. Leave the eye white.
Tip Go over your lines and your pike is done!
Your finished drawing
Follow the steps above and this is where you end up: a pike, drawn by you.
Every step in one picture